Field Trip to a Concrete Pour

The husband scheduled the barn slab pour for 8:30 a.m. By the time I picked WS up and drove to the site, one mixer truck had already come and gone and the second one was in place.

BarnSlab1.jpg

We walked back to the pour site and positioned ourselves for a good view.

The husband went over to talk to the mixer driver and boom operator.

BarnSlab2.jpg

When the boom truck begins pumping the concrete through the tube, it sets in motion a very complicated dance between the husband and the rest of the crew.

BarnSlab3.jpg

We also had one of our former employees on this pour. He now has his own construction business, but when his schedule permits, he comes and helps out on larger pours. He has two boys in their early teens. When he worked for us, his boys sometimes came with him to work in the summer. The husband would have them running back and forth fetching things. They called it “concrete camp,” and now the older one wants to come work for the husband as soon as he’s old enough. (I think he has to be 16.)

WS was fascinated by the way the concrete came out of the tube.

The guys spread out the concrete and started leveling it. This barn has a trench drain down the center, so the slab had to be sloped toward it.

BarnSlab4.jpg

Three mixer trucks came and went while we watched.

BarnSlab5.jpg

The husband has a large power screed for leveling out larger areas.

BarnSlab6.jpg

We watched for about an hour, then headed into town to run errands. We went to Joann Fabrics, Cabelas, the feed store, then stopped at Applebee’s for lunch. WS was a very helpful companion and we had several interesting conversations along the way. On the way home, we stopped at the site again to see how the finishing was going:

BarnSlab7.jpg

The husband was happy with the way this pour went, and that makes me happy because this is the slab for my friend Tera’s barn. Now that the slab is done, the timber frame kit can be put together. This is going to be a beautiful barn, and she will have a greenhouse on the south side of it.

I came home and finished quilting the white/cream Candy Coated top. It is trimmed and ready for the binding, which I’ll have to make today. After that, I’ve got a few small items to knock out, and then it’s on to quilting Noon and Night.

So Many Paisleys

Despite working on it for about six hours yesterday—with frequent breaks—I still have approximately two square feet of paisleys left to quilt. I was trying to explain the process to the husband last night. He understands the mechanics of quilting. The hard part is communicating what is going on in my brain. Even though the quilting motions are second nature now, I still have much to consider. Which direction should the next paisley go? How big should it be? Do I need to fill in any gaps? Am I quilting myself into a corner? How do I get from here to there? Is the overall design still coherent?

MorePaisleys.jpg

Hence the frequent breaks. It helps my brain rest and reset. This quilt is close to being done, though.

****************************************************

I’ve been noodling around with Electric Quilt 8 in the mornings over my cup of coffee. I discovered that the EQ8 block library includes half a dozen blocks from the Ladies Art Quilt Company book, although not the ones I’m interested in. EQ8 has tools for drawing blocks that aren’t in the library, but once you get used to using Illustrator, as I have, the drawing tools in EQ8 are frustrating. It’s like drawing with crayons instead of fine-tipped markers. Where EQ8 really shines is in allowing you to lay out blocks and then color them, either with solid colors or actual fabric swatches. One click of the mouse and you can re-color an entire quilt. That’s very helpful.

****************************************************

We have a leak in our master bathroom. I noticed a tiny puddle on the floor underneath the light fixture, so I alerted the husband. He went up into the attic and didn’t see anything coming from the roof. It’s a very slow drip, so he said he would hunt down the leak this weekend and fix it. He built the house. If he thinks it can wait a few days, I trust his judgment and will stop worrying about the ceiling falling down.

****************************************************

It is not snowing this morning. Hopefully, the barn slab pour will go ahead as planned. The husband noted that pouring concrete at this time of year is not a matter of picking the best weather day; it’s a matter of picking the least worst weather day. He tells me that the bridge support walls are all framed and they are planning to pour those on Friday. And then it may be time for him to knock off for the winter and play in his new shop.

I am taking WS with me to watch the concrete pour. Elysian asked me last week if I could keep him for a few hours this week so she could get some Christmas preps done. We will stay for the exciting part of the pour and then go run errands and perhaps get lunch in town. Elysian is sewing a lot of her Christmas presents this year. WS is also learning some sewing skills—he made a burrito pillowcase—but there is competition for the sewing machine. I could find him a machine to use. The issue is that he isn’t quite ready for solo sewing yet.

I have a ton of 5” squares. Maybe I’ll set him up with some and he can make himself a quilt. We’re all about the practical life skills here.

A Concrete Post

I am aware that not all of my blog readers are interested in sewing content, so here are some pictures of the husband’s current project. He is building a concrete base for a bridge. I will try to explain these shots coherently, but this is not my area of expertise and he’s not interested in starting his own blog, so you get what you get.

These are the footings.

Bridge1.jpg

The walls get poured on top of them, which is why those long pieces of rebar are sticking up in the middle. They will anchor the wall in place.

Bridge2.jpg

This is what the footings look like after they are filled with concrete:

Bridge3.jpg

And that’s the husband’s computerized surveying and layout system. It rather reminds me of a droid:

Bridge4.jpg

These are the finished footings, ready for the walls to be formed and poured:

Bridge5.jpg

And these are the steel concrete forms for the walls.

Bridge6.jpg

I am not sure what the pouring schedule will be this week. The barn slab is ready to go, I think. Snow is in the forecast every day this week, which may or may not be an issue.

Some Christmas Spirit

I hung all my porch lights on Friday afternoon, screwed in the light bulbs, plugged in the extension cord, and—

Nothing. I checked all the connections. I changed out the extension cord. I tried a different outlet. I went along each string and made sure the bulbs were in tight. Still nothing. The husband came home and did his own troubleshooting and he couldn’t get them to work, either.

I did not want to box up seven boxes of lights and take them back to Home Depot. Yesterday morning, I looked at the product page on the Home Depot website. There were 500+ reviews and a 4.5 out of 5 star rating. What did these people know that I didn’t?

It turns out that almost every single reviewer had the same issue. A few took their strings back to the store, but most people said that the key to getting the lights on was to screw the bulb in much tighter than expected. I took down each string of lights, one by one, and brought it into the house. After the string warmed up, I plugged it in, unscrewed each bulb, screwed it back in until it lit up, took the string back outside, hung it up, and connected it to the previous string. Wash, rinse, repeat.

They do look nice, though, especially with the fresh snow.

XmasLights.jpg

Those lights have been emblematic of my last couple of days, which have been less than productive. I made a to-do list and vowed that I was going to work on one thing—and only one thing—until I could cross it off as done. It was an uphill slog. The sewing machines were being cantankerous. (The industrial Necchi really doesn’t like that Klum House canvas.) Simple tasks like putting in zippers confounded me. I was finally able to break through and finished the last couple of Christmas gifts, including this stocking:

XmasStocking.jpg

This was a custom order from one of my cousins. I had never made a stocking before. I worked largely from this tutorial, with some modifications. The designer sewed the lining and outside fabric together, which left raw seams on the inside. I sewed the outside—interfaced with some fusible fleece—separately from the lining, then matched them with wrong sides together, thus hiding the seams, before sewing on the flannel cuff. It all went together smoothly and quickly.

I threw up the Buttercup Made online store a little over a year ago with few expectations. And then 2020 happened. I let the store languish, but this fall, I got several orders for inventory and a few custom requests. I know I don’t want to go into full-time sewing production, but I am going to list the rest of the pillowcases and aprons already made up, as well as this stocking. I’ll consider custom orders, if nothing else, although I am done making Christmas items for this year.

[I received an e-mail this morning which was clearly a scam, as it was someone looking for large quantities—dozens—of several of the pillowcases and did I take credit cards? I sometimes get those from the Big Sky Knitting Designs website: “Could I place an order for 500 knitted hats and do you take credit cards?” No.]

Obviously, there has been no quilting on the Q20. I did get the king-sized quilt top basted together on the church fellowship floor Friday morning while I waited for the piano tech to work on the piano there. I have no idea when I’ll quilt that top, but at least it’s ready to go. The same tech is coming to work on my baby grand tomorrow morning. I usually have it tuned in October, but we were occupied with a wedding this year.

I located the stack of prototype Noon and Night blocks and have those ready to make up into quilt sandwiches so I can experiment with threads and quilting.

******************************************************

The husband has pictures from the bridge concrete pour on his phone. I’ll get them transferred to my computer today so we can all see what he’s been up to. We should have a date for the barn slab pour soon, as well. Our fire department had a training session yesterday morning for the newer firefighters on how to respond to chimney fires, and he helped with that. We’ve had a few calls for chimney and structure fires recently as well as several one-vehicle rollovers on icy roads—and no surprise that some of those cars had California plates. Welcome to Montana.

Quilting with Qubes

I did not think my list of errands was unreasonably long, but it took me most of yesterday and two trips to town to complete them. Our dog, Lila, is of an age now where she prefers to spend her mornings napping. I’ve gotten into the habit of leaving her inside when it’s cold so she can nap on her pouf. She’s good for three or four hours, but I wouldn’t leave her inside all day. I’m usually home by lunchtime and she’s ready to go out.

Yesterday, though, I was only halfway through my errands by lunchtime, and the remainder of them couldn’t be put off until next week. I had a choice: go home, let Lila out, then come back and get the rest of the things on my list, or spend today in town finishing up. As yesterday was already a wash, I opted for the former course. We’re half an hour from town, so that added an hour to the process.

I’ve come to the conclusion that shopping in Kalispell is only easy for about three months out of the year, for brief periods in fall and spring when the weather is decent and the stores aren’t packed. At the height of winter, when it’s snowy and icy, getting around is just a slog. During the summer, there are tourists to contend with. And at Christmas, everyone is out shopping, although things seem a bit more subdued this year. Throw in a pandemic and some surprise road construction on top of it, and everything slows to a crawl.

First world problems, I know. I did my best to get through the day with a smile and a pleasant attitude.

I got some excellent help at Home Depot—I ended up being short one string of lights for the porch, but when I went back to get more, the shelf was empty. The employee in that department checked the computer and said, “We have more—let me find them,” and proceeded to move half a dozen boxes way up high to pull out a big box containing more stock. Yay! My light installation has passed inspection by the husband and I just need to put in the bulbs and plug it in.

The Big Brown Truck of Happiness pulled in shortly after I got home (the second time) and brought me this:

Qube9.jpg

We had reward points to redeem at Amazon so I went shopping. I’ve never felt like the Qube sets were critical to have because I bought a lot of my dies before the Qubes came out. These are great for people just starting out with the cutters, though, and I can see the potential for being able to make lots of different blocks. Qubes come in 6”, 8”, 9”, 10”, and 12” sets, depending on what size quilt blocks you prefer. I dithered about what size to get. I like bigger blocks and was going to buy the 12” size, but I ran across a blog post where a quilter said she used the smaller size Qubes more often because it was harder to rotary cut smaller units correctly. This is about as small as I will go. The thought of sewing a 6” quilt block makes me break out in hives.

I also got the 9” Qube Angles companion set. I think these will be useful for some of the more esoteric quilt blocks I want to play around with.

**********************************************************

The husband is getting better about bringing me clothing for repairs before things have reached the catastrophic failure stage. He ripped the pocket on one of his Carhartt traffic control jackets while he was out working in the woods:

JacketFix.jpg

I was able to fix it so he can use the pocket again.

I’ve got a custom Christmas stocking order to make today, as well as a pillowcase order to ship, but I’m hoping to finish quilting the Candy Coated and get it bound by the end of the weekend. I found the thread I want to use for Noon and Night and that one will be next up for quilting. I’m putting a pot of soup on to cook today and we’ll have a salad with it for dinner. All of my Kratky lettuce-growing supplies are here and that is also on the list for setting up this weekend. Lots to do.

Meandering Paisleys

DD#2 told me I was posting too much and she couldn’t keep up. LOL.

I am halfway through quilting the cream/white Candy Coated quilt. That much has taken roughly six hours. I am doing “meandering paisleys,” one of the patterns we learned in the Angela Walters class in Spokane.

MeanderingPaisleys.jpg

I love paisleys. They look like little parameciums, and who doesn’t want little protozoa all over their quilt?

I went with this pattern because I figured it would involve many of the same movements as loops, and it does. It is a far denser quilting pattern, however. I am not a huge fan of really dense quilting—quilts that have so much thread in them that they can stand up the corner by themselves. This is about as much thread as I am willing to put into a quilt.

Learning a new quilting pattern by practicing on quilt sandwiches is helpful, but I also understand why most quilting teachers will tell you to move on from quilt sandwiches to an actual quilt, even if you don’t think your quilting is good enough. I could tell the moment that this went from something I had to think about to something I was doing unconsciously—rather like learning to ride a bicycle. (I was about two hours into the process, for what that’s worth.)

The Q20 doesn’t seem to have an issue with the seams in this quilt, and with the sides up on the table, I have plenty of space to move the fabric around. I’m using a Schmetz 90/14 quilting needle—the size recommended by Signature for the 40wt thread—and I’ve changed it twice so far. I think I am overly sensitive to the “thunking” noise that a dull needle makes. The bobbin thread is the Mettler that came with the machine.

These Candy Coated scrap quilts are good for practicing on as the busy-ness of the design hides a multitude of quilting sins. I know where the hiccups are, but as a friend of mine said to me once, the difference between a professional and an amateur is that the professional doesn’t point out the mistakes. I like this paisley design and will use it again.

I have another Candy Coated basted and ready to quilt, but Noon and Night is up next. I’ve been driving myself nuts trying to settle on a quilting design and thread color for that one. I like the 40wt thread for most of my quilts because I like to see the quilting. I don’t like to see the quilting so much that I am willing to use a contrasting thread color—I would never quilt red paisleys on a white quilt—but I like to see the texture. For Noon and Night, though, I want the stitching to blend in as much as possible to allow the design to be the focal point. I’ll experiment on some of the orphan blocks, but I’m leaning toward a 50wt smoke gray for the top thread. And perhaps it’s a cop out, but I think straight diagonal lines are going to be a better choice than a free motion pattern.

So many design considerations.

**************************************************

Yesterday’s Living Free in Tennessee podcast was a fascinating interview with one of the community members named Rae Bardon. Rae is a fiber artist and a member of the Society for Creative Anachronism. She and her husband also have an online business called Viking and Weaver where they sell their handmade Viking drinking horns and other items. I knew nothing about drinking horns before I listened to the podcast and now I do! I learn so much from that group.

**************************************************

The husband is pouring concrete supports for a bridge project today, but it’s not in a location I can get to easily so no pictures. He’s getting a lot of use out of the computerized surveying equipment he bought this summer. I don’t think surveying is really part of his job—neither is architecture, for that matter—but he runs into a lot of projects where the information he has been given by the surveyor and/or the architect doesn’t match the reality on the ground. He checks everything now as a matter of course, and sometimes he has to make adjustments.

Tera’s barn slab is on the schedule for some time next week—if the weather cooperates—and I will get pictures of that pour.

Collaged

I’m working through my pile of things to be finished. Yesterday afternoon, I quilted the collage quilt from our class in Spokane last month. I wanted to get that on the machine for two reasons: first, I do not want it to languish; and second, I wanted to see what working with the Superior Threads MonoPoly was like, because I thought I might use it to quilt Noon and Night.

Eh.

The collage is done, I will say that:

FinishedCollage.jpg

And I am okay with it, given that I went into this project with no idea what I was doing. I understand the process much better now. Were I to make another one—and I might—I know now what changes I would make.

For the backing, I used a sewing print from the stash:

CollageBacking.jpg

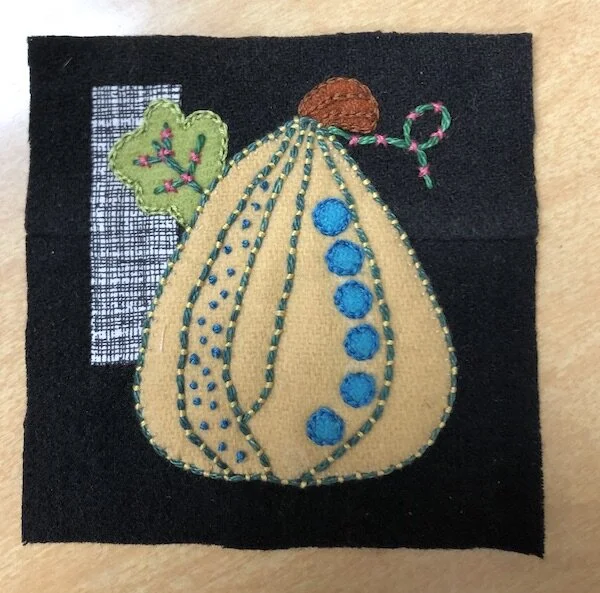
I thought this was a multi-directional print because some of the sewing machines are upside down, and therefore did not pay attention when I was layering it with the batting and quilt. As I discovered when it was all quilted, however, there is a direction to this print. And I put it on the wrong way. Oh, well.

[I have some choice words for that fabric designer. Either make all the large motifs unidirectional or make all of them multidirectional.]

You can see the quilting on the backing. That’s 50wt Aurifil. The quilting on the front is nearly invisible, which is both good and bad. I wanted to use a monofilament there because there are so many colors in the quilt itself. If I had chosen a beige thread to blend in with the background, it would have stood out too much on the tomato. If I had chosen red to blend in on the tomato, it would have stood out on the background. In terms of blending in, the MonoPoly did what it was supposed to.

It’s much thinner, though, than anything I’ve used before. The Superior Threads website indicates that it’s a 100wt thread. It’s not awful to quilt with, although it’s so invisible that it’s hard to keep track of its location. I used a nonstick needle, which is a lifesaver with these appliqué pieces.

So what’s not to like? Well, the front of the piece doesn’t look like it’s quilted at all. At first I thought that was the fault of the thread, but I realized that the collage process results in a very stiff fabric. A stiff fabric combined with a thin monofilament results in a delicate grid of invisible thread lying on the surface. I wonder if using a heavier monofilament—Sailrite carries one that is approximately the same weight as regular sewing thread—would make a difference. Or maybe I should have used a 40wt pale pink cotton? Or a poly batting instead of cotton? I’d also be inclined to use something other than the Pattern-Ease as the foundation. What would the collage feel like if it were built on a thin lawn or muslin, instead? So many questions. Not enough time.

Interestingly, I ran across a blog post—after I had finished the quilting, of course—where the maker had added a layer of tulle over the top of the collage before quilting it. I thought that was a creative addition. It might be a pain to work with, but it would add another layer of texture. I think I might suggest it to Tera for her octopus collage.

The binding is some gray I pulled out of the binding box which coordinates nicely with the backing. I didn’t want to have to make binding just for this project.

I am glad I tried out the MonoPoly, as I am sure now that I don’t want to use it on Noon and Night, but I am still left with figuring out how I do want to quilt that top. I am leaning toward some dark gray thread that will blend in on both the black background and the colored stars. I could do black in the background sections and a variegated in the stars, but I am not sure my custom quilting skills are up to the task yet. I’m going to make some quilt sandwiches with the orphan blocks from the early part of the design process and experiment with them. I know Tera would do Noon and Night on the longarm for me, but I need to master some of these techniques on the Q20 and I’d like to try this myself. And I am not as much concerned with the quilting as I am with just getting this done and bound and ready to photograph for the pattern. Most people buy quilt patterns based on the design of the quilt, not because of the actual quilting.

I’ve got two Candy Coated quilts basted and ready for quilting. At some point, I also want to see what quilting a big quilt on the Q20 is like. I have a king size Scrapper’s Delight—also from Sunday Morning Quilts—that is ready to be basted with batting and backing, but it’s a bit further down the queue along with two other quilt tops that still have to be assembled.

******************************************************

I stopped in at Home Depot yesterday morning and bought lights for our porch. During the winter, we tend to get trapped under inversions, which make things very gloomy. Imagine cloudy, but a depressing gray cloudy close to the ground. Our house is at an elevation where sometimes the sun will break through. The valley, though, gets stuck under stagnant air until a system comes through and scours it out. (It’s why burning is closed until March, so the smoke doesn’t add to the problem.) For some reason, I feel like it’s important to have some cheerful lights up, this year more than ever.

I don’t have a good history with Christmas lights. I tried them the year after we built the house—the husband helpfully put hooks up on the porch rafters for me—but if I didn’t remember to turn them off before I dried my hair, the combination of the hair dryer on the same circuit as the lights tripped the breaker.

These are not Christmas lights, per se, but rather plain Edison bulb outdoor lights. And they are LED lights, which hopefully won’t draw as much current. We shall see. I might be looking for a different circuit for my hair dryer. I have to take down my wind chimes, but they can go into storage for the winter.

Guerilla Sewing

I am chatty this week.

The Q20 is now safe from dust:

Q20Cover.jpg

This is definitely not heirloom sewing. I was going for function, not aesthetics. The inside seams aren’t bound and probably never will be. The binding around the opening for the thread stand is kind of a hatchet job, but it sits underneath the stand and isn’t visible. I was exactly 1” short of binding on the bottom edge, but when I put the cover on the machine, I discovered that the 1” gap is right where the cord comes out of the back of the machine. I couldn’t have engineered that if I had tried. I am going to cut a notch out in that spot for the cord and go over the exposed edge of the foam and fabric with a zig-zag stitch.

Sometimes you just get lucky.

Done and done. I moved on to other projects. I basted the white/cream Candy Coated quilt in preparation for getting it on the machine.

BastedCC.jpg

If I scoot the Necchi cabinet out of the way, I have enough space on our bedroom floor to baste most quilts. When they get up to a queen or king size, though, I usually take them up to the church and do them in the fellowship hall (the floor there is carpeted). After I laid out all three layers, I went over the top and smoothed and pinned it. I also trimmed down the edges a bit. I need to leave a couple of inches of backing and batting extending past the top on all sides to account for shrinkage during quilting, but if I leave too much flapping at the edges, it can get caught underneath and sewn into the backing. Ask me how I know.

I haven’t decided how I will quilt this. I might try an allover paisley design. I could also quilt each row individually. I did that on another CC and liked the way it looked. The one issue I have with this pattern—and we’ll see how the Q20 handles it—is the number of seams. I’ve had a lot of problems quilting allover patterns on these quilts on the Janome because it tends to hiccup over the seams.

The backing on this one is a grey and cream toile pattern. I didn’t match the pattern when I pieced it; matching the pattern adds extra time to the process and I am in finishing mode right now. The print is busy enough that it’s hard to see the seam anyway.

I added the last bit of embellishment to the collage quilt and that one is ready for batting, backing, and quilting. Those collage quilts seem to benefit from plain grid quilting with 1” lines, so I’ll do that one on the Janome.

*****************************************************

I did a bit of quilt block detective work yesterday morning. Someone in the MeWe quilting group posted this picture and asked for help identifying this block:

WheelBlockColor.jpg

I started with a Google image search, but Google assumed I was looking for American flags, not quilt patterns. I converted the image to grayscale and tried again, but that didn’t work, either. I did a Google search on “cog wheel quilt blocks,” which brought up a similar image on the Q is for Quilter blog. A bit further down the page of Google image results, I found this clipping, which matched the block on the Q is for Quilter blog post.

CogWheelFancy.jpg

Aha. There was a note underneath this image that it came from the Ladies Art Quilt Company book, so I did a search on that title. That took me back to the Q is for Quilter blog, where I discovered thumbnail photos of each page of that book (it was published in 1922). I clicked on each thumbnail to enlarge the photos, and spotted what I was looking for on the eighth or ninth page:

LadiesArtPage8.jpg

Do you see it? This is block #212 from the Ladies Art Quilt Company book. The original poster of the question on MeWe was delighted that I was able to find this, but I am not sure it helps her much. These are just images, not patterns, and given the age of the publication, the block would have been done with templates, probably cut out of cardboard or heavy paper.

I was explaining this to the husband over dinner and showing him the photos. He commented that it was clear the maker of the original quilt block didn’t have the advantage of laser-cut—or even die-cut—quilt pieces. (Go back and look at that photo of the red, white, and blue quilt block, above; you can see that the quilter even pieced some of the individual units to use up tiny bits of fabric.) I am curious about all the quilt patterns than have fallen out of use over the past 100 years because they just didn’t lend themselves well to speedy rotary-cutting techniques. Noon and Night is a great example.

I think the potential is huge for resurrecting some of these patterns, especially if they can be die-cut with the Accuquilt dies. Accuquilt will make custom dies if you provide them the measurements (and are willing to pay extra). I need to finish Noon and Night (soon—it will be up right after the CC quilt) and get that pattern published, but my brain is awhirl with ideas.

Covering the Q20

I should have some concrete-pouring content soon, for those of you who are tired of hearing about sewing.

I did not quilt on the Q20 yesterday; the house needed some attention, and in the afternoon, I decided to make a dust cover for the machine. Armed with a pattern from the Q20 Facebook group, I pulled out fabric and foam and got to work. I have a lot of sewing-themed fabric in my stash, but it is mostly in one-yard cuts and I needed more than that for the cover. I had a two-yard piece with reproduction vintage sewing machine ads on it, so I used that.

[Bernina makes Bernina-themed fabric, and the quilt store carries it, but I think it’s a bit ridiculous to sally forth and buy fabric when I am sitting on a mountain of it here. Bernina owners do seem to be a bit obsessed about their machines, if they have Bernina-themed fabric available to them.]

For the lining, I pulled out what was left of the shell fabric I used as lining for the crab appliqué apron. Do shells have anything to do with sewing? No. Am I ever going to use this fabric for anything else? Probably not. I had enough and decided to use it up. This is a lining. No one is going to see it.

The pattern calls for using wool, cotton, or poly batting, but I’ve done enough byAnnie bags with the foam interfacing that I went that route. I quilted the two side pieces yesterday:

QuiltedCover1.jpg

The pieces are quilted larger than necessary and trimmed to the correct measurements. I did straight lines about 3/4” apart (using the edge of my walking foot as the guide) on the Janome, with Signature 40wt in the top and Aurifil 50wt in the bobbin.

I’ll quilt the top/front gussets this morning—there are two in order to leave an opening for the thread stand—and hopefully have this put together by this afternoon. And then I can get back to finishing some quilts. I am going to leave the Janome set up for straight-line quilting because I also need to quilt that collage wallhanging from the class a few weeks ago. I’m going to try the Signature MonoPoly thread for that one. I picked some up in Spokane when I was shopping with Tera. I don’t usually quilt with polyester or nylon thread, but that collage calls for less visible thread in the quilting.

*****************************************************

Elysian has been cooking down tomatoes for sauce the past couple of days. She brought over a pint of some Rhubarb-BQ sauce for my birthday, made with a recipe from the Ball Blue Book. She has a huge rhubarb plant. (My rhubarb struggles, for some reason. That’s on my list of things to address next spring.) I popped a pork roast into the crock pot with the sauce she made and cooked it all day. It was very good.

*****************************************************

The homesteading group I belong to on MeWe has had a big influx of members lately—people finding out about it from other MeWe groups as well as people fleeing Facebook. We have an ongoing chat room as part of that group. The people there are fantastic. Everyone is helpful and supportive. It’s not a clique, either. We will happily welcome new people. I am always amazed, though, at the people who just barge right in and start posting in chat without waiting to get a feel for the room or getting to know the other people there. I posted a picture one day of the Noon and Night quilt and some new guy responded that “his neighbor has a side hustle”—it’s all about the side hustles with some people—”as a knitting designer, and maybe you should think about doing that with your quilts.” I had to leave my computer for about 15 minutes while I went away and laughed myself silly. I know he was only trying to be helpful, and I thanked him for his input later, but the irony was a bit much for me.

Then we get the people who join a chat to spam members with ads for their businesses. They don’t tend to last long. We also get a class of men that I describe as 14 year-olds in adult bodies. One showed up the other day. These tend to be guys with a sense of humor that has never developed past ninth grade, and they think the are the funniest people in the room. They also swear constantly. The rest of us aren’t prudes by any stretch of the imagination, but our conversations tend to be elevated beyond potty humor. I suspect this particular guy was asked to leave by the group admins, because he disappeared. No big loss there.

Why do people behave like that?

Meandering With the Q20

I pulled out the stack of things needing to be quilted, which included a wallhanging made from leftover hourglass units. The wallhanging needed a border, so I found half a yard of fabric for that, then basted the whole thing together with a piece of leftover batting and backing from the same quilt project that generated the leftover units.

[I have the luxury of having enough space and resources to have accumulated a small craft store here in my house. Part of what makes me so productive is the fact that I don’t have to make a trip to town with a list every time I need something to work on a project.]

I pulled out the appropriate thread—Signature cotton 40wt for the top and Aurifil 50wt for the bobbin, which is my favorite combination—and sat down at the machine. The Q20 has a feature called “kickstart.” The foot pedal can be depressed toward the front like a normal sewing machine pedal. It can also be depressed toward the back with the user’s heel. This took a bit of getting used to. (Some of this can be custom programmed, but for now, I am using the factory settings.) One press of the heel backwards on the pedal makes the needle go down and up once, to bring the bobbin thread to the top of the work. Pressing the heel backwards on the pedal a second time makes the machine take four stitches to secure the threads.

Here is where it got tricky. When I quilt on the Janome, I use the pedal to control the speed of the machine and thus the length of the stitches. It’s a complicated dance of keeping the machine sewing at a consistent speed that produces even stitches of the right length while moving the fabric. If the machine moves faster than the fabric, the stitches will be tiny. If the fabric moves faster than the machine, the stitches will be long. If both those things happen over the course of the quilting, the stitches will be uneven. I know where the sweet spot is on my Janome foot pedal and how fast I need to move the fabric, so the stitch length on my Janome is relatively even.

With this machine, however, there is no controlling the speed with the pedal. The length of the stitches is regulated by the machine, which uses sensors in the throat plate to adjust the speed of the machine based on how fast the quilter is moving the fabric. Move the fabric slowly, and the machine quilts slowly. Move the fabric faster, and the machine speeds up. I was getting some skipped stitches in the first part of the quilting, and it was because I was unconsciously trying to speed up and slow down the machine with the pedal. Once I figured out what was happening, I made an effort to break myself of that habit. By keeping the foot pedal depressed completely, the skipping stopped. I believe there is a way to program the machine so that it isn’t necessary to use the foot pedal at all except to begin and end the quilting.

And, of course, this thread combination required a different tension setting than the Signature/Mettler combo. This machine has memory for several user profiles, so once I get different settings dialed in, I’ll be able to save them.

Even using an unfamiliar pattern—I practiced quilting swirls again—I did that wallhanging in record time. I trimmed it and went in search of some binding. Whenever I bind a quilt, I usually make extra binding and keep it in a large plastic bin. I had exactly enough (6” left over) black binding. The husband went to fire training and I sat by the fire and sewed the binding down and now that wallhanging has moved from top to Finished Object:

WallhangingSample.jpg

I quilted swirls in the center and defaulted to loops in the border. The swirls look okay, but my loops are much smoother. I still need to stitch in the ditch between the border and the center. I’ll have to do that on the Janome, however. I confess to a bit of frustration with Bernina’s sales model. They only sell through independent quilt stores, which I applaud, but if the store doesn’t have the item I want in stock—and our store doesn’t, because they have just started carrying these machines—they have to order it for me with no clear indication of when it will come in. It could be a week or it could be two months. Right now, I am waiting on a ruler foot to do straight lines. I would also like to have a dust cover. I found a pattern for one and might just make it myself.

I could work on another couple of wallhangings or I could jump in and quilt that cream/white Candy Coated. I’m trying not to get too hung up on choosing patterns for these practice projects. Some people make lots of tops and never quilt them because they can’t decide on the “perfect” quilting pattern. Finished is better than perfect, in my opionion.

I’ve got this book sitting next to the quilt table and it’s a great reference:

MeanderingBook.jpg

It’s basically an expanded version of what we learned in the class with Angela in Spokane. I aspire to this.

********************************************************

The husband and I had a discussion about the fact that I am capable of attending to multiple issues simultaneously. He said that he didn’t want to disturb me while I was quilting to ask me a question or let me know that he was going out to the shop. I said that as long as he didn’t walk up behind me and scare the living daylights out of me, it was perfectly fine for him to interrupt my quilting. All I have to do is take my foot off the pedal and the machine stops. I pointed out that while I was quilting, I was also watching the flock of welfare turkeys running back and forth past the office door to the porch, because it was about 3 o’clock and they were looking for their daily ration of scratch grains.

Women’s brains are wired differently than men’s brains. That’s not a judgment, just an observation.

Getting to Know the Q20

I had a few items to take care of yesterday before I could sit down and quilt at the Q20. The owner of the quilt store had loaned the husband a moving blanket to bring the table and machine home, and I wanted to return it to her before I forgot. While I was in the store, I noticed that she had just gotten a shipment of Accuquilt dies, including that adorable gnome die. I bought it. I also ordered the ruler foot for my machine because she didn’t have one in stock.

[This is a true free-motion quilt machine. If I want to do straight lines, I either have to do them on my Janome with the walking foot—which is not as difficult as I’m not moving the quilt around as much—or use a ruler foot on the Q20 that glides along the edge of an acrylic template.]

I grabbed a quilt sandwich left over from my class with Angela Walters in Spokane in 2019 and sat down at the machine. Loops are easy for me. I need to force myself to branch out to other designs. I tried a pointy swirl design and was pleasantly surprised at how good it looked on the first try, especially in the middle. (The outside edges get a bit janky.)

TestQuilting.jpg

This looks like a mess only because of the thread tails and because I quilted over my initial quilting. This is the only quilt sandwich I had and I was too lazy to go upstairs and make more. I was more interested in learning the feel of making swirls than how the quilting looked. For instance, I learned that I need to keep my swirling motions bigger and wider than I think I do, or I get myself stuck into tight spaces.

Along the way, I tinkered with the some of the settings, including the tension, which is all digital. I was using Signature cotton 40wt in the top and Mettler 50wt in the bobbin. The Mettler thread came with the machine. I haven’t used it before, but it seems nice.

Putting this machine in my office was the right decision. I was able to pop in and out and quilt while I was making dinner. I haven’t decided whether I want to practice on more quilt sandwiches or go right to a quilt. I may split the difference and quilt some of the wallhangings I made last spring when I was trying to use up orphan blocks. The quilting goes ridiculously fast on this machine, both because of the machine and because of the workspace. I could have quilted faster on my Janome were it not for having to rearrange the bulk of the quilt constantly.

I am so glad that I took that class with Angela Walters; so much of what I learned then is beginning to coalesce in my brain. I’d love to take another one. She’s done some YouTube videos, though, and that’s almost as good.

The husband and I were watching an Essential Craftsman video the other night. Scott, the EC, is selling a kit to make a leather axe sheath, and he noted in the video that making something small is a good introduction to a craft that might lead to something bigger. The husband laughed and said, “Yes, and the next thing you know, you’ve got $50,000 worth of tools.” (My machine did not cost anywhere near that, but I know what he was getting at. Also pot, meet kettle.) And this is going to sound horribly conceited, but I don’t know how else to say it: Talented people master things so quickly that it becomes harder and harder (and progressively more expensive) to find things to challenge them and keep them occupied. Tera and I both find it interesting that many of the the doctors we know—she’s married to one—are taking up farming as they retire from medicine. People who operate at a certain level all their lives simply aren’t content to retire and do nothing.

I’ve long held the philosophy that better tools do not automatically make one better at something. A talented pianist can make the most humble instrument sound lovely; someone who is just learning to play is not instantly going to sound better on a baby grand just because it’s a nicer instrument. A better tool in the hands of someone who has reached a certain level of mastery, though, is a game changer.

Pork, Elk, and Another Kind of Animal

Tera went above and beyond yesterday and helped me with picking up and delivering pork. I had driven up to the processor on Monday afternoon and picked up our personal order, but the BMW is not a truck and I really shouldn’t treat it like one. Unfortunately, the husband was trying to get some concrete pours done while the weather was nice and was unavailable to retrieve the rest of the pork. My old red truck has the plow and chains on it, so I couldn’t drive that. Tera borrowed her husband’s full-size pickup and we made a field trip of it. (Some of the pork we were picking up belonged to them, and she’s helped me before.)

The day was lovely and sunny and we had the chance to do some visiting on the way. We had lunch back here in Kalispell, and by the end of the afternoon, all the pork was delivered. We even got to see a herd of elk!

ElkInField.jpg

As I was leaving Tera’s, I got a text from the husband: “Do you want me to stop and pick up your quilting machine on my way home?”

[I said to Tera, “Why is this even a question?” LOL]

I called the store to let them know he would be stopping in so they wouldn’t ask him if he was lost. (That has happened before when he’s gone into fabric stores looking for me.) He got home about 10 minutes after I did, with the table and machine on the back of his truck. The store sold me a new-in-the-box machine, but the table was the already-assembled floor model. Getting everything into the house took some doing. He pulled the forklift over and we rolled the machine from the back of the truck onto a platform so he could lower it to the porch. Unfortunately, the table was wider than the kitchen door, so he had to get underneath the table and unscrew the top.

I had planned to put this machine upstairs in the spare bedroom, but that room is small with poor lighting. After some consideration, I decided to put it here in my office. I have an L-shaped desk for my Mac. When I started doing transcription, we added another desk at right angles to it—to make a U shape—for the PC. I haven’t used the PC in over six months, so I took it down. We removed the desk and scooted the Necchi industrial treadle table over into that spot. That left a large enough space by the window for the Bernina Q20 and table.

The husband reassembled the table in that spot. We were both tired and hungry, and I would have been willing to wait to set up the machine. However, he likes to finish a job once it’s started. I should have taken some “unboxing” pictures, but we just opened the box and went for it. And now I have this:

BerninaQ20.jpg

In my head, I keep referring to this machine as “The Beast,” because it’s huge. This is a great spot for it, though, because the overhead lighting in my office is excellent. That’s an east-facing window, so the only sunlight it gets is early in the morning, and not much because of the mountains and the covered porch. The table is on casters and can be rolled out with the extensions up when I’m working on a quilt. It also has a hydraulic lift, so I can work sitting down or standing up. And we still have room for guests upstairs.

I am going to attempt to be disciplined today and cross off the rest of the tasks on my to-do list before I sit down to do any quilting. I am looking forward to getting through the backlog of quilt tops, though, and expanding my machine quilting skills in the process.

Tera and her husband are building a timber-frame barn and the husband will be doing the concrete slab some time in the next few weeks. I will take pictures of that pour when it happens.

Almost December

The schedule for this entire week is a bit up in the air. I am expecting the processor to call and say the pork is done. They prefer that we come get it as soon as possible so it’s not taking up space in their freezer. It’s more than I can carry in the station wagon. I could take one of the work trucks and go by myself, but it’s easier if we both go. I’ll also have to make arrangements with the customers to get it delivered that same day.

And the owner of the quilt store called yesterday to tell me my machine had come in. Again, I might need the husband’s help for that one. The machine will fit in the car, but I’m also getting the hydraulic lift table, which probably won’t. I’m going to stop at the store this morning and assess the situation. Getting the machine home is only half the battle; I also need to clear out the space in the spare bedroom and move some things to other rooms or out to the storage container. Hopefully, though, everything will be set up for quilting by the weekend. I need to baste a couple of quilts this week so I have something to practice on. The white/cream Candy Coated top is done AND I have a backing for it. That might be a good one to start with. I want to expand my free motion quilting techniques beyond loops.

The husband is still working—they are pouring concrete today—so the schedule might require some creative juggling. We’ll have to see.

This is my first Squash Squad block:

SpaghettiSquashSquad.jpg

This may end up being my only Squash Squad block. It’s supposed to be a spaghetti squash. I still have a few little embellishments to add to this one. (I might also take that vine out and re-do it with two twists.) I don’t have any guidance other than Instagram photos—and some sparse written instructions—which means that every time I have to add something new, I need to pull up IG on my phone or tablet and search for a picture. My patience for that is wearing thin.

I have other embroidery projects I could be working on.

I’ve also got the Noon and Night pattern open in InDesign so I can finish getting that written. The bulk of it is in there; right now, I’m fleshing out details like measurements, yardage requirements, etc. I am still aiming for a January release.

I was out working in the woods with the husband yesterday afternoon when he pointed to the road and said, “Aren’t you expecting a FedEx delivery?” We can always tell when it’s a new driver because they drive back and forth past the house. I walked out to the road and flagged down the driver and showed him which was our driveway. (There are metal street numbers on the garage, but sometimes it’s confusing.) He pulled in and handed me a small package from the front seat, and then said, “The system says you have two packages—could you help me find the other one?” He opened the back doors to the van, which was piled from floor to ceiling with dozens and dozens of boxes.

I expressed my sympathy that he was having to work on a Sunday to deliver all those packages, but he was very cheerful about the whole situation and said he was just glad to have a job. After a few minutes of searching, we found my other package—a box with Accuquilt dies—and he wished me a good day and I wished him safe driving. I hope he wasn’t out until midnight delivering all those boxes.

I ordered a 3” strip die, the Bear Paw die, and a triangle die, all for the Studio cutter. I can use the regular Go! dies, too, with the adapters, but sometimes I want the beefier dies.

The Bottomless Scrap Bag

I used up nearly all the white/cream scraps on that Candy Coated quilt, which was gratifying until I unearthed a bag under the cutting table that held the remains of the previous multicolored Candy Coated quilt I made a few months ago. Some of the rows were too long, so I had trimmed them but left the sewn strips as seeds for the next CC. And the current multicolored scrap bag is stuffed. What to do except make another one?

CandyCoated9.jpg

These are the rows still left to finish. The completed strips are hanging on the fence in the hallway.

I am beginning to think the scraps multiply when I am not looking.

Lynne at the Patchery Menagerie blog had a post about this a few weeks ago. She said she had a moment of clarity (and terror) when she realized how many quilts were waiting to be made just from her scrap bins. Humble though my CC scrap quilts are, they use up fabric and that makes me happy. They’ve also been good projects for me to practice my machine quilting skills on. The sewing is easy—long strips cut into shorter strips and sewn into rows—which makes them great for days when I want to sew but don’t have the mental energy for anything more complicated.

I finished the project I was making with the Klum House waxed canvas. I noticed that the canvas tends to dry out after a few days, so perhaps it’s a matter of taking the yardage out before using and hanging it somewhere to allow the excess volatiles to evaporate. I wonder where they get their base canvas. It is a tighter weave than the AL Frances canvas. A combination of the Klum House base canvas and the AL Frances beeswax would be amazing.

I’m still plugging away at the embroidered squash project, but with less enthusiasm than I had when I started it. Part of the problem is that unless I buy a (very expensive) kit, I am having trouble finding all of the threads I need. Not all of the stitches and techniques are explained in the instructions, which requires going to Instagram to watch the IGTV videos. I have enough trouble watching YouTube videos through the Roku on my TV; I don’t have the patience to sit at my computer to watch them. Also, finding said videos was next to impossible when Instagram decided to block hashtags before the election. The whole project has been an exercise in frustration.

It’s a free pattern and I have no cause to complain. I’ve resigned myself to coming up with my own embroidery designs on the pattern using what I’ve got available. I’m trying to view it as another opportunity to be creative, although I am fumbling my way through parts of it. I’m disappointed, because I thought that embroidering squash would be fun and educational. It’s up to me to figure out how to make it that way.

It turns out that the homesteading chat group I belong to has quite a few stitchers in it. We’ve had some fun discussions over the past couple of days. And Elysian came over last evening to borrow a sewing book (which I told her to keep) so she could start working on some projects. Last spring, she scored a deal on a pristine Singer 600, one of the last 1960s models with metal gears, with all the accessories. She didn’t have a manual for it, but I had an extra one, so I gave her that along with a cutting mat, ruler, and rotary cutter. That should help get her started. I am looking forward to seeing what she makes. WS told me that he plans to make himself a pillowcase and I said I thought that was a great first project.

************************************************

The woods look much better after two days of us working out there. I, on the other hand, do not.

The husband looked at me at one point yesterday and said, “Did your hairline get singed?” Yep, it surely did. I had my hair tied back (for obvious reasons when working around fire), but I was walking up to one of the slash piles to throw an armful of branches onto it when the wind shifted unexpectedly and a gust blew the heat in my direction. A small section of my hairline and a bit of my eyebrows took a hit. You can’t tell when my hair is down, although it’s going to be annoying when those pieces start growing out again.

And this morning, I was pulling on a branch that was stuck under another branch when the second branch gave way suddenly and the first one came back and whacked me in the face by my lip. It bled a little bit.

The husband looked at it and said, “People are going to think I beat you,” but I assured him that anyone who knows me is not going to find it strange that I did this to myself. I am hardly an example of grace and coordination. I am going to quit while I’m ahead, however.

************************************************

It occurred to me that this December is going to be a lot less hectic than normal. I’m not playing for the Lutheran church because they are doing their midweek Advent services differently this year. And our choir is not singing on Christmas Eve, so we won’t have practices on Sunday afternoon. DD#2 is going to fly home for a couple of days at Christmas, but other than that, it will be a quiet one with no houseguests. What a strange year this has been.

Matchsticks

The Deputy Chief of Fire Operations and I spent our Thanksgiving Day out in the woods burning slash piles.

SlashPiles.jpg

This is ongoing cleanup from that horrendous windstorm last March. He had cut up some of the trees last spring and piled brush, but we can only burn at certain times of the year. We’d like to get as much of this done before burning season ends on Monday.

The husband put a propane torch to each pile to get it burning, but once it was going, this brush burned hot despite being soaked with moisture. It’s a sobering thought to imagine how it would burn in the middle of a hot, dry summer. Slash piles that are burned in the spring can smolder until a stiff breeze re-ignites them in hot weather. It’s better to burn now.

My job is to collect branches and put them on the piles, and then monitor each pile and rake it into a smaller pile as it burns down. I like the physical activity. I don’t feel 55 and I want to keep it that way.

We were taking a break on the porch mid-afternoon when the husband said, “Look, here come your turkeys,” and sure enough, a flock of about a dozen of them came running over to get their daily ration of scratch grains.

ThanksgivingTurkeys.jpg

I told them they were lucky they weren’t on someone’s dinner table.

We’ll be back at this project today. The woods—what is left of them, anyway—look better, but there are still a few more dead and dying trees that need to come down, and hopefully not in another windstorm.

*************************************************

I wasn’t feeling well on my actual birthday—some mild stomach complaint—but the universe made up for it when I ran errands on Wednesday. My first stop was Joann Fabrics, where all the knits were on sale for 60% off. I picked up enough for three more tops AND I found another length of knit fabric in the clearance bin for 80% off AND all the thread was Buy 3, Get 2 Free. I stocked up on more neutral serger thread.

I went to the quilt store north of town and picked up a spool of black Aurifil to use in the bobbin when we quilt the Noon and Night top.

Hobby Lobby is in that same area north of town. I was wandering through the bolts of fabric, waiting for the line at the cutting table to go down, when I spotted some Essex Yarn-Dyed Linen! This is produced by Robert Kaufman—the same lovely company that brings you Kona—and either I have to order it online or buy it when I go to Spokane. Granted, there were only a couple of bolts and they were mostly neutrals, but there was a bolt of the prettiest light green (a color called “Seafoam”), so I bought a couple of yards, destined to be at least one apron.

[That line has 147 colors, half of which are the yarn-dyed fabrics that look almost heathery. It’s a shame that whenever I see it in stores, the only colors offered are the neutrals. Some of the jewel tone colors are just gorgeous.]

Say what you will about Hobby Lobby—and I respect the fact that people won’t shop there for various reasons—but if Hobby Lobby provides me a way to buy Essex Linen locally, I’m going to buy it.

One of my last stops Wednesday was the quilt store south of town. I am now committed to a Bernina Q20. The store owner gave me a great deal—so great that I actually asked her if she was making any money on the transaction. (She assured me she was.) I am not sure yet when I am going to pick up the machine, but it should be some time within the next month or so. I am excited! I’ll be able to blast through the stack of quilt tops that have piled up, and that will make room for the quilt ideas in my head that are clamoring to get out.

Which Waxed Canvas?

I did not mean to sound so grumpy in yesterday’s blog post—and on my birthday, to boot—but I am not going to be one of those people who posts only rainbows and unicorns. Life is what it is, and I am definitely grateful for another trip around the sun. I just find it wearying to share this planet with other people sometimes.

I sewed all day yesterday, on a project with some waxed canvas. This is the waxed canvas I bought from Klum House, in Portland. My previous waxed canvas projects have been with the material from AL Frances Textiles, on Etsy. The AL Frances waxed canvas is incredibly easy to work with; the Klum House waxed canvas, not so much. Klum House uses a vegan wax blend on their canvas which is comprised of petroleum jelly, mineral oil, and paraffin. The saturation is good, and the weave of the canvas is tighter, but I found myself fighting the Klum House canvas every step of the way. When I crease the AL Frances canvas, it stays creased, which makes sewing it a breeze. The Klum House canvas would not stay creased, no matter how hard I went over it with my Hera marker (a plastic blade used to mark and shape fabric without pins). And my Necchi industrial didn’t seem to like sewing it.

I prevailed, however, and the project is almost done. It looks good and I am happy with it. I need one item to finish it, which I’ll pick up in town. I can’t show you a picture, though, because it’s a gift for someone. I’m glad I did a simpler project with the Klum House canvas before embarking on that Slabtown Backpack, because now I know what I am dealing with. I don’t dislike the Klum House canvas; it simply requires different handling.

I was laughing at myself yesterday morning, because I spent a couple of days cleaning and organizing my sewing area, and within 15 minutes of starting that waxed canvas project, it looked like a bomb had gone off again. I engage in a lot of creative destruction when I am working, apparently.

[“Creative destruction” is such a wonderful oxymoron.]

I pieced the backing for the Noon and Night quilt, too. I like to use 108” wide fabrics so I don’t have to piece backs, but I wanted a specific backing for this one and it only came in 44” wide yardage. As I was pressing it, though, I noticed a tear in the fabric:

RippedBacking.jpg

So I turned it over and ironed a small piece of black interfacing over the hole to keep it from getting any bigger.

RipFixed.jpg

When it’s quilted, the flaw won’t be noticeable.

**********************************************************

The husband is still working, although not as many hours because there just isn’t enough daylight. The early snows caught a lot of people off guard and scrambling to get projects done. He poured some sidewalks yesterday at a duplex whose foundation he did in the summer of 2019.

I expect we’ll be picking up the pork orders some time next week. I’ll be glad to have that all done and wrapped up. We’ve already had people asking us about reserving some for next year. I am hoping we can use the same supplier for piglets.

I’m also going to order seeds a lot earlier this year. I saved a lot from last season—especially tomatoes—but I don’t want to get caught without other ones that I need.

Happy Birthday to Me

Today is my 55th birthday. My birthday falls so close to Thanksgiving that usually I am celebrating with family—my mother and the girls and I spent it in Seattle last year—or I take myself on a long weekend trip. Neither of those things will be happening this year and I am kind of bummed. I am reluctant even to travel to Missoula because the weather has been so lousy. I was getting ready to head into town yesterday morning to run errands and had one ear on the scanner. We had gotten some snow and already, fire departments were responding to a couple of motor vehicle accidents. I narrowly missed being hit in town—as I approached an intersection at Main Street, where I had the green light, someone coming down Main Street ran the red light right in front of me. Had I been in the intersection, he would have hit the front end or side of my car. He never slowed down.

Sigh.

I wore my new top all day yesterday. So comfortable. The next time Joanns has a sale on knits, I’ll pick up a few more lengths.

One of my errands yesterday was to track down the totes for my Kratky lettuce system. Home Depot was out of the ones I needed, so I ordered a box of five-gallon totes from Amazon. They seemed like they were taking forever to arrive, so I checked the order status. Imagine my surprise (/sarcasm) when the US Postal Service tracking number indicated the the mail carrier had tried—unsuccessfully—to deliver them last Monday. I doubt she even made an effort. I never received a slip or anything that notified me that I needed to go to town and pick them up, so I printed the page with the tracking number from the Amazon website and stopped at the main post office in town yesterday. The box was there.

This is just another in a long line of issues we’ve had with the postal carrier out here. Back in August, I had to remind the driver that the easement between our properties is not a road and she cannot drive 35 mph on it. On that particular day, our renter and her 4 year-old daughter were outside playing in their yard as she blew past, which is why I felt compelled to say something. The mail carrier apparently failed to notice the sign that said “Don’t drive like an asshole down this easement.” (The sign actually says, “Slow—animals and children playing” but you get my drift.)

I have the totes now, so I will work on getting the Kratky system set up. My mother suggested that I stay home this weekend and work on some of my projects. I have several.

I pulled out a bag the other night so I could press some pieces I’ve been using as leaders and enders:

88Squares.jpg

When I was a freshman in high school, I took a semester of art. Our teacher, Ms. Furey, assigned us a project known as “88 Squares.” We were to draw a grid of 88 squares on a large piece of paper, choose two opposing colors from the color wheel, and fill in each square with a design using those colors in tints (add white) and shades (add black). I’ve always thought that would be a fun project to interpret as a quilt. These are 2-1/2” squares, and there will be far more than 88 of them when I’m done.

One of my other errands yesterday was stopping at the quilt store to talk to them about sit-down longarm machines. I’ve been looking at the HandiQuilter—and this store is a dealer, but they are also a dealer for the Bernina Q system. I am not an impulse purchaser. I like to research and think and research and think some more. I was mightily impressed by that Bernina, however.

The husband is very useful for talking through decisions like this; he doesn’t know anything about quilting, so he asks basic questions about what I am looking for and what I want to do, and that helps me to distill down my thinking. I do not want a longarm quilting frame. I do not want to devote the space to it, for one thing. I also have no desire to do custom longarm quilting, where the quilter moves the machine to create special quilting designs and effects. I would use it primarily to do computer-controlled allover quilting patterns, where the computer moves the machine in a specific design. As frame systems run into the tens of thousands of dollars, however, that seems bit extravagant to me. Most people who buy longarm quilting machines do so intending to custom quilt for other people, which helps pay for the machine.

A sit-down longarm machine is basically a bigger version of my domestic machine and does only one thing: free motion machine quilting. Rather than the quilter moving the machine, the quilter moves the quilt. I’m already used to moving the quilt when I quilt on the Janome, so quilting on the Bernina Q20 came really easily. Interestingly, one of the women working at the quilt store sat down and tried it after I did. She has a longarm frame and she had a lot of trouble quilting on the Q20 precisely because she’s used to moving the machine, not the quilt. You get used to different movements.

The decision now is the Q16 or the Q20. One of the limitations of my Janome is the throat size, or space to the right of the needle. My Janome has approximately 8” of throat space. Quilting anything larger than a twin size quilt gets to be a wrestling match because the excess quilt has to be folded up into that space. The Q16 has 16 inches of throat space—about double the Janome—and the Q20 has 20”. I think I’d be perfectly happy with the Q16, and it’s is (obviously) less expensive than the Q20. The only reason to get the Q20 would be because it could be upgraded to a frame system in the future. The husband says to make sure I don’t buy something I’ll outgrow too quickly. And I could certainly do some custom quilting for other people if I were so inclined.

I am still thinking on this. I have the cash available and could get either one. I also don’t know how long it would take for the store to get the machine after I order it. Input is welcome, if anyone reading has experience with these machines.

Frankenpatterning

I don’t sew clothes for fashion reasons. (The chickens do not care what I am wearing as long as I have a can of scratch grains in my hand.) I sew clothes because I am sick and tired of the poor-quality, ill-fitting pieces that are offered in stores these days. Almost everything is too short. Or is full of spandex that stretches out of shape. Or falls apart after one wash.

I could go on, but you get the picture.

I’ve stubbornly held on to a couple of pieces of clothing that fit me well, intending to recreate them at some point. Several of them are Liz Claiborne tops; of all the ready-to-wear labels, I have the best chance of finding clothes I like that fit well in that line, although the quality has deteriorated significantly in the past decade (thank you, JC Penney).

One of my favorite Liz tops is a black-and-white striped tunic with a plain round neckline. It widens slightly below the bust. I wear it a lot because it’s so comfortable and fits so well. The fabric is a rayon/spandex of a good weight—not too light, not too heavy. It’s been at the top of the list to duplicate. I wore it the other day and found myself wishing for a similar top, but with a turtleneck. It’s winter here in Montana, you know. The neckline on the Liz top is too low for a turtleneck. It might be okay for a cowl neck, but I knew that if I traced the top to make a pattern from it, the neckline was going to require some adjustment to accommodate a turtleneck.

I went in search of a turtleneck pattern. The Hepburn Turtleneck from Itch to Stitch seemed a likely candidate, so I bought the pattern and took the file with me on a thumb drive to town on Thursday. The blueprint place where the husband gets construction plans done printed it for me on their large-format printer for a whopping $4.00.

Step 1 was tracing the Hepburn Turtleneck pattern in my size. The actual turtleneck pattern piece is just a rectangle, but I needed to see and understand the front and back neck shaping.

Step 2 was tracing the Liz top. That was a bit trickier because it’s an actual piece of clothing, but I was able to get a good outline of the pieces.

Step 3 was to lay the two front pattern pieces out on top of each other and see where I needed to make adjustments. The Hepburn turtleneck is much more fitted and has a tighter armhole opening. I kept the armhole shaping for the Liz top, but moved the pieces around and drew in lines where I thought they should go. I ended up raising and closing the front neck opening by about 2”.

[I wish I had thought to take pictures of this whole process, but I was concentrating on what I was doing. I probably will use this same method on some other tops, though, and I’ll try to remember to document what I do.]

The sleeve was the trickiest part. The sleeve cap and sleeve on the Itch to Stitch pattern is shaped, which is something I’ve only seen on patterns for wovens.

SleeveCap.jpg

The armscye on the front is correspondingly shaped differently than the back, to accommodate the difference in cap shaping. Knit fabric has enough give that most designers—knitting and sewing, both—draft a sleeve in which one half is a mirror image of the other half. I could have taken the easy route and simplified the sleeve shaping, but I was curious to see how it fit, so I approximated it as best I could for the lower and shallower armscye on the Liz top, giving bountiful thanks for years of knitwear design where I had to calculate sleeve cap shaping. This was new, but not wholly unfamiliar, territory.

Once I had a pattern I thought I would work, I cut the fabric—a rayon/spandex from Joanns—and started sewing. I’ve got my knits serger dialed in with settings that work nicely for this kind of fabric. (I have a knits serger and a wovens serger so I don’t have to keep changing needles and thread.) The pieces went together perfectly. I even serged clear elastic into the shoulder seams to stabilize them. Boo-yah.

The moment of truth?—I put the top on and didn’t want to take it off, which says to me that it was a success. I got a better picture on my dress form:

BlackFlowerTunic.jpg

This is exactly what I was envisioning. (I am especially happy that I was able to avoid having flowers end up in awkward places on my chest.)

And now for the post-mortem:

  • The fabric was lovely to work with. When I bought it, even the lady at the cutting table at Joanns remarked on how nice it felt. This seems to be an improvement over some of the knits they’ve offered in past seasons. It feels almost like peachskin.

  • When sergers behave, they are a joy. Two shoulder seams (with elastic!), two side/sleeve seams, a turtleneck and boom!—the top is put together.

  • I am getting better at coverstitching hems. If my serged seams got an A on this project, the hems got a B-. Coverstitch machines are fairly new to home sewing. I’ve got one of the earlier Janome 1000CPX machines, a generation which seems to have suffered from severe quality control issues. I followed the tips from a Facebook coverstitch group and opened the machine, raised the feed dogs, and oiled it thoroughly. Ever since then, it’s worked much better. I just need more practice with it.

  • I think that turtleneck pattern piece needs some shaping, or needs to be shorter. It ends up pushing the neckline down in the front when I am wearing it. The cowl tops I’ve made all have shaped cowl pieces. I will have to research that a bit more. The turtleneck feels nice and cozy, though.

  • The shaped sleeve caps/armscyes do make a difference. It’s subtle, but when I put the top on, it settles onto my body and doesn’t slide around like other tops tend to do. The front also has a slightly longer and curved hem compared to the back, which helps it avoid looking shorter than the back.

I’m going to retrace this pattern, incorporating some refinements, and then add it to my stack of “tried and true” patterns. The 5 Out of 4 Nancy Raglan is another tried and true pattern—I can cut that one out and make it and know that it’s going to fit well. I’ve discovered, though, that I prefer the Nancy Raglan in French terry or sweatshirt knits. I don’t like it as well in slinkier knits.

This truly was an accomplishment for someone with my lousy spatial perception skills. I actually managed to draft my own pattern. What’s more, it fits. I’ve got a stack of knit fabric and now I have confidence that I can turn that fabric into some great additions to my wardrobe. I spent most of yesterday on this project, but more than half of that was on drafting. This top could be put together, start to finish, in just a couple of hours.

I told the husband that I’m seriously considering jeans next. Joanna Lundstrom, who wrote a great coverstitch machine guide, just published a book on making jeans. I’d be thrilled to have four or five pairs of high-waisted, 100% cotton, boot cut jeans. We’ll see.

Oops, I Did it Again

I made Yet Another Candy Coated Quilt, or at least most of one:

WhiteCandyCoated2.jpg

This is what happens when I get into cleanup mode in the sewing room. I started putting together the rows I’d made and realized I was close to a finished top, so I kept going. I’ve got another hour or two of work left.

I also matched up the stack of quilt tops with backings. Some day when I have nothing else on the schedule, I’ll pin baste each of them with batting and roll them up to be quilted. I’ve got four of them ready to go—five, if I add in this Candy Coated. I am not counting the Noon and Night quilt, because we’re going to do that one on Tera’s longarm.

I am still kicking around the idea of getting a sitdown longarm machine. I don’t want to devote the space required to a frame system. As I said to the husband, though, every time I clear one bottleneck, another one appears. I bought a Studio die cutter so I could cut fabric faster, but now I make more quilt tops. More quilt tops means I need a way to quilt them faster.

He nodded and said, “Yes, that’s how it goes.” (He is no help at all.)

I am going to go talk to the owner of one of the quilt stores next week and see what my options are. The quilt store in Spokane where we took the collage class sells Juki machines. I love my Juki sergers, but with these indefinite lockdowns, I am reluctant to buy a machine there in case I need service on it. I won’t use the Juki dealer here. Right now, the HandiQuilter Sweet Sixteen looks like the best choice, but I am still researching.

Now that the sewing area is cleaned up, I can make a priority list of projects without getting distracted—in theory, anyway.

**************************************************

I canned the rest of the beef broth the other day, for a total of 23 quarts. The canning supplies will go back into storage now, only to be brought out if we run out of canned beans. Everything else is done.

I am still waiting for the rest of my lettuce-growing supplies to arrive. I have the net pots and the lights, but not the totes. We continue to have issues with our mail delivery here, and I may have to pick up the box of totes at the post office. I wish Amazon would just ship via UPS or FedEx. They are far more reliable.

**************************************************

I was a participant in a very interesting chat Thursday morning in one of the liberty-leaning groups I belong to. The topic was politics and religion—a third rail if ever there was one—but it went on for over an hour, and afterward, everyone agreed that it had been enlightening and enjoyable. People shared a wide variety of opinions. No one got offended or started slinging insults or calling names. I find it sad that a discussion like that is so rare nowadays that it requires me to remark on it. I also think that those are the only kinds of groups left where civil discussion can take place, because they hold as a fundamental principle, “Don’t tell other people what to do or how to live their lives.” Telling other people what to do or how to live their lives seems to have become the favorite pastime of many Americans these days.

I’ve decided that I am a digital extrovert, which is a new term I have come up with for myself. I am fairly introverted. Being around people in real life is terribly draining for me. However, I do tend to interact quite a bit with others online. I think the difference is that online, I can get up and walk away when I have had enough. Being without the internet for a few days was hard for me because I was missing those online interactions. And I have some really interesting online friends.

Noon and Night Makes an Appearance

I’ve reached that point in the season where I begin panicking because I realize it’s time to make Christmas presents. I’d prefer to start panicking, say, in August, but that’s usually right smack in the middle of canning season. Part of the issue is my desire to gift handmade items. The number of people on my list divided by hours in the day is a math problem with no solution. (I do have some breathing room this year because some people are getting wedding prints and albums.) Still, Thanksgiving is only a week away and Christmas rushes up right after that. I need to look at and rearrange the sewing to-do list this weekend.

The apron order is done. The Noon and Night quilt has been sashed and bordered. This is how it looked before I put the borders on:

NoonAndNightUnbordered.jpg

I am quite tickled with it. I like the size, I like the overall look, and now I can move forward with writing the rest of the pattern.

I also need to address the backing fabric and batting. Tera and I talked about doing a combo of two different kinds of batts to help make the stitching pop. I have a black batt that will be placed just underneath the front. If I used a white batt there, I’d run the risk of “bearding,” or having the white fibers come through the stitching and show. That won’t be an issue on the backing, though, and I can have a second, white batt of either wool or polyester against that fabric.

I’ve had an ongoing issue with storing cones of thread. I prefer to keep my thread in boxes because the house gets so dusty. About a year ago, I picked up some great plastic storage bins at Hobby Lobby that were perfect for my serger and quilting thread cones. When the pandemic hit, they disappeared and I haven’t seen them since, despite checking at every Hobby Lobby between here and Seattle. The regular thread storage containers are back in stock. I finally broke down and bought a couple of these ArtBin boxes (6990SO):

SuperSatchel.jpg

and paired them with these inserts (6901AB):

ThreadTray.jpg

I’m using the ArtBin boxes to hold my quilting thread and the Hobby Lobby ones for my serger thread. The ArtBin ones are much bigger, although they have handles and the Hobby Lobby ones don’t.

It’s time to start cutting out some tops, too. I want to get all the cutting done at once so I can assembly line pieces through the serger and the coverstitch without having to change threads too many times. I don’t care if my thread matches the fabric exactly, but it has to be reasonably close.

Accuquilt released a new die this week. It is so cute!

GnomeDie.jpg

I have no idea what I would do with it, other than to appliqué gnomes all over everything.

I’ve got one more batch of beef stock to run through the canner, and I still need to defrost the freezer in the old garage. I’m almost done with one prayer shawl—it will need fringed—and have knitted a third of another one. At some point, I’ll get back to embroidering squash.