My Coat Class with Ryliss
When I took my first class with Ryliss last November, she showed me several variations of a coat pattern she had designed. I loved the style and thought that making her pattern with her guidance would be a good introduction to a type of sewing I hadn’t done before. I was able to schedule a one-day coat class the day before my trouser class, so on Thursday morning, I met Ryliss at the Sewing and Design School at 9:30.
I had bought some coating fabric, but Ryliss suggested that the first iteration should be using something a bit less special. We looked through her collection of coat fabrics. Ryliss travels to New York’s garment district at least once a year and has amassed a stack of gorgeous wools and other coating fabrics. I chose a blue-and-gray plaid—which actually came from Pacific Fabrics in Seattle—because I liked the colors and because I have not yet worked with plaids. They require a bit of finesse in matching the pattern.
This is the line art for the coat:
You’ll notice that it has princess seams (the diagonal body seams). Princess seams and plaids don’t mix, so the first adjustment we made was to remove those seamlines and cut the fronts of the coat in one piece, which we did by sliding pattern pieces and taping them in place.
Ryliss demonstrated how she lays out the pattern pieces on plaid fabrics and cuts them. We cut each piece in a single layer so we could make sure the pattern matched at key points. The only length adjustment we made was to the sleeves. By far, the trickiest part of assembling the coat was the hood, which is cut in one piece with the body. Sewing it to the collar of the coat requires some wrestling as it is an inside curve being sewn to an outside curve. I finished all the seams on the serger.
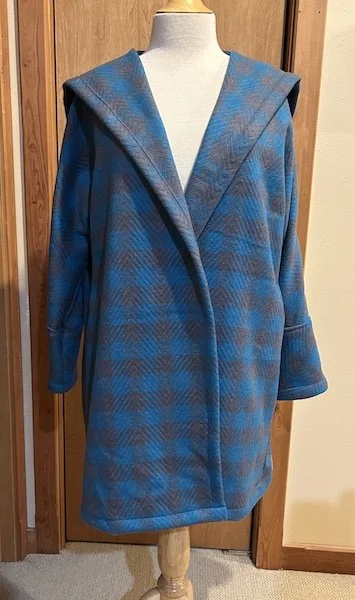
By the end of class, I had a coat:
It hangs funny on the dress form because the dress form doesn’t fill it out as a human body would, but you get the idea. (It also needs a good steaming.) I still need to do the buttonholes. I haven’t decided if I will tackle those myself or send them out to be done. Apparently there are places that do nothing but make buttonholes on fancy computerized buttonhole machines. Who knew? I probably will add some bias-cut patch pockets to the fronts as well.
The cuffs look great cut on the bias:
For my first coat and my first experience working with wool, I am very happy. I want to try the pattern as originally designed, with princess seams, but probably not this winter. And I have some other plans for that green coating fabric.
*******
Yesterday was a catch-up day. I spent the morning on paperwork and laundry and tidying up the house. After lunch, I re-traced my pant sloper onto some Pellon Easy-Pattern, which is a bit sturdier than paper. Eventually, I’ll make a plastic or oaktag version.
I also traced the Ramona skirt pattern from Tilly and the Buttons. This is a simple pencil skirt with an invisible zipper. I’ve got some dark green stretch corduroy and pink stretch corduroy earmarked for this pattern once I run up a muslin to check the fit.
I put a border on the baby quilt; I just need to add the second border and that top will be ready to baste and quilt. And I finished binding the Christmas quilt/table topper. Moving right along.


