Tiny Little Squares

I do not, as a rule, make little quilt blocks. If that is your jam, you have my undying admiration.

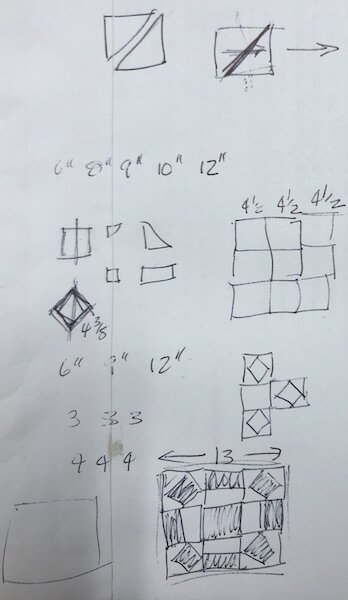
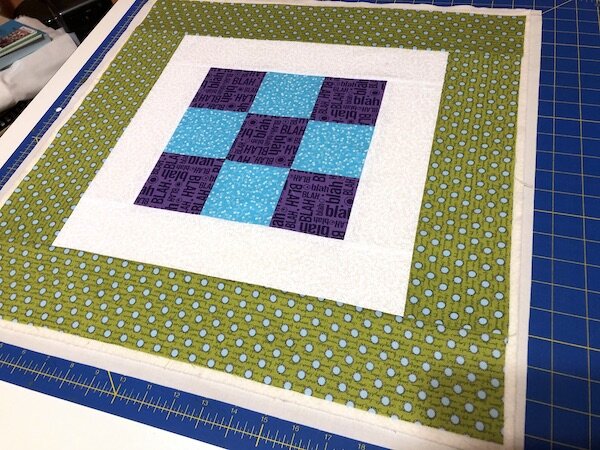
However, because I was dying of curiosity, I made a 6” Broken Wheel Block. (This website has cutting instructions for this block in seven sizes from 5” to 15”.)

TinyBrokenWheel.jpg

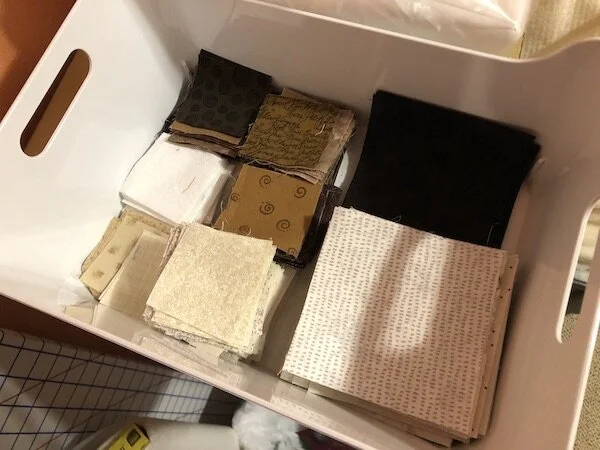
My goodness, that’s tiny. I should have put a quarter down for comparison. To give you an idea of what’s involved, the square in a square blocks are made by sewing 1-1/2” squares of fabric into the corners of 2-1/2” squares. I pulled the smallest scraps out of my scrap bag to make this block. It felt good to use them up, but I don’t know that I could make an entire quilt of 6” blocks.

I am doing something with the bigger Broken Wheel blocks, but that one is going to stay under wraps for a bit longer. That new design has gone quickly—in part, I think, because I had a ready-cut supply of 5” and 2-1/2” squares in my scrap bins. And what I haven’t had at hand, I’ve been able to cut quickly with the Studio cutter. The design also lends itself well to chain piecing, which also speeds up the process.

I truly do love scrap quilts. Every block is magical because it is unique. And I love how all the different elements come together to paint an overall picture. I see something new every time I look at it.

One of the best pieces of advice I got as a new quilter came from a woman who worked at the quilt store north of town. She said that if I liked it—the design, the fabric, the quilt itself—that was enough. Funny how we sometimes seek permission to rely on what we already know. Bonnie Hunter mentioned this the other day in a blog post. She said that long ago, someone told her that she should only use small amounts of yellow in a quilt. Bonnie realized later that the admonition came from someone who probably didn’t like the color. Bonnie now uses it with abandon.

I am going to make the kinds of quilts I like. No doubt they will contain a lot of “scraps.”

***************************************************

I brought a basted quilt top down to my office and put it on the table next to the Q20. I thought I might work on it here and there this week when I get tired of writing patterns.

FramedQuilt.jpg

This is a top I finished just about a year ago, after my MIL went into hospice and the family had gathered in Maryland. A few weeks ago, I added a narrow white inner border and a wider, outer navy blue border, then basted it with batting and backing. I think it will be a good quilt to practice more rulerwork on. When it’s finished, this one likely will get donated to a relief sale.

Approaching the Finish Line

Finishing Noon and NIght—The Quilt—is not the end of that project. Finishing Noon and Night—The Pattern—is the end of that project. I’d say the pattern is about 85% complete, but it’s that last 15% that seems to take forever as it involves chasing down all the details. Right now, finishing the pattern is the only item on my to-do list for next week.

I finished and bound off a prayer shawl last night while the husband and I were watching the latest Unloose the Goose episode on YouTube. The shawl still needs fringe, which I’ll probably attach tonight so I can take the shawl to church with me tomorrow. We keep 3-4 shawls out on a quilt rack in the foyer so that anyone who needs one can take one, and the rest are in a storage bin in the sewing room. I also picked up more Lion Brand Homespun at Joann’s yesterday. I usually stock up this time of year because it’s on sale (it’s 40% off right now), but the stock has been limited for months now. (Some of it stays here at my house and some is kept at the church for the other knitters to take as needed.) I need four skeins for one shawl, but lately, Joanns has only had 2-3 skeins of each color in stock. I was able to find enough of a dark blue in the same dyelot. We try to keep good mix of bright- and somber-colored shawls on hand. The shawl I just finished was hot pink, so it’s time for something more sedate.

[I have another shawl on the needles, but it’s in the knitting bag I take to church so I can knit during the sermon. I work on that one until it gets too big and unwieldy and then bring it home to finish it here. That shawl gets replaced in the knitting bag with a new shawl. I like my system—it’s all about keeping stuff in the pipeline.]

I did a Costco run yesterday. I have been checking there for Mechanix work gloves. The husband watches a YouTube channel called Den of Tools with—I kid you not—some guy dressed up in a bear costume doing tool reviews. Sometimes, I also watch Den of Tools (and try not to giggle). The husband tells me that the guy who does Den of Tools lives in Bozeman. A few weeks ago, the Tool Bear mentioned that their Costco had Mechanix gloves for sale. I really like the Mechanix gloves when I can find them in my size, but our Costco hasn’t had any, in any size. They did, however, have these:

CostcoGloves.jpg

These are the same “gummy gloves” I bought at the quilt store last week. They are billed as gardening gloves and come 10 pair to a package for $9.99. I am going to keep a couple pair in here for quilting and put the rest in the greenhouse as I never seem to have enough gardening gloves. I was able to try these on at Costco. They only come in one size but they fit my hands nicely.

Given the problems we had last spring, I put my seed order in early. The seeds arrived this week:

Seeds2021.jpg

This will be filled out with the seeds I saved from the tomatoes last year. I plant the same things year after year, sticking to what I know will grow and produce well. Gardening here is enough of a tightrope walk that I don’t need to add to the uncertainty by experimenting with anything unusual.

Cathy texted me the other night to tell me that the meat processor we both use—she raises Dexter cattle—is closing. They called her to ask if she could move up a butchering date. Apparently, their building has been sold. (I wonder if that was a surprise to everyone involved except the seller and the buyer.) I’m hoping they can find another location, but just in case, I’ll need to start calling around to see if we can get on the schedule at a different processor. I am so unhappy about this. We really liked that processor. I am mostly annoyed at the federal government (which is nothing new) for making the barrier to entry so high that no one can come in and start a meat processing plant in an area that desperately needs one. But hey, a giant corporation will be happy to sell you meat raised in China.

More Wind, More Firewood

Earlier this week, I had my eye on a storm system, watching it come in off the Pacific, hammer Seattle, rip across the Cascades, and plow through Spokane before arriving in the Flathead Valley yesterday morning. This wasn’t a back-door cold front, so I wasn’t expecting the kind of windstorm that we got last March, but this storm was intense nonetheless. The weather station on top of Mount Aeneas, the high peak in the range just east of our house, recorded a gust of 101 mph yesterday.

The husband was called out early for trees down—around 5 a.m.—and the festivities continued to ramp up from there. We lost power around 9 a.m. after lines went down both north and south of us. The husband was on the fire call north of us for the downed power lines and described it as “carnage.” (He is not given to hyperbole.) County dispatch was swamped; some time in the middle of the day, they stopped toning out the rural fire departments for power line calls in favor of having them call in to get the next address on the list. The area north and west of Kalispell appears to have been hit the hardest, although damage extended across the whole valley.

We have a generator big enough to power the house and shop (keeping unnecessary lights and appliances off), so outages aren’t quite as painful for us. The internet was out, however, and cell coverage up here is spotty at best. There are three places in the house where I can pick up data, but even those spots aren’t that reliable. I was able to get some text messages out to the girls and to the neighbors.

I was in the living room, finishing the binding on Noon and Night (it’s done!) and the husband was in the kitchen eating lunch, when we heard a noise that sounded like someone driving a semi through the backyard. I leaped up and went to see what had happened:

TreeDown1.jpg

A tree next to the woodshed sheared off about 12 feet up. The butt end of it landed on one of the trailers.

Sigh.

The husband changed into his steel-toed boots and got out the chainsaw:

TreeDown2.jpg

Thankfully, the tree did not damage the trailer. He had it cleaned up within a few hours.

We kept the generator running all night. The husband got up every couple of hours to check on it and make sure it still had fuel. The electric co-op warned people not to expect to have power restored before the end of the day, but ours was back on by lunchtime today.

We’ve lived here the better part of three decades and I am sure that we didn’t used to have these kinds of windstorms, with this frequency. You’ll notice from the photos that we also don’t have a lot of snow. We’ve had quite a bit of precipitation, but it’s all been rain. (The husband is grateful.) We’ll see what February is like. And March is always fun.

***************************************************

Noon and Night is finished. I won’t post the big reveal shot until I have a chance to get a good photo. I think I’ll take it to church with me on Sunday; we have a couple of quilt hangers mounted on the walls in the fellowship hall where we display quilts from time to time. I will hang it on one of those and get a picture.

The husband is also working on the railing for the loft in the new shop—or as I like to refer to it, “The place where I’ll be able to hang quilts for photos.” He looked a bit baffled when I mentioned my excitement at having a railing there. I don’t think he was anticipating that particular use. Heh.

The new quilt design is coming together nicely. The blocks are fun to make.

***************************************************

I happened to run across Lisa Bongean’s YouTube channel the other day. She is the mastermind behind the Primitive Gatherings patterns and has been designing wool embroidery patterns and kits for over 20 years. She has a new book out (Martingale), and I was able to find a copy in town.

BongeanBook.jpg

Remember when I was complaining that embroidery patterns assumed a certain level of knowledge on the part of the stitcher, and how frustrated I was by that assumption? This was the book I needed. Lisa breaks it all down, step by step, with detailed explanations and beautiful close-up photos. I’ve already been through the book once and I feel so much more confident about what I am doing. And her YouTube videos are great, too. Yay.

Painter's Tape Sewing Hacks

I thought it might be helpful to have a visual of how I am using the tape guide to sew diagonal seams. I placed the painter’s tape so the left edge is aligned with the needle. I also drew a line at the quarter-inch mark because I needed to be able to see that mark for a straight seam on some other units.

TapeGuide1.jpg

And this is what it looks like when I am ready to sew a corner square to a larger square with a diagonal seam. The bottom point of the small square rides along the painter’s tape and gives me an accurate seam.

TapeGuide2.jpg

I do have to remove the tape to replace the bobbin, but that’s not a huge issue.

Some sewists go so far as to mark the actual bed of the machine with a line, using a permanent marker, but I won’t do that.

The next quilt top is coming along nicely. I was going to sew each set of units in one fell swoop—rather like how Bonnie Hunter structures her quiltalongs, where she has you sew one part before going on to the next—but I get too excited about seeing a completed quilt block. I have to make several blocks before I settle down enough to chain piece, and even then, I’ll only chain piece enough units for four or six blocks before I stop and assemble the blocks. I decided yesterday, though, that my system has the advantage of catching any problems before I get too far into assembly. One of my units was coming out a tad small and I had to make an adjustment. I was glad I caught that after I had made eight of those units, not after I had made 80.

I finished quilting the stars on Noon and Night yesterday afternoon. I am going to go over the top today with a fine-tooth comb to make sure I didn’t miss anything before I trim and bind it. I am rather hoping for a good dump of fresh snow with this next storm system (arriving today), because I think that a photo of a black quilt on a snow-white background would be lovely and dramatic.

****************************************************

January and February are tough months in Montana for a lot of people. I’ve noted an uptick in the number of suicide calls on the scanner recently. We heard a few days ago that someone who was an important influence in my kids’ lives when they were growing up committed suicide last week. And I found out this morning that someone else I know lost her father, a schizophrenic. He was unable to meet with his social worker during the pandemic and stopped taking his medication. Stories like these are why I get so angry with people demanding that everyone stay home during a pandemic “to help save a life.” (I get especially annoyed when I hear those kind of statements coming from people in cushy situations who don’t have to make any sacrifices.) The reality is that life is not black and white, and “saving a life” by forcing everyone to stay home involves the possibility that someone else will lose theirs from the despair of isolation or lack of access to medical care. There are always tradeoffs, and to pretend otherwise is disingenuous. We should be trying to find the middle road with the fewest impacts, not immediately defaulting to the most draconian solution possible because that makes some people more comfortable. I’ll say it again, louder this time for the people in the back: Life is risky. You can’t avoid dying. News flash.

I listened to the Farmish Kind of Life podcast yesterday on my way home from town. Amy, the host, noted that she’s been getting a lot of comments from people who are concerned that she’s not paying attention to what is happening in the US. She noted that there is a difference between “paying attention,” and “being consumed by.” I think a lot of people are missing that distinction. I have absolutely zero control over what is happening in Washington DC right now, so I am not going to spin myself up into a tizzy about it. You know what I do have control over? I have control over what is happening in my own life and my own community, and I have stuff to do. I have no idea what’s coming down the pike, and I don’t want to waste the time I have been given by spending it yelling into the void of social media. It’s interesting to me that the people in the homesteading community have no problem understanding that concept—almost as if we’re all too busy getting stuff done.

Quilting With Gummy Gloves

Just a reminder, I am moving all of the concrete-related content over to the husband’s website. I’ve set up a blog over there called Form and Pour—The Blog. And on both of our websites, I’ve set up a way for you to subscribe and have new blog posts sent directly to your e-mail inbox. Click on the Contact/Subscribe button in the navigation bar to find those signup forms. Your e-mail address (on either signup) will be stored in my Mailchimp account. I will not sell it or share it.

I’ll be making a few more updates to this website, too, but nothing that should affect the blog.

************************************************

When I machine quilt, I wear a pair of gloves that help me to grip the fabric. It sounds almost counterintuitive to wear something that decreases sensation when doing something that relies so heavily on one’s hands, but they really do help. I’ve been buying and using the Fons and Porter gloves because they are inexpensive and easy to find at Joanns, but they don’t last. I’ve had this problem with two pair already:

Machingers.jpg

Sometimes I have to remove safety pins—basting pins—from the quilt as I move it around. If they get caught in the knit of the gloves and I don’t realize it, they tear a hole which just continues to get bigger until the gloves are unusable. I also have to remove the gloves to thread the machine or do anything that requires very fine motor skills.

Angela Walters has been using some new gloves in her videos. She carries them in her online store. I thought they were intriguing because two of the fingers on each hand are cut out—the ring and pinky finger. I am not sure why those two are cut out and not the thumb and index finger. . .

The quilting store south of Kalispell just completed a big expansion project that doubled the floor space. They moved the classroom into the addition, which puts it clear on the other side of the building from the longarm machine. That solves what used to be a big problem: customers couldn’t rent time on the longarm machine if there was a class in session because of the noise. Moving the classroom opened up more space on the retail floor, too. Things were getting pretty cramped in there. I spent some time walking around the “new” store last week, getting familiar with the layout and looking at each section. I spotted a new kind of gloves on one of the display racks:

GummyGloves.jpg

The husband wears these kind of rubber-coated gloves every day. My kids long ago dubbed them “gummy gloves” and that’s still how I think of them Marianne, the store owner, suggested I cut off the tips of the thumb and index finger on each hand so I could thread my machine.

They are thicker than the gloves I’ve been using, but I don’t notice that much when I am quilting. And I doubt that I am going to rip any holes in these.

******************************************************

I cleaned the house yesterday morning and then spent a few hours sewing. I’ve switched to piecing on the Janome, not because I need the even-feed foot but because I wanted to use some blue painter’s tape as a seam guide. I am wary of putting anything on Vittorio that might damage the finish.

I don’t want to have to draw diagonal sewing lines on hundreds of small squares, so placing the blue painter’s tape on the bed of the machine gives me a guide for the bottom point of the seam. I might pick up a roll of the new Diagonal Seam Tape from Cluck Cluck Sew if I see it at one of the quilt stores, but the painter’s tape works well. I also looked at mounting a laser guide on top of the machine, but I still wouldn’t be able to use that on Vittorio because it relies on adhesive.

After some monkeying around to figure out how to organize the fabric pieces to feed most efficiently into my chain-piecing system, I was off and running. This new design incorporates two alternating blocks. I made two of each just to see if I liked how they looked. EQ8 is good at approximating how a design might look, but making it up in actual fabric reveals any unexpected interactions. So far, I am very happy with how this is coming together. It’s nothing amazing or spectacular, but not everything has to be a masterpiece to eclipse all others.

More Qube Thoughts

I’ve had my Accuquilt cutters for several years now. I started with a Go! cutter that I bought at Joann Fabrics back when they were still an Accuquilt retailer. I still have that cutter and still use it, but last year I bought myself an Accuquilt Studio cutter, a bigger, beefier model.

StudioCutter.jpg

I am glad I upgraded. The Studio cutter usually remains set up so I can process leftover fabric quickly and sort it into the scrap bins.

The dies are foam boards with steel blades embedded in them. As the dies go through the cutter, a couple of steel rollers compress the fabric against the blades and slice it into the appropriate shape(s). In the photo above, you can see my Go! die for cutting 2-1/2” squares. It is sitting on top of a white plastic adapter that allows me to use it in my Studio cutter.

The Go! dies can cut six layers of quilting cotton. The Studio dies can cut 10 layers. The Studio dies are also much bigger and can cut multiple shapes at once. I have a Go! die with two squares on it which can cut twelve 5” squares in one pass. The Studio 5” square cutter has eight squares on it and can cut eighty 5” squares in one pass.

The Accuquilt cutter is one of those tools that can do several different things. It has taken some time for me to figure out its best and most appropriate use in my system.

Appliqué: The cutters are fabulous for people who do a lot of appliqué. Fuse the fabric for the appliqué to some fusible webbing before running it through the cutter, and when the shape comes out, it’s all ready to be ironed to the base fabric.

Strip cutting: I can’t live without the strip dies, especially the larger Studio ones. I’ve got them in every increment from 1” to 3”. They slice up the long pieces of fabric that get trimmed off the edges of quilts before binding. And cutting binding strips, both straight grain and bias binding, is a snap.

Geometric shapes: I love the 2-1/2” square die, the 5” square, the tumblers, the triangles, and the rectangles. They gobble up all of my smaller, odd-shaped leftover pieces.

Quilt blocks: Accuquilt has something they call “Block on Board (BOB)” dies, which cut all the shapes for a single quilt block. Some of these are more useful to me than others. The Drunkard’s Path dies (3-1/2”, 4-1/2”, and 7” sizes) make short work of cutting curved pieces. I got the Cleopatra’s Fan die because I didn’t want to have to cut 10 different shapes for one block using templates. I usually cut other blocks, like Ohio Star, with a rotary cutter, for reasons I’ll talk about in a moment.

Miscellaneous dies: Accuquilt makes dies for bowl cozies, bibs, pincushions, stockings, and other items that people might want to make in quantity. These usually come with nice features, like darts already cut in, that speed up the sewing considerably.

Custom dies: If you want to make a block for which there isn’t a die, or you need some other custom shape, Accuquilt offers a custom die service. Tera has used this with great success. You send Accuquilt the sketch and measurements and they confirm them and make the die. I suspect a good number of the new dies they launch each year started out as custom dies. I did kick around the idea of getting a custom die for Noon and Night, but decided against it.

The reason that the Block on Board dies—with the exception of ones with odd shapes, like Cleopatra’s Fan—aren’t as useful to me has to do with my block construction style. There are two schools of thought about making quilt blocks. Some people prefer to cut pieces to the exact measurements and sew them together. Tera once took a class from a teacher who preferred this method to the point where she would soak the fabric pieces in liquid starch and let them dry before cutting. Other people prefer to cut pieces slightly larger and trim them down to the proper measurements. I don’t think one approach is better than the other; you need to know your preferred working style and also determine what technique is best for the situation at hand.

[There are no quilting police. Don’t let anyone tell you otherwise. Do what makes you happy and gives you the result you want.]

As I mentioned, there were two issues I ran into when thinking about writing a pattern that incorporated both conventional rotary cutting instructions and Qube cutting instructions. One was the difference in block sizes. The second was an issue I ran into with bias edges stretching.

When I write a pattern, I’m always, always, always trying (although sometimes I fail) to anticipate problems that might arise. I can’t assume that a quilter is going to know how to adjust to sewing with bias edges, and the last thing I want is for someone to be unhappy with the pattern (because then they will be unhappy with the designer). It’s a balancing act.

The Broken Wheel block uses a square-in-a-square unit. This is often constructed by sewing triangles to the sides of a square. The Qube system comes with the two dies needed to make the SiS units. One block cuts two triangles and one cuts a square on point, and the Qube block instructions specify to use these two dies to make the SiS units.

EconomyBlockDies.jpg

I am going to take a momentary side excursion into the technical weeds. Despite its name, the square on point die does not actually cut a square with the points aligned true to the lengthwise and crosswise grain. Any square can be placed “on point” within a unit or quilt block; truly cutting a square “on point” is going to result in all four sides being on the bias, which no one wants as it would wreak havoc with the piecing. When the Qube instructions refer to the square on point die, it means that this square will be placed on point within the unit or block. However, squares cut with this die could certainly be used in a situation where they aren’t on point, as long as they are the correct size. It’s a niggling detail, but one I thought was important to point out.

I cut some of each shape and started making SiS units. It is crucial to note that the long edge of the triangles—the side that gets sewn to the side of the square—is on a bias edge.

Bias edges stretch, requiring gentle handling and a good deal of starch. Despite knowing this and adjusting accordingly, I wasn’t happy with the way my SiS units were coming out. They had an annoying tendency to stretch in the middle of that triangle-to-square seam, even with starch, lightened foot pressure, and careful pressing (not ironing!), which resulted in a SiS unit that was slightly rounded. That made seaming the SiS units to other units problematic, and I didn’t have enough extra fabric at the edges to trim them to square.

[I will note that I was sewing on Vittorio, my vintage Necchi. I did not try piecing on my Janome with the even-feed piecing foot, which may have alleviated some of this problem. I prefer piecing on Vittorio, though.]

Fortunately, there is a different technique which yields a better (at least for me) result. Esther alluded to this in one of her comments on my previous Qube post. Instead of sewing an already-cut triangle unit to the side of the square, I sewed a smaller square diagonally to each corner of the larger square, trimmed it and pressed the triangle back. The result was a perfectly square block. By sewing that seam while the bias edge was still contained within the weave of both squares, I avoided the stretching problem. It does involve a bit of waste, but one could always save the little triangles that get trimmed off and make this quilt.

I know that was a long and convoluted trip through my thought processes, but I’d like to think that it makes for interesting reading. (And possibly helpful for anyone out there considering an Accuquilt cutter.)

**************************************************

I have reached the home stretch with Noon and Night. I have 12 blocks left to quilt and then it’s on to trimming and binding. I may leave that work for Monday as the house needs some attention and I have to start sorting paperwork for tax prep. I confess to making a big pile of it during the year because I hate filing. If I work on it in 20-minute chunks here and there, though, it is less overwhelming. And I might work on the next quilt project just for a change of scenery.

A Chicken Named Sue

I’ve been trying to stick to a schedule of posting no more than three days in a row, but I have a lot to talk about this week.

The Christmas fabric I ordered from an Etsy seller arrived Tuesday, so I washed and pressed it and finished the Christmas stockings yesterday. My brain feels much better now that I no longer have two unmatched stocking fronts lying around. I can box up my Christmas supplies and put them away until later in the year. I do need to replenish my supply of fusible fleece, however, and it’s on sale at Joanns this week.

This popped up in my YouTube feed. I watched it while I was sewing, and then the husband and I sat and watched it last night:

I thought it was entertaining, and I am curious to see what else this group does. These are three brothers whose family owns the store Sew Yeah Quilting in Las Vegas. Their dad makes an appearance in the last segment and he’s quite the character. Men have such a unique approach to sewing, LOL.

****************************************************

One of the chickens I hatched out last spring is lame. Its right leg sticks out at a weird angle. I have no idea how that happened or why I didn’t see it until it was almost grown.

Sweetie.jpg

I didn’t cull it last fall because it has a pleasant disposition and I felt sorry for it. I assumed it was a female. Despite the deformity, it appeared quite able to defend itself against the other chickens. Yesterday afternoon, I went out to the chicken coop. I scattered scratch grains in the chicken yard, and after all the chickens went out, I closed the door to the yard. I do this so I can give scratch grains to the lame chicken and it can eat in peace. (And also so I can collect eggs without a rooster following me around begging me to hand feed it scratch grains.) I went back out to retrieve the egg basket from the porch. As I was walking back to the coop, I heard a crowing noise coming from inside the coop. “How did one of the roosters get in?” I wondered. I went in and discovered the lame chicken standing in the middle of the coop, crowing its little heart out.

Is it a rooster? I’ll have to see if I can pick it up and examine it more closely. If it is a rooster, why did it wait so long to crow? If it’s a hen, why is it crowing? So many questions.

The husband says we should name it Sue.

****************************************************

I set up a blog page on the husband’s website yesterday. I’m calling it Form and Pour—The Blog. Any future posts about his concrete jobs are going to get posted over there. I still have to set up the e-mail subscription form, but you can bookmark the page for future reference. He’s scheduled to pour some foundation walls today and I have just happen to have an errand near that jobsite, so I hope to get some pictures and write the first blog post soon after that. Stay tuned.

****************************************************

I’ve been collecting pieces for a new quilt.

IkeaBoxScraps.jpg

I haven’t had to dip into remnants yet, because everything I’ve needed so far has been in my collection of scraps. There are various scrap management systems out there. Mine is to cut leftovers into 5” charm squares or into 3-1/2” tumblers—the tumbler box is getting full—and then into either 2-1/2’ squares or strips, depending on the shape of the leftover. I stack them by color family which makes it easy to go into the box and pull just the squares I need.

That plastic bin came from Ikea. I saw it on a trip to Ikea in Portland last February and didn’t buy it, adhering to my usual Ikea shopping strategy of not buying something the first time I see it. I picked up two of them on a subsequent trip to the Ikea in Seattle, and now I wish I had bought a few more. They are fabulous for holding and carrying things around my sewing rooms.

****************************************************

And finally, I have a new favorite wine, Apothic Inferno:

ApothicInferno.jpg

This combines two of my favorite things: red wine and whiskey. The wine is aged in whiskey barrels for 60 days, which layers the perfect amount of whiskey flavor—and it’s a good whiskey—on top. Apothic is one of the wines I buy regularly. I plan to stock up on this one as it’s a limited release.

Completed Bridge Abutments and Qubes

Just for the sake of completeness, here are the pictures of the bridge abutments after the forms were stripped. In this one, the lumber used to form the recess has not yet been removed:

Abutment1.jpg

This is after the lumber was removed:

Abutment2.jpg

And this is a shot of the completed abutments on either side of the creek.

Abutment3.jpg

If anyone has any further questions, let me know and I’ll pass them along to the contractor. He does have a website. I am kicking around the idea of putting up a blog page over there for these sorts of things, not that I need another blog to manage. If I do that, the posts would be irregular and less frequent, but I’d set it up so anyone interested could subscribe to updates via e-mail.

***************************************************

I’ve got 18 of the 42 Noon and Night stars quilted; if I do 12 a day, that’s two more days of work before I can trim and bind it. I may be able to stick to my original deadline. Or I may take a break for a day or two and work on some other projects. I’ll re-evaluate after breakfast.

The husband and I have a debriefing session every night when he gets home. Sometimes it’s over drinks, sometimes it’s while I am making dinner. In nice weather, it’s out on the veranda. This is the sketch I drew for him last night over drinks.

QubeSketch.jpg

I was trying to explain the Qube system to him. The sketch is more to help me present the information than to help him understand it, as he has no trouble picturing what I am describing in his head.

The Qube system works with the Accuquilt cutters. Each Qube is a collection of eight basic die shapes that can be used together to make 72 different quilt blocks. Currently, there are five Qube collections that create quilt blocks in 6”, 8”, 9”, 10”, and 12” finished sizes. Each Qube collection also has two add-on collections—Corners and Angles—with additional dies for making even more quilt blocks.

Some brilliant person figured out that each Qube collection—which makes quilt blocks based on a four-patch, or four-square grid—could also be used to make larger squares if the grid were expanded to a nine-patch. Thus, an 9” Qube can be used to make 13-1/2” quilt blocks (not 13”, as I had in my head for some reason), a 10” Qube can be used to make 15” quilt blocks, and a 12” Qube can be used to make 18” quilt blocks. That’s expandable even further, in theory, but eventually the blocks get too big.

I redeemed some credit card reward points to buy myself a 9” Qube system as I wasn’t sure how I was going to feel about using it. Why did I pick 9”? That was entirely a random decision. That size sounded good at the time.

If I am going to design something for publication, be it knitted or quilted, I will be thinking about the pattern writing process right from the very beginning, because the ease with which I can present information about how to make the thing is going to inform some of my design decisions. I may be fascinated by some esoteric technique and want to incorporate it into the design. However, if that technique requires two additional pattern pages and a lot of illustrations and explanations, I might discard it in favor of something less complicated.

When I began working on this new quilt design, I thought it would be great if I could write the pattern in such a way that it could be constructed conventionally with rotary cutting or with the use of the Qube. I soon found myself in the weeds. To explain why, I’ll use the Broken Wheel quilt block as an example. This was one of the two blocks I was playing with on Sunday:

BrokenWheel.jpg

This is a nine-patch grid. I can make each of the nine units using dies from the 9” Qube, but that will result in a finished quilt block measuring 13-1/2”.

For ease of cutting—because quilters do not like having to cut odd measurements such as 3-5/16”—directions for making the Broken Wheel block are generally given in 6”, 9”, and 12” finished sizes. That wouldn’t work in a quilt design using a 9” Qube because I’d have to write two simultaneous patterns, one for a 12” block and one for a 13-1/2” block.

[If you read that and said to yourself, “But it WILL work if you used a 6” or 8” Qube, because you would end up with a 9” or a 12” quilt block,” you may go to the head of the class. Good work.]

A 13-1/2” block is an oddity in the quilting world. If I were writing a pattern specifically to be used with the Qube, with no rotary cutting instructions included, it wouldn’t matter one bit to have an odd-sized block. I don’t think I would try to combine the two methods in one pattern. At most, I might include a notation along the lines of, “This block can also be constructed using (X size) Qube system, if you would prefer to construct it that way. Use the following dies: (die numbers).

There is one other issue that crops up when using Qubes, but I’ll address that in a different blog post.

Quilting Stars

I worked on Noon and Night for most of yesterday; I am not sure I will be able to pull marathon sessions like that very often as I don’t like to sit that much. I fell into a routine of quilting a star, then getting up to do something else for a few minutes before coming back to work on the next star.

From my practice blocks, I knew that I wanted to outline the star in black thread. I also liked the way the star looked when I quilted inside the larger, outer diamond, but I hadn’t decided on whether or how to do the outer star points. The Original Star quilt in the Fons and Porter book has a quilting diagram for hand quilting in which each separate star point unit is quilted 1/2” inside the seam. It’s a lot of quilting.

In the end, I compromised, quilting the diamond and inside each of the four star points. I treated the star points as one unit rather than two units.

StarQuilting.jpg

The star pops off the background nicely. I’m using a Signature 40wt color called Pearl on top and Aurifil 50wt black in the bobbin.

The only other place I might need to add some quilting is in the background sections between the stars. They are approximately 5” x 5” and that might be too large a space to leave unquilted. I don’t want the batting to bunch in those areas when the quilt is washed. The easiest solution would be to quilt a straight line through the middle of the sashing both vertically and horizontally, but I don’t want to ruin the overall look of the quilt. I could also quilt a small motif in those areas. I’ll finish the stars and re-evaluate (and also check the labels of the batting to see what the recommended maximum quilting distance is).

I feel like I am moving at a snail’s pace, but it’s forward progress and that’s what matters. I’ve also started working on a new quilt design, after an exhaustive search of Google images and Pinterest to see if anything like it has been done before. The design is based on one of the blocks I sewed up on Sunday. The other block has been set aside for now.

************************************************************

The last part of 2020 saw a proliferation of podcasts and YouTube channels. I’ve added several podcasts to my listening schedule and let some go. One of the new podcasts I am enjoying very much is called Drinks With Ali. I know Ali from one of the homesteading groups we both belong to. She lives in Nova Scotia. She’s been podcasting three times a week and focuses on a different subject—mixed drinks, wines, etc.—on different days of the week. I like that she explores the background of different drinks as well as offering cocktail recipes and pairing ideas. She also has a lovely voice.

Living Free in Tennessee is probably the best podcast in the queue, bar none. Nicole Sauce has podcasting, homesteading, and community-building dialed in. She is also part of the Unloose the Goose crew, but those podcasts are Zoom recorded and posted to YouTube, so the husband and I save those for evening viewing. The Constructive Liberty Podcast, with Ken Eash, is another one I enjoy. Ken also belongs to one of the homesteading groups. I tease him that I call his podcast the “Church of Ken,” because he sounds very much like a preacher (in a good way). Each podcast is about 20 minutes long. I usually listen to them on the way to town, and they make me feel like I’ve just been to church and heard an inspiring sermon.

Peak Prosperity and the KunstlerCast drop on a less frequent and irregular basis, but the episodes are always worth waiting for. I still listen to Sewing Out Loud and Sewing with Threads. And C&T Publishing has a great podcast called Behind the Seams. I’ll also add in episodes recommended by the husband from podcasts he listens to.

************************************************************

The husband is off to check out a jobsite this morning to see if they can start forming a foundation. We’re getting a lot of precipitation—there is a string of systems coming in off the Pacific—but the temps so far have been in the 30s and the precipitation is in the form of rain. The longer-range forecast looks like we’re going to get hammered in February, which is to be expected.

A New Workweek

I got quite a few questions about the bridge abutment pour—here, on MeWe, and on Facebook. I am wholly unqualified to answer them. Several people wanted to know why there was lumber inside the concrete forms, and the husband says that that was done to form a recess for the steel bridge framework when the trestle is laid on the concrete supports. He does have a better picture of that on his phone showing the finished abutments, but he has an Android phone and I have a Mac, and getting pictures from his phone to my computer is a cumbersome and annoying process. (Thank you, Google.) I’ll try to include those in a future blog post, or at least try to be better about which pictures I choose so that they make a bit more sense. (I am as lost as some of you are, trust me.)

I thought the husband was going to be home for a while, but he tells me that one of the general contractors is digging a foundation for a house—it’s still relatively warm here—and they may be setting that up this week.

***********************************************

Changes are afoot in the sewing world. Barbara Emodi, a sewing educator who writes for Threads magazine, posted on her blog last week that she thinks something is going on with the Big Four pattern companies: Vogue, McCall’s, Butterick, and Simplicity. Her suspicions were driven by the lack of new designs for Fall/Winter. Some of her readers pointed out that the large printing house in Kansas which prints the tissue patterns for all four companies—as well as for many indie designers—lost their entire computer system in October due to malware. As Barbara noted, though, that wouldn’t have affected the Fall/Winter designs, which would have been printed much earlier in the year so they would be ready ahead of the season.

And then I happened to listen to Friday’s Sewing Out Loud podcast. The topic was grading between pattern sizes. A member of their Facebook group noted that KwikSew patterns are now coming with instructions NOT to grade between sizes, which makes no sense, and asked Zede and Mallory for their opinions. That led to a discussion about what is going on with the Big Four pattern companies, and a reference to a recent Craft Industry Alliance article. CSS Industries, which owned the Big Four, was sold to Design Group, a British company specializing in gift wrap and party supplies. CSS Industries is a public company and its stock seems to have been involved in some kind of hostile takeover attempt. (Oh, the intrigue!)

As Zede noted on the podcast, companies buy other companies for lots of reasons. Sometimes it’s to acquire valuable assets. Sometimes it’s to put competitors out of business by liquidating them. It sounds as if there was no huge rush to fix the malware problem at the printing facility, which begs the question of whether pattern printing is a priority for Design Group, the new owner of the Big Four. I also wonder if there is a misguided assumption by people sitting on corporate boards that no one sews anymore.

I will say that I think the Big Four pattern companies have been way out of touch with modern sewists for a number of years. They still seem to be drafting for body shapes of fifty years ago. The quality of the printing and instructions is very poor. Their inability to keep pace with the market opened up space for indie designers to step in and deliver what customers wanted. At this point, I’m only picking up reprints of vintage apron patterns.

***********************************************

I monkeyed around with blocks for another design while watching the Browns play the Steelers yesterday. The Browns pulled it out and made it into the playoffs.

[This is the first year in a long time that I haven’t ended the season saying, with forced cheerfulness, “There’s always next year!” I might be saying it next week when we play the Steelers again, but for now, I am going to celebrate a season where this team did better than anyone expected it to.]

My original idea—two alternating blocks—needs some tweaking. One of the blocks was an absolute monster to make, although less so after I started ironing the seams open. I don’t usually iron seams open because I was trained by Margaret to iron them to the side, but this is one of those instances when breaking the “rule” is necessary; the seams are too bulky otherwise. I am going to remove that block from the design, however.

I’ve got my second ruler work practice block put together, ready for whenever I have time to get back to that project:

RulerBlock2.jpg

This week, though, is devoted to finishing the quilting on Noon and Night.

Bridge Abutments

For the men in my audience—yes, I know that’s sexist, but it’s only ever the men who ask for more concrete pictures, so make of it what you will—here are pictures of the bridge abutment pour. Quilting content below the fold.

Wall framing:

AbutmentPour1.jpg

Wall framing from a different angle:

AbutmentPour2.jpg

Looking down into the wall framing:

AbutmentPour3.jpg

Another perspective on the wall framing. (Truly, it’s hard to write engaging content about concrete):

AbutmentPour4.jpg

A nice view of the small creek:

AbutmentPour5.jpg

The boom truck wasn’t available that day, so they brought the regular line pump:

AbutmentPour6.jpg

I am always amazed at the ability of these mixer drivers to get these trucks into all sorts of jobsites. I know where this job is and the husband keeps telling me not to try to drive up there.

AbutmentPour7.jpg

This is the bridge—an old railroad trestle—that is going to go over the creek. It will sit on those abutments that the husband constructed. The trestle is upside down in this picture, so you’ll have to imagine it flipped over.

AbutmentPour8.jpg

I asked the husband if he was going to do the foundation of the house that will be going in on this site, but he says he doesn’t think the homeowner has gotten that far in the planning yet.

*******************************************************

I took a break from working on Noon and Night yesterday. The quilting is going reasonably well, but it’s accompanied by a lot of me chanting, “Finished is better than perfect!” in my head. I also have to push down on the surface of the quilt to compress the wool batting enough to use the ruler, and that tires out my forearms after a while.

I was noodling around in EQ8 yesterday morning and came up with an intriguing quilt design, so instead of quilting, I got out the 9” Qube, pulled some fabric from the stash, and started cutting. I might sew up a couple of test blocks today. I like where it’s headed so far.

If I do end up publishing more quilt designs, they will be scrap-focused for a couple of reasons. I discovered when I was a knitting designer that it was virtually impossible for me to stay ahead of the “new and exciting” yarn releases. Some of that was due to being in the backwaters of Montana. By the time I was able to get my hands on a line of yarn and make a sweater out of it, it was out of date. I could—and sometimes did—get comp yarn from manufacturers, but I was also conscious of not being beholden to any one company. I am not interested in playing those games with fabric. And if this pandemic taught me anything, it’s that I can’t rely on there being a consistent supply of black Kona.

I’ve also built up a large—my family says “huge”—stash of fabric over the past couple of years. I love being able to go through my bins of fabric and pull the ingredients for a quilt. (This is very similar to how I cook, interestingly.) And if I don’t have enough of something, that inspires me to be creative and come up with a solution.

Bonnie Hunter’s overall design style appeals to me, but I am not interested in making tiny little blocks or working with 1” pieces of fabric. Her quilt designs sometimes end up so busy that they make my head hurt. I like scrappy, but I want coherent scrappy.

As I said to the husband, it’s a matter of finding my lane and staying there. I will publish patterns for quilts that I like to make. They won’t appeal to everyone and that’s just fine.

Hello, 2021

I sat down this morning and made myself write out a to-do list for this year. If I don’t have a hard copy in front of me listing the tasks at hand, I am going to get distracted. This is a b̶a̶t̶t̶l̶e̶ balancing act between the two halves of my brain—prioritizing those things I want to finish while leaving space for creativity to happen.

Rather than post the line items, I’ll give a broad overview in each category:

Quilts: Charisma Horton, the designer whose embroidery retreat I attended in October 2019, had over 100 quilt designs published in the space of 18 months, many of them in magazines. She says that she just decided to start putting things out there to see what would happen. (She also has three longarm machines and a couple of people who quilt for her.) I am trying to adopt a “put it out there and see what happens” mindset instead of overanalyzing everything.

[Someone on Twitter posted an anecdote about a college professor in a creative field—pottery, maybe?—who divided his class in half. He told the first half of the class that they could submit everything they designed to be graded. The second half was told to pick the best piece and submit only that one to be graded. The quality of designs ended up being higher in the half of the class that submitted everything.]

I will start with Noon and Night, but I’ve already got two more designs made up in EQ8. I am eager to start working on one of them. During one particularly delusional moment, I thought my goal should be to release one quilt design a month. I’ve scaled that back to four patterns in 2021. I think that’s do-able. I would like for my designs to feature lesser-known blocks, as we all know the quilting world doesn’t need any more sawtooth star or log cabin quilt designs. Mine will also tend toward scrappier designs, for reasons I’ll talk about in future blog posts.

I expect that my machine quilting skills will expand, too, along the way. A week ago, I didn’t know how to quilt with rulers. Now I do.

Embroidery: I still feel like I am fumbling my way through this. Either I am not reading the right resources or they simply don’t exist, but every time I open a new embroidery pattern, I am struck by how much knowledge is assumed, especially when it comes to threads. (The last time I identified this kind of gap in the creative literature, it resulted in me writing a book on finishing knitted garments. I am not going down that road again.) I don’t think my assessment is far off base, as I am reminded of trying to source class materials for the basic wool embroidery class in Spokane a few years ago when all that was given in the class supply list was “A variety of threads and appropriate needles.”

I am currently working on a wool pincushion. I have an ambitious wallhanging started, barely. And after the embroidered squash debacle—abandoned for the moment—I treated myself to the “Urban Chicken” pattern by Three Sheep Studio. This is a substantial, comb-bound booklet with directions for making nine wool embroidery chickens. The instructions are detailed and the materials called for are ones I already have in my stash. I don’t have to hunt through Instagram posts to find the appropriate videos and stitch instructions. I am reserving that pattern as a treat for when I accomplish something big, like releasing Noon and Night.

Homesteading stuff: My goal was to have the Kratky system set up by the end of November. I am now a month behind. That needs to be done this week or next. Seeds and pigs need to be ordered. (The Baker Creek catalog arrived in the mail yesterday.) I need a master plan for the big garden this season which includes fixing the strawberry bed and establishing an herb garden out there. I need to figure out what to do with the old herb garden, which thwarted all of my attempts to eradicate it. That area might still become part of a bigger chicken yard. I have to investigate whether the Forest Service still sells larch seedlings, and if so, I will get some and plant them out in the woods where we lost all those trees. The basement is crying out to be cleaned and organized. I have a couple of sewing machines to work on. The husband and I probably also need to have our annual farm meeting and check in with each other.

Of course, I recognize that I had a plan for 2020, too, and that went out the window about halfway through January. I am going to be charitable and assume that the universe was trying to tell me that the timing wasn’t right for some of those goals.

I outlined half the stars on Noon and Night yesterday.

QuiltingNoonAndNight.jpg

I’ll do the other half today, and then figure out how I want to quilt the inside of them. I am trusting the process. It has worked out so far.

Goodbye, 2020

I did not get as far with the ruler work yesterday as I had hoped. When I sat down at the machine, I discovered that I had the wrong foot. Bernina, like many companies, wants you to use only their products, so they designed a proprietary foot system that looks nothing like the high- and low-shank feet more commonly used by other manufacturers. These feet are also insanely expensive. At some point, Bernina changed the design of the foot slightly. Even though none of my domestic machines are Berninas, I’ve run across enough Bernina accessories that I knew about difference in feet. One batch of machine accessories I purchased had over a dozen old-style Bernina feet, which I gave to my friend Susan because her beloved sewing machine is a Bernina Record from the 1970s.

I suspected that the store had given me the old-style #72 adjustable ruler foot instead of the new style #72 adjustable foot. I called the store and talked to one of the women there and she confirmed that there were two and I had probably gotten the wrong one, so I re-packaged the foot and headed back into town.

[At the same time, the husband was leaving to go back to the auto parts store, because he’s working on the backhoe and the store had sold him the wrong switch. Welcome to our world.]

The owner of the store was very apologetic and said she would mark the packages so that didn’t happen again. (The number on the old-style package is red and on the new-style package it is black, but otherwise, they were identical.) I came home, put the foot on, and prepared to quilt.

And then I got a thread jam in the bobbin area. I am not sure how it happened, but I stopped, cut the threads, cleared the jam (I thought), and rethreaded everything. At that point, though, the machine refused to move and flashed a picture of two gears on the screen. That’s it—a picture of two gears. I assumed it was an error message, so I looked at the troubleshooting section of the manual.

Nothing. No pictures, no description, nothing.

This is a machine with some fancy electronics under the hood. In these situations, turning off the machine and unplugging it will often reset the machine. I did that, turned the machine back on, and got a new (and terrifying) message:

Error: #2010 Maindrive sync failed! Restart Machine!

I tried again. Same message. Restarting the machine had no effect, despite the instructions to do so. This error message wasn’t in the manual, either. The needle would not move using the handwheel. I know better than to force something like that, so I left it.

I did a Google search on that error message. Nothing.

I checked the Bernina website. Nothing.

I called the store. They must have been busy because I was sent to voice mail. I left a message.

It occurred to me (finally) to search the Bernina Q Machines group on Facebook. Sure enough, there were a few posts from other people who had experienced the same problem. The fix—how hard would this be to put in the manual???—is to remove the bobbin and use the back handwheel (there is a back handwheel? yes there is, on the back side of the machine) to carefully turn the hook. I did that and a huge chunk of lint popped out. I brushed out the hook area again. I have been doing that regularly because this machine accumulates lint like nobody’s business, but I must have missed a spot. I also added a few drops of oil. This machine needs frequent oiling.

I turned the machine back on and breathed a sigh of relief when the home screen popped up. I had no further problems and was able to get the center of my practice square quilted. Then I had to make marks for the quilting on the inner border:

RulerWork1.jpg

That’s a disappearing ink pen—the ink fades out with water.

Of course, marks only work if you follow them. I did the first pass around the border as instructed, but didn’t realize until I was three-fourths of the way through the second pass that I wasn’t following the same path. Can you tell?

RulerWork2.jpg

I was supposed to go from border edge to the mark 1/2” from the border, not from border edge to border edge.

A mistake that is repeated over and over is thereinafter known as a “design element.”

I still have to do the outer border on this block, but at that point, it was late in the afternoon and I decided that I had earned my glass of wine.

The marks did fade out after spritzing with the water bottle. I think I will spray baste the next block, because this one shifted more than I liked:

RulerWork3.jpg

By the end of this first session, I could feel the necessary motions settling into my brain. Instead of having both hands on the quilt, one hand has to be on the ruler to keep it in place. The trickiest part, by far, is eyeballing where to place the ruler. The ruler doesn’t indicate the stitching line—it cannot occupy the same space as the needle—so it has to be placed 1/4” from the stitching line. The edge of the ruler foot runs along the edge of the ruler. Quilters are ridiculously good at eyeballing a quarter inch, but even so, this was slow going at first. I also need to practice stitching in all directions. This is a small enough piece that I was able to turn it so that I was always stitching toward my body. I won’t be able to do that with a quilt. Toward the end of the inner border, I tried to practice keeping the block in the same position and stitching in different directions.

I think I am comfortable enough, though, that I can start quilting Noon and Night. The reason I got the adjustable ruler foot instead of the regular ruler foot is to accommodate the extra thickness of the two battings in that quilt.

*********************************************************

It’s only January, but we’re already making a to-do list for this spring. We decided that the husband needs a phone line out to the new shop. If he ever decides to run an auto repair business out of it, he’s going to need a separate number. He also needs internet access to work on electronic engine components. We could run things off the house, but I think a separate line makes more sense. I wish we had been thinking about that while we were building. Installing that has to wait, now, until the ground is soft enough for the husband to trench a line.

I am going to get my seed order in early this year. I saved a lot of seeds from last season’s crops, but still need a few things.

I want to call the woman who supplied us with piglets last year to make sure we get on her list for this year. We are on the calendar at the processor for the third week of October, so we’ll have to have piglets here no later than June 1 or so.

I hope I don’t have to hatch chicks again. That was fun but nervewracking.

I’ll talk about my sewing and quilting goals in the first couple of 2021 posts. I am still working on that list.

*********************************************************

The David Collum interview with Chris Martenson on Peak Prosperity has dropped. I know what I’ll be listening to this morning. See you next year. Stay safe.

Ready for Ruler Work

I have my first practice block put together for the ruler work lesson:

RulerBlock1.jpg

The fabric/color combo is one I pulled a few months ago thinking I might make a quilt with it (adding in a nice sunny yellow), but I decided to use it for this project, instead. That purple Blah Blah Blah fabric makes me laugh.

The block is huge—21” square, which almost makes it a wallhanging. The lesson overview indicates that each block can be made into a pillow or combined into a quilt at the end of the class. There are nine blocks, so either everyone I know is getting pillows for Christmas next year, or I’ll have another quilt to add to the donation pile.

I stopped by the quilt store and picked up the ruler foot and a set of five rulers for the Q20:

RulersAndFoot.jpg

The rulers have paper backing on them that needs to be peeled off. I went ahead and got the Bernina set because they are the ones used in the class.

Because I did my trip to Missoula on Monday and finished up 2020 paperwork and ran errands yesterday, the rest of this week will be devoted to learning how to quilt with these rulers. I also need to spend some time making a plan of attack for January.

***********************************************

Elysian and WS and I had our gift exchange yesterday afternoon. I am so proud of her! Last spring, she bought a gorgeous Singer 600 in a cabinet, with all the accessories, from the Habitat store. (The 600s were some of the last slant-shank Singers with all metal gears.) She and WS spent three weeks in December hunkered down in their sewing room making all the Christmas gifts for her family, including zipper pouches for her siblings out of clothing they had worn as kids. It sounds like those were a big hit.

I love handmade gifts. They gave me this coffee can onto which they decoupaged gardening-themed fabric.

FabricCan.jpg

I am going to put it out in the greenhouse to hold my hand tools. Inside the can was a batch of homemade fudge—I love fudge—and this darling vintage Simplicity charm, which is going to get hung near one of my machines.

SimplicityCharm.jpg

WS made a fleece neck warmer for the husband, who pronounced it very warm.

I got WS a Slinky and a gyroscope as two of his gifts, which seem to have been a good choice for an almost 7 year-old boy. I also got him a big container of Costco mixed nuts, which has become a tradition. The husband usually has a container of them sitting next to his chair, and the boys know they can help themselves when they’re here, but WS appreciates having one of his own.

Some Much-Needed Vitamin D

I went to Missoula yesterday. About halfway there, I drove out of the everlasting cloudbank into bright sunshine. I appreciate the sunroof in my car much more in the winter than the summer, and that flood of sunlight was most welcome. Traffic was light and the roads were good.

Joann Fabrics is on the south side of Missoula, so I went there first, intending to work my way back. The parking lot was empty. That was a bit odd. I am used to the store being crowded after Christmas when everyone is out looking for deals.

The purpose of this trip was to see if I could find enough of one specific fabric so I could finish a couple of Christmas stockings. You may remember that I accidentally cut two fronts instead of a front and a back, and not being able to complete that project is making my brain hurt. I checked Joann’s (basically useless) online inventory system before I left, which indicated that the Missoula store had 8 yards of that fabric in stock. Indeed, they did not. I looked all over the store for that bolt of fabric and never found it.

[Joann’s inventory system bears absolutely zero resemblance to reality. I wish they would scrap it and start over. The right technology exists, clearly, as the guy at Home Depot was able to scan the barcode on the empty shelf and locate a box of lights for me. How hard could it be to find a bolt of fabric?]

A bit dejected, I walked over to the remnant rack, which was actually two racks. Does no one in Missoula buy remnants? This was something of a bonanza. Remnants are normally priced at 50% off the current price of the yardage, whether that is full retail or a sale price. Occasionally—when the store wants to get rid of remnants—they will sell them at 75% off the current price of the fabric. Sure enough, there was a 75% off sign over the remnant rack. I loaded up on all the quilt cotton I could find, which included Kona (black!), some Christmas fabrics, and a chunk of Joann’s special “state pride” fabric. Joann’s released lines of fabrics for each state this year, and every time a bolt of the Montana fabric comes into the store in Kalispell, it disappears almost immediately.

Just about all of Joann’s cottons are currently on sale, so I got 75% off the sale price. The total for this haul? $13.78. After you purchase something, the cashier tells you how much you saved over what it would have cost at full retail. The young woman looked at my receipt and said, “You saved $77.70. Happy New Year!” I bought roughly six yards of fabric for the cost of one yard.

There is a quilt store in the little strip shopping center just behind Joanns, but when I walked over, I discovered that they are closed on Sunday and Monday. Oh, well.

[For those of you keeping score, I finally was able to find the fabric I need to finish those Christmas stockings. I came home and did a Google image search and found an Etsy seller with half a yard in stock, which is all I need.]

From Joann’s, I headed over to the quilt store on the east side of Missoula. This is only the second time I’ve been there as it’s not in a section of town with other stores. I bought a couple of packs of Schmetz chrome-coated quilting needles for the Q20.

My next stop was the used bookstore (Book Exchange) which always has a great selection of craft books. I picked up this gem:

QuiltBlocksBook.jpg

I am still trying to limit the number of quilt books I buy, but block books, like knitting stitch dictionaries, are raw material for designers. This book has the blocks nicely laid out in grid systems, which will be helpful when I need to draw something in EQ8. Of course, I looked to see if Noon and Night was in there. The more common Noon and Light block is included, but not not Noon and Night.

No trip to Missoula would be complete without a stop at Vicki’s Quilts, in the basement of the office building next to Rosauer’s grocery store. I didn’t buy anything on this visit, but I love to stop in there because it’s like an archeological quilt dig. She has bolts of fabrics from lines that have long been out of print.

On the way home, I stopped at the Amish store in St. Ignatius. When I drive into town, I always think of that July day a few years ago when Margaret and I took a trip to the Amish store. We stopped at the Old Timer’s Cafe, too, where I had a grilled cheese sandwich and Margaret had a huckleberry milkshake. I was greeted cheerfully by the older woman at the register when I walked in, and as she finished ringing up my purchases—chocolate-covered espresso beans for the husband and a big bag of ClearJel to replace what I used up this fall—she smiled and said, “I wish you a most blessed new year!”

What a much-needed benediction to 2020, for all of us.

*********************************************************

I am going to run into Kalispell this morning for chicken feed and to pick up my ruler foot. In a bit of serendipity, Bernina is offering a Rulerwork for Beginners series on their website. It is intended to help quilters become comfortable using rulers on their machines (including the Q20). Each lesson is done on a nine-patch block with borders. I’ve already pulled half a dozen fabrics and will get my blocks made up this week. I love small, discrete projects designed to teach a specific technique, so this is right up my alley.

Never Ask a Lady About the Size of Her Stash

Tera texted me the other day and asked if she could stop by after church on Sunday. She is taking an online Stitches class from Sarah Peasley in a few weeks (what fun!) and needed some Cascade 220. She arrived bearing a large bag containing many goodies.

She finished her octopus wallhanging from the collage class we took in November:

OctopusFinished.jpg

You can’t see on this picture, but she did layer a piece of tulle over the whole thing before she quilted it. If I do another collage, I definitely will add that to mine. You can also see that there is a big difference between a collage made from a kit as opposed to Janet’s fly-by-the-seat-of-your pants method. (Mine turned out fine; I just think hers looks a bit more coherent.) She is going to hang this by her fish tank.

She gifted me some free-motion quilting books!

QuiltingBooks.jpg

I need all the help I can get. Tera has been longarming for many years but remembers what it is like to start out. We also looked at my Noon and Night test blocks and discussed options for quilting them. I am glad I followed her advice to add the wool batt. The ruler foot I ordered has come in to the quilt store and I’ll pick it up this week.

In return, I gave her several skeins of Cascade 220 from my stash. I said to the husband after she left that she and I have reached the point where if either of us needs something, we check to see if it’s in the other person’s stash before we sally forth and buy it. I like to think that she and I are adequately prepared for any crafting emergency.

I am keeping an eye on class schedules at the quilt stores in Kalispell, Missoula and Spokane in hopes that the two of us will be able to attend some this spring.

The husband is home this week and the weather for the next couple of days is supposed to be nice—no snow, at least—so I am taking a road trip to Missoula today. I’m going to hit the fabric stores and the book stores and the Amish store in St. Ignatius.

*****************************************************

One of the traditions I look forward to at the end of every year is reading Dave Collum’s Year in Review report. Dave is the Betty R. Miller Professor of Chemistry at Cornell University—he’s no lightweight by any metric—and an astute observer of the world around us. This year’s Review clocked in at 200+ pages and is best consumed in small doses. For those who prefer the Cliffs Notes version, Dave also does an in-depth podcast review with Christ Martenson of Peak Prosperity, where the written review is posted. The podcast, reported to be 2.5 hours in length, has been recorded but not yet released.

I don’t think I’ll post much of a review of 2020 because it doesn’t need more press than it has already gotten. We lost my MIL, which was awful, but DD#1 got married, which was wonderful. The events of this year revealed the true nature of a lot of people in my circle of “friends.” (That’s not a positive, in case you were wondering.) Once again, I was reminded that how people behave is the best indicator of what they believe, even while they are telling you what they believe, and those two things might be very different. I continue to strive not to insulate myself in an echo chamber, although spending time with my tribe—both in person and online—has been a huge solace to my soul.

I am grateful for all of you, new readers and not-so-new readers, who check in on this soap opera of a blog a couple of times a week. I will strive to provide as much interesting content in 2021 as I possibly can.

Quiet Christmas 2020

We had a quiet Christmas. DD#2 flew here on Wednesday and left on a very early flight this morning as she has to work this afternoon. I was part of a group of eight or so in church on Christmas Eve to help lead the service; everyone else was on Zoom. We had video chats yesterday afternoon with my mother and sister in Cleveland—where they had 10” of fresh snow—and with DD#1 and her husband in Washington state.

DSIL’s mother gifted me an ELCA Lutheran Hymnal, spiral-bound accompanist edition:

ELCAHymnal.jpg

Oddly enough, even though I play for an ELCA congregation during Advent and Lent (except for this year, of course), I’ve never gotten my own copy. This is a most welcome addition to my hymnal collection!

DD#2 had asked me to make an apron for one of her coworkers with some Mickey Mouse fabric, so on my way to the airport on Wednesday, I stopped at Joanns and picked up two different Mickey fabrics and some red polka dot for lining and accent. I liked one of the fabrics better than the other and bought what was left on the bolt, which was a bit more than a yard. I started making up the apron on Thursday, but apparently, I cannot visit and work at the same time. After folding the pattern piece to make it a bit narrower, I somehow managed to cut it with the wrong edge on the fold. Ugh.

Even with the additional bit of yardage, I couldn’t make that fabric work. The repeat of the print was too large for me to piece what I needed. DD#2 pronounced the other Mickey print entirely suitable, so I made the apron out of that yard and made a cute dog bandana out of the print I originally wanted to use and it all worked out.

I sewed down the binding on the multicolored Candy Coated quilt:

CandyCoatedMulti.jpg

Noon and Night is up next, after which I’ve got a king size scrap quilt for our bed to do as well as two small lap quilts. One of the lap quilts is basted. I did that Tuesday afternoon, although I didn’t realize until the backing and batting were laid out on the floor that the quilt top still needed two borders. I was unwilling to leave that project half-basted, so I went stash diving and came up with fabric for a narrow inner border of white and an outer border of a navy blue leaf print. The navy blue print coordinated perfectly with the colors and the floral prints in the quilt. I had exactly enough and the top is ready for quilting.

I also stopped at the quilt store Wednesday afternoon and picked up a couple of cute embroidery patterns. I would like to get a stack of things lined up to work on when I don’t have quilts to bind. One is this Bluebird Pincushion pattern from Primitive Gatherings:

BluebirdPattern.jpg

I still do not have enough pincushions for all the machines I have.

The other is this Pig Heaven wall hanging by Crane Design, because why not?

PigHeaven.jpg

I’m in the process of putting my cutting room back together—I had to move the table out so DD#2 could sleep there—and then it’s full steam ahead. I have much to do in the next couple of weeks.

Clearing Out the Backlog of Quilt Tops

The cream/white Candy Coated is finished—quilted and bound (and difficult to photograph well on a gloomy and blustery December day):

FInishedWhiteCC.jpg

The husband always asks me, “Who is that for?” when I finish something. Sometimes I can tell him. Sometimes I can’t, because I don’t know. When he asked me that question Sunday night, I said, “The quilt is going to have to tell me who it’s for.”

The binding looks very dark in the picture, but it’s actually a medium gray that goes well with the gray and white toile print on the back. At 63” x 78”, the quilt is not huge, but it’s a nice size to snuggle under.

I’m so happy with the way this turned out. This quilt got me to thinking about those darned Squash Squad blocks again. I am trying to muster up the enthusiasm to revisit that project. I admire the business Sue Spargo has built up for herself, but something about a craft that is priced in such a way that only a small segment of people can afford to indulge in it really bothers me. (I can afford her threads; I choose not to spend that much money on them.) It is no secret that quilting is a billion-dollar industry overwhelmingly supported by middle-aged and older white women. I never liked yarn snobs when I was designing knits, either—those women who looked down their noses at knitters who bought yarn at Joann Fabrics and Michaels. I had a particular sweater that I would bring to all my cabling classes, where I would wax enthusiastically about how much I loved the yarn because it resembled my beloved Brunswick Germantown. And then I would reveal that it was Lion Brand Lion Wool, bought at Joann Fabrics. I would much rather someone knit with what is available to them than not knit at all.

I look at a quilt like this, made with scraps—scraps!—left over from other projects, and I am reminded again that expensive supplies aren’t necessary to create beautiful objects. So I should suck it up and get out those Squash Squad blocks and be creative with the supplies I have on hand.

I finished quilting a multi-colored Candy Coated on the Q20 yesterday. (Loops, of course.) It is ready for trimming and binding today, which will give me handwork for Christmas Day, when we traditionally sit around watch football and eat leftovers.

DD#2 texted me last night that it was snowing in Seattle; she has snow tires on her car so she shouldn’t have any trouble getting around. Snow tires in Seattle fall into the category of overkill, because it only snows once or twice a year there, but the only way in and out of the city in this direction is over mountain passes. I will happily sacrifice a set of snow tires to make sure that she can get home if she needs to, although she’s flying here for Christmas. When DD#1 was in graduate school in Spokane—which gets almost as much snow as we do—she was the designated carpool driver in bad weather because she had snow tires and knew how to drive in those conditions.

I’m going to wait until next week to start quilting Noon and Night. I also need to order more off-white thread from the store in Spokane, or figure out when I can make a trip to Washington state, because I went through almost a full cone of thread (3000 yards) on these last two quilts. It feels good to get through this backlog of quilt tops, but I am hoping we will be able to have Mennonite relief sales again in 2021 so I have a place to donate them.

Dopamine Hits and Christmas Gifts

I had an epiphany yesterday. Perhaps this is obvious to other people, but I needed to have it laid out for me. I ran across an article explaining that productivity—making to-do lists and crossing items off as they are completed—results in a dopamine hit similar to the kind that people get from “likes” on social media.

The day started by me saying to to the husband, “I need to look at my to-do list and figure out which of the 5000 items on it I am going to tackle today.” I spent an hour working on the Noon and Night pattern, making and adding in some graphics. Making graphics is my least favorite part of pattern writing, so having gotten that done was hugely satisfying. I then got out the practice squares to play around with the quilting. I wanted to see if I could quilt straight echo lines around the inside and outside of the stars without having a ruler foot and ruler.

I can, and they look reasonably good:

NoonAndNightPracticeQuilting.jpg

I did it by using the edge of the quilting foot of the Q20 as the guide. I don’t know when that ruler foot I ordered is going to come in, and I don’t want to hold up the pattern waiting for it.

My practice quilt sandwiches only have one layer of cotton batting and I thought they looked rather flat. Tera had suggested using two layers of batting—one cotton, one wool—in the quilt. I decided it was time to baste Noon and Night, as the backing has been hanging over the fence in the hallway for several weeks. I cleared a space on the bedroom floor, put on an Angela Walters YouTube video about backing, batting, and basting, and started layering the quilt.

Adding the wool batting absolutely is the right way to go. Combined with the outline stitching, it is going to add the depth I need to make the stars pop when they are quilted. I basted my last prototype square together with the same black cotton batting and layer of wool batting that are in the quilt, and I’ll use that to fine tune the tension before I start working on the quilt.

After lunch, I wanted to quilt. I’ve got four tops basted, including another Candy Coated, so I pulled out that one and started quilting loops. My goodness. Loops go much faster than paisleys. I worked for about two hours and got one half of the quilt finished. And after dinner, I sat and worked on the binding of the cream/white Candy Coated.

It was then that the realization hit me like a ton of bricks.

I am addicted to productivity in the same way that some people are addicted to Twitter. And no, I am not making light of addiction, before anyone leaps in to scold me. Any kind of addiction can become a negative in someone’s life, including that of being addicted to work. My days consist of me chasing down dopamine hits—not on social media, but on my to-do list. I think that’s mostly a positive thing, but I need to be careful not to let it get out of hand. And the husband is no help here, as he spent his day out in the new shop tackling his list of items needing attention. His only comment was, “There are worse problems to have.” We are two productive peas in a pod.

The latest Unloose the Goose podcast focused on mental health. I applaud them for taking on such an important topic, esepcially one that I think has been sorely neglected during this pandemic.

*********************************************************

I received some lovely Christmas gifts yesterday. Our neighbor, Theresa, stopped by with this beautiful basket she put together:

GiftBasket.jpg

She made the Christmas tree. It’s lovely! I am tickled by the mug with the truck, as our plow truck is red. The basket also contained all the ingredients for several luxurious cups of hot chocolate.

And Ali and her little guy stopped over with a jar of homemade muesli—which I am eating as I write this—some pretzels dipped in chocolate, and a bottle of whiskey (she knows me well!). The muesli is full of good things like pumpkin seeds, currants, walnuts, pecans, and shredded coconut.

I love our little community here on the corner.

The Quilt Says No

I discovered that the employees at Joann Fabrics are quite taken with WS. He had been there on Tuesday with his mom and then on Wednesday with me. I stopped there yesterday on my way to pick up a concrete saw blade for the husband. As I was perusing the remnant rack, the manager came over and asked me if WS knew how to sew. I explained that he was learning, and she proceeded to tell me how he came in with his mom and picked out his own fabric and paid for it with his own money, and they all thought he was the cutest kid ever.

[Even though Kalispell has grown quite a bit in the last decade, I get glimpses every so often of what it used to be like, when everyone at the store knew your name and the names of your friends.]

I think that WS and I need to work on building a punkin’ chucker this summer. We could position it in the garden to launch excess zucchini into the pig pasture. That’s a whole physics lesson, right there.

*********************************************

I made binding and attached it to the cream/white Candy Coated quilt, and that is my handwork for the next couple of evenings:

BindingCC.jpg

I also pulled out the prototype Noon and Night squares and made quilt sandwiches with them so I could test out thread and quilting patterns. I started with the smoky gray thread and straight diagonal lines, but even before I finished quilting the second line, the block was yelling “No!” at me. It did not like either the thread or the straight lines. I pulled out a different thread and plan to play around with some allover quilting designs this morning—probably loops, to start—but I am beginning to suspect that this quilt is only going to be happy with echo quilting in and around the blocks. There are times when it’s okay to compromise on design decisions for the sake of expediency. I don’t think this is one of them.

I am still aiming for a January release of this pattern. The release date might be January 31, but January is the goal. The bulk of the pattern is done; I need to add a few details and have some other eyes look it over.

And I whipped up a few more Christmas stockings, just to refine my version of the pattern and the assembly process in case I want to offer them as custom orders next year. I can get two stockings out of a half-yard of fabric (with another half-yard for the linings), but that is only if I remember to flip the pattern piece when cutting it out, as I am cutting on a single layer of fabric. I forgot to do that on one of the stockings, so now I have two fronts instead of a front and a back, and Joanns doesn’t have any more of that print. The store in Missoula still lists it as being in stock. If I get down there in the next couple of weeks, I might be able to snag what I need. If not, I could use a coordinating print for the back.

That leak in our bathroom seems to have stopped—how mysterious—but I am hoping the husband has that on his list of things to investigate today. I need to get ready for Christmas, too. DD#2 arrives Wednesday afternoon for a couple of days and she needs a place to sleep.