Introducing Noon and Night!

My first quilting pattern is available for sale in the Buttercup Made store!

NoonAndNightQuiltPhoto.jpg

The journey to this quilt pattern started in 2013 when my friend Vicki brought a quilt top to the ladies at our church to be finished. The design was scrappy multi-colored stars on a muslin background and had been pieced by her great-grandmother, Florence Aikey. Vicki had this to say about the quilt:

I believe many of the prints in her quilts were scraps from housedresses and clothes she made for my mother and her siblings when they were children in the '30s. I believe it was one of her first quilts because it remained as an unfinished top until the ladies at Mountain View Mennonite Church finished the quilting about 75 years later!! Nana went on to become a very accomplished quilter and finished dozens of them until she passed away in 1978.

For a few weeks, we had Vicki’s finished Noon and Night quilt hanging in our church’s fellowship hall. My friend Margaret and I—Margaret is one of the “quilting ladies” at our church and an avid quilt historian—stood there one Sunday looking at the quilt and trying to figure out the name of the block. She had never seen it before, and she’s looked at a lot of quilts over the years.

I went home and started researching. I went down lots of rabbit trails. As it turns out, that block is called “Noon and Night” and is attributed to Laura Wheeler (a fictitious designer of quilt blocks in the 1930s and 1940s). The block had been published in the Kansas City Star in the mid-1930s. Because it relied on templates for its construction, however, it fell out of favor in the era of rotary-cut, geometric quilt designs. About a year ago, I decided to see if I could design and write a set of instructions for cutting and piecing the quilt that didn’t rely on templates.

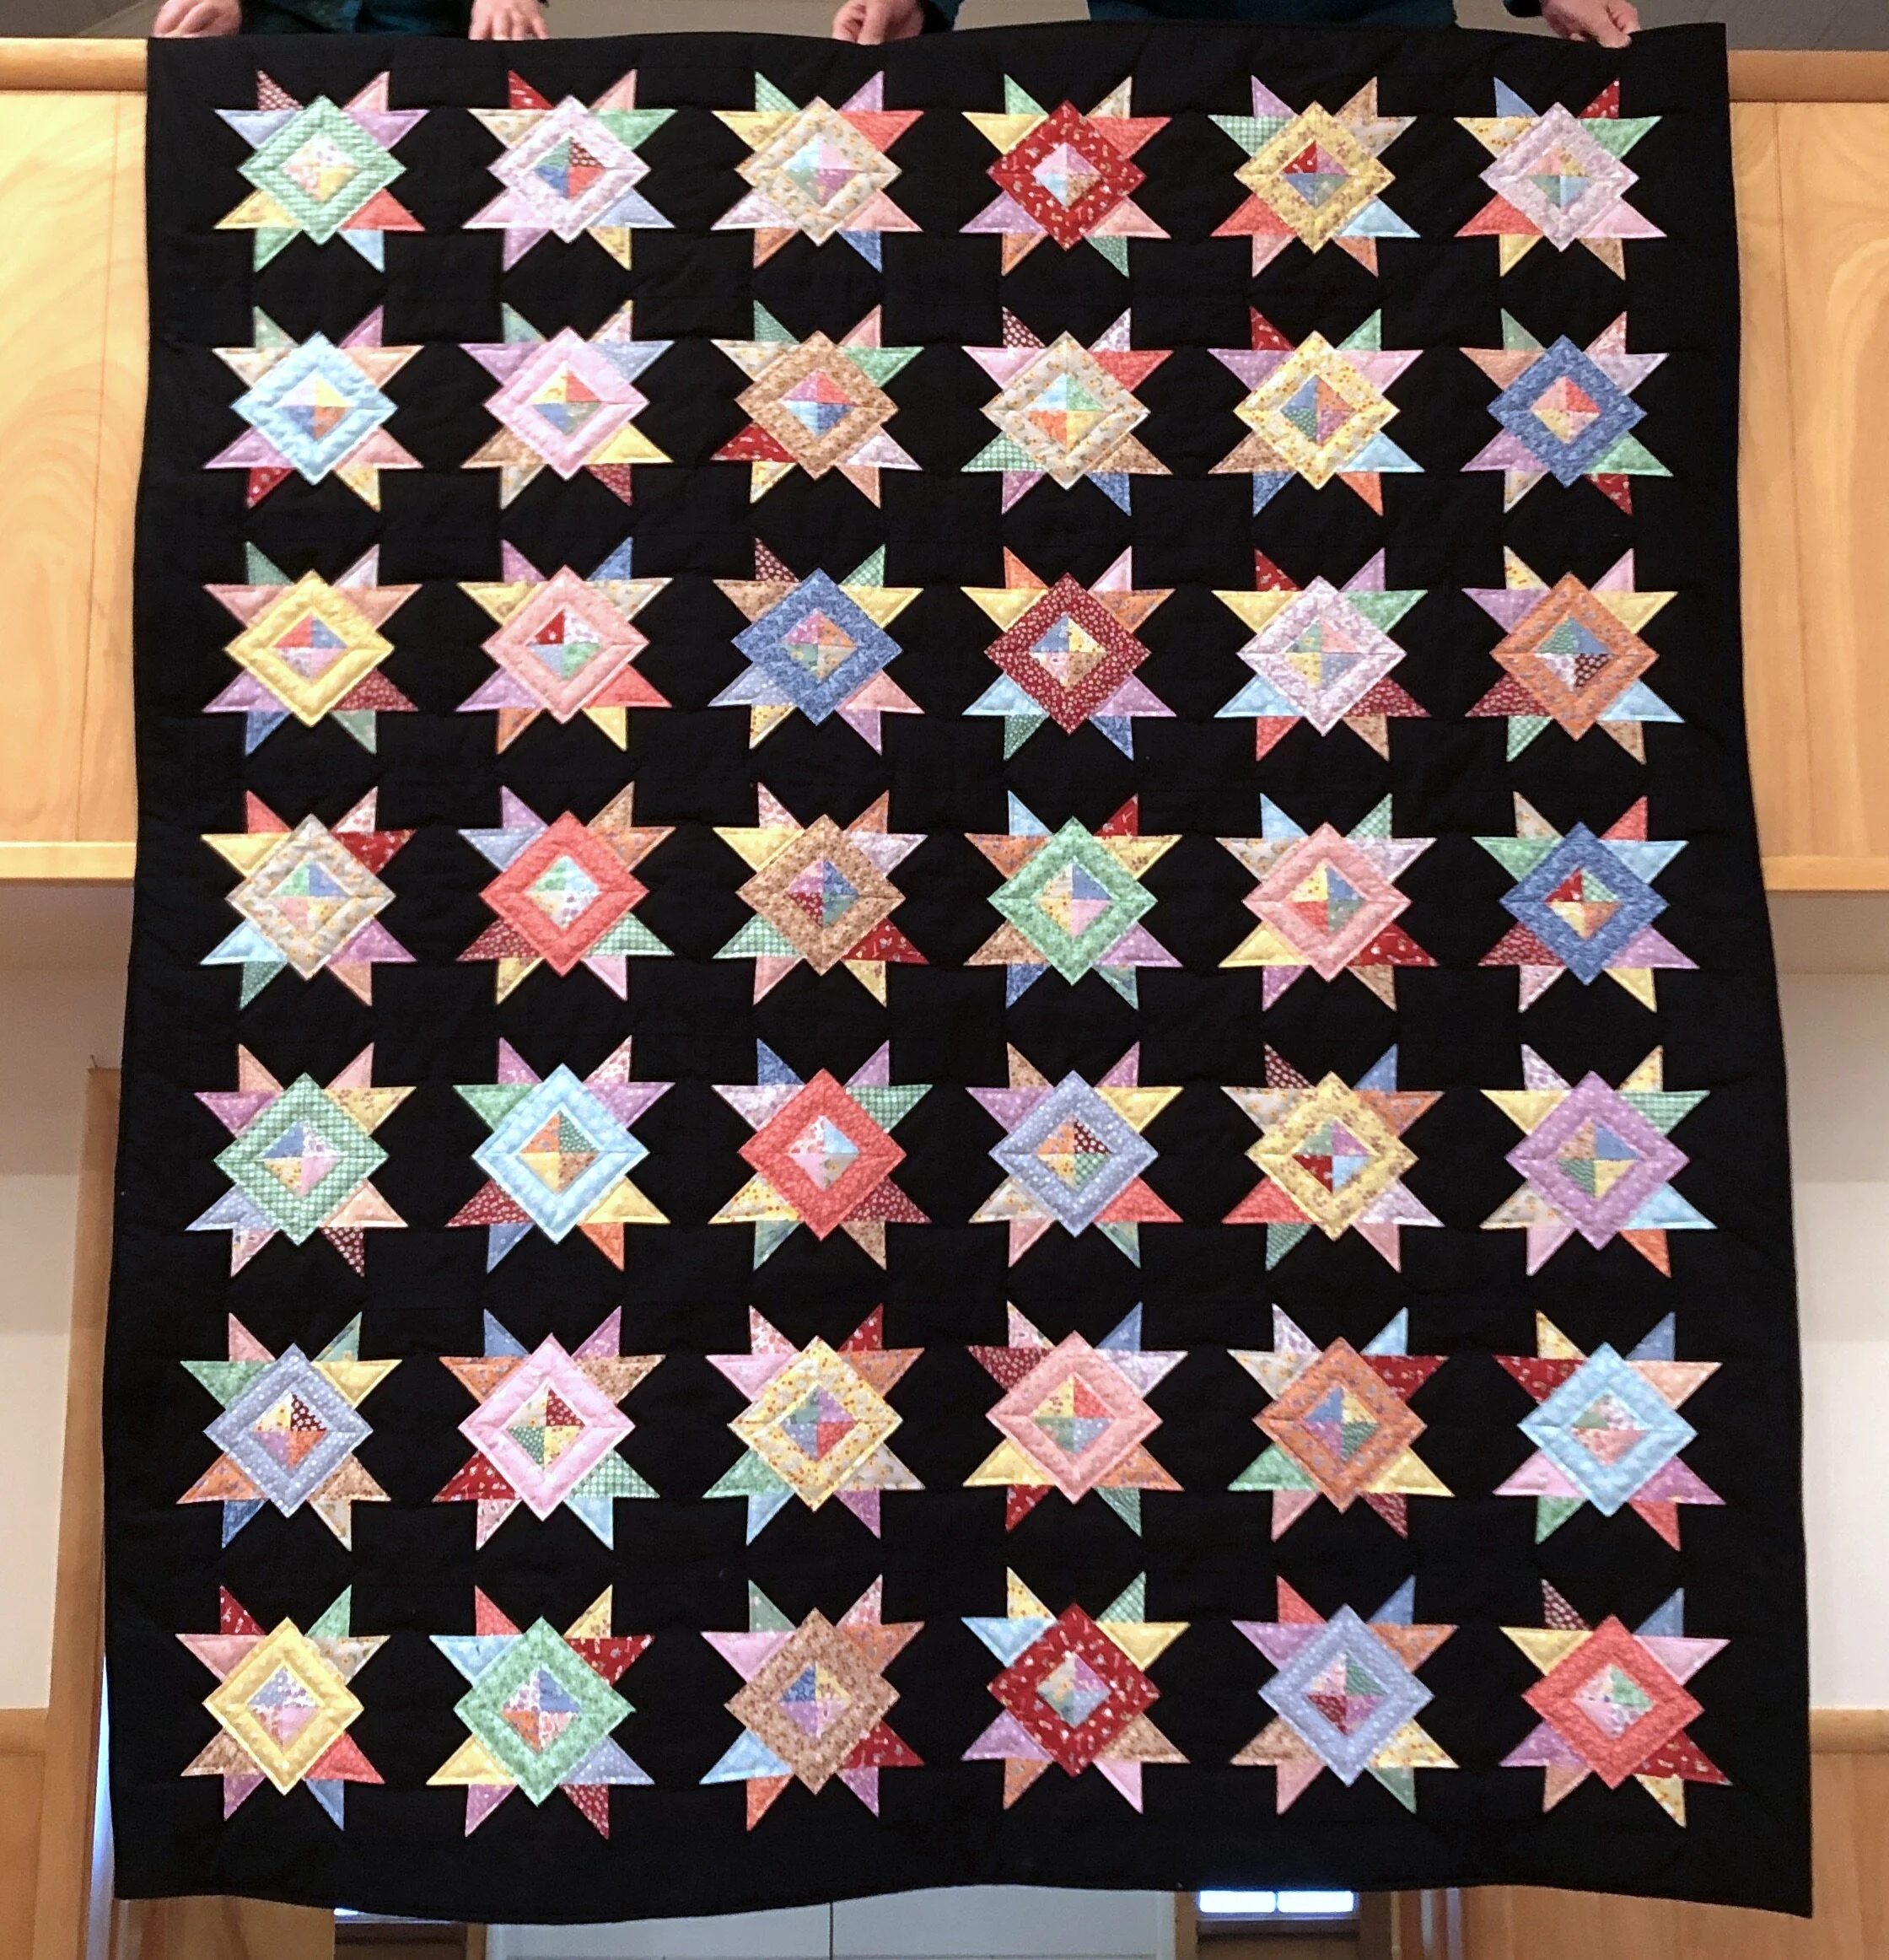
This quilt is the result. After much experimentation, I decided to re-create it in reproduction feedsack prints on a black cotton background. All the pieces are cut with a rotary cutter and ruler, and while the construction is a bit unorthodox, the stars come together beautifully in a 10” block. I chose to go “controlled scrappy” rather than use the original light-and-dark layout that gives the block its name. Each star has a center diamond composed of a single print. The other elements in the block are scrappy, in keeping with the quilts of the Depression era.

This has been a long and fascinating journey and now I get to share the results with other quilters. The regular price of the pattern is $10.00, but for the next week, it will be on sale for $8.00. The pattern includes instructions for making the quilt in four sizes from lap to queen. The design is scrap-friendly and fat-quarter friendly, and although it was inspired by a 1930s block and fabric, it looks great in modern prints as well. I hope you’ll enjoy making it as much as I did!

The Amazement Zone

I need to come up for air today and take care of some paperwork and errands. I spent most of yesterday working on the Big Top quilt. Designing something—be it a sweater or a quilt—is a process fraught with a rollercoaster of emotions: excitement at beginning something new, dismay when an idea doesn’t pan out as envisioned, a sense of accomplishment at overcoming an obstacle, and a bit of amazement when the whole thing comes together in the end. I was in the amazement zone yesterday and wanted to stay there as long as possible.

I’ve been watching a lot of podcasts/YouTube videos, especially A Quilting Life, which is the weekly podcast by Sherri McConnell of A Quilting Life and her daughter, Chelsi Stratton, of Chelsi Stratton Designs. I love to hear designers talk about how they design and how they sew. I am especially impressed by designers who have a vision and know how to get from that vision to a finished product because I tend to operate by the seat of my pants. I have never designed a quilt by figuring out exactly what I need, cutting all the pieces, and sewing all the blocks. With this Big Top quilt, I pulled out all my reproduction feed sack fabric and some background yardage and started by cutting enough pieces for enough blocks to determine if my idea was workable or not. When I ran out of one print, I switched to another. When I needed more pieces, I cut them. I put everything up on my design wall and moved units around. I did the same thing with Noon and Night and with Cobbles.

My way isn’t better or worse; it’s just what works for me. I think it’s also why I don’t like to design in EQ8. Would EQ8 have told me that the loud navy blue print became sedate and well-behaved when I paired it with a medium-blue floral? Nope. I had to move it around several times to figure out where it belonged (and then I added a bit more of it). The entire construction process for this quilt has evolved as well. The original quilt had one kind of block, which became another kind of block, which became two separate blocks dependent on a specific layout. And that, by extension, has dictated how I plan to present this pattern. CAD software is good for some things, but not for everything (or every designing style). Ask the husband some time about his experiences with architects’ foundation plans in the real world. He will tell you that 23’ 5/16” might be the measurement the computer spits out, but he can’t form that.

I am also thinking of this book:

HillardScraps.jpg

I like Stuart Hillard a lot—he has some great YouTube videos. The Amazon reviews for this book, however, seems to indicate that many of the designs were created virtually and never tested by making up a real quilt, and there are problems with the instructions as a result.

It is what it is. I am 55 years old and unlikely to change my ways now. I suspect that the reason so many designers design in EQ8 and stick to less complicated designs is because they are working with fabric companies and are required to produce two fabric lines a year with a dozen projects made from each line. That doesn’t leave a lot of time for experimentation.

Big Top isn’t going to be a huge quilt, just because I don’t really want to make any more blocks. After 80+ Drunkard’s Path units, I am really good at sewing curves. Really good. So good that I should probably design something else with curved piecing. For now, though, I need to add setting and corner triangles to what I have pieced so far, then put on a border or two and get it quilted.

BigTopAssembly.jpg

This is design #3 for 2021 for anyone keeping score. My goal was four designs for this year. At the rate I’m uncovering quilt blocks left and right in my research, I’ll have plenty of ideas to work with. I can’t believe some of them have never been used in a design, or at least designs that I can find with Pinterest or a Google image search.

Seeing Patterns

[I apologize in advance for the length of this blog post. I had a lot to cover and it got away from me.]

Human brains are wired to see patterns. It’s how we make sense of the world. What’s odd (and oddly fascinating) is that two people can look at exactly the same picture, collection of data, etc., and see vastly different patterns.

Speaking of brains, the universe is currently using mine as a playground. I should note that I like to spend about half an hour every night before bed looking at Pinterest. My theory is that doing so primes my subconscious to make all sorts of connections while I’m sleeping. When I get up in the morning, I spend another 30 minutes over coffee looking at Pinterest or Google image searches again. That’s when my brain is awake and ready to do some heavy lifting.

Thanks to Noon and Night, I am a bit obsessed with Laura Wheeler quilt patterns. Laura Wheeler is believed to be a fictitious character—much like Betty Crocker—whose quilt block designs appeared in publications in the US starting around 1933. Some Laura Wheeler blocks, like Cleopatra’s Fan, are popular enough that Accuquilt has made dies for them. Other Laura Wheeler blocks seem to have faded into oblivion. When Barbara Brackman writes about Laura Wheeler on her quilt history blog, Material Culture, her comments always seem to be tinged with a bit of exasperation. Many Laura Wheeler quilt blocks are overly complicated and designed in such a way that interesting secondary patterns would appear when the blocks were set together.

I wonder if the block in yesterday’s post was a Laura Wheeler block?

I purchased this wonderful book last year:

It’s a compilation of Laura Wheeler quilt blocks—just the block illustrations, no instructions—but Noon and Night is in there. The block from yesterday’s post is not, but Barbara Brackman notes that she thought she had found all of the Laura Wheeler/Alice Brooks quilt blocks and then several more surfaced.

I created a Pinterest board this morning to help me keep track of all this Laura Wheeler ephemera, and in my travels, I ran across this:

It appeared in the Burlington Free Press. (I didn’t crop the photo because the story of the opera costume designer that appears below the quilt is hilarious—see if you can zoom in enough to read it.) I looked at this clipping and thought, “What an attractive and easy quilt! I wonder if anyone has made that up? Look, the block is called ‘Beginner’s Choice,’ which makes sense as it appears to be on a 3 x 3 grid and comprised of squares and half-square triangles. And it only uses three fabrics! Definitely a win-win for a beginning quilter.”

I went and drew up the block in EQ8:

BeginnersChoiceBlockSmall.jpg

You’ll note that I only drew the 3 x 3 portion of the overall design, because it is this single block which rotates as it moves across the rows that creates the overall design.

The next thing I did was to search the web for a Laura Wheeler block called Beginner’s Choice. I did not see any blocks that looked like the one I drew, nor any finished quilts that looked like the one in the newspaper clipping, but I did find the Early Women Masters website with a block that looks like this:

beginners_choice_piecing.jpg

The note accompanying this piecing grid indicates that this block appears in Jinny Beyer’s Quilter’s Album of Patchwork Patterns, so I went and looked. Yes, it does, on page 145-12, where it is listed as being on a 6 x 6 grid.

BeginnersChoiceBeyer.jpg

I don’t know about you, but I wouldn’t describe a block of that complexity as “beginner” anything. Theoretically, I think this 6 x 6 block could also be made using nothing but half-square triangles and squares, but it’s those trapezoid pieces that are throwing things off. (And one of my quibbles with this book is the use of patterned “fabric” in the illustrations, because I think it unnecessarily muddles the waters when it comes to deconstructing blocks.)

So I am left with a puzzle. I think the block that appears in the newspaper clipping is simple enough that it is deserving of the name “Beginner’s Choice.” How did the “Beginner’s Choice” block that appears on the website and in the Beyer book end up being so complicated?

I went back to the American Legacy Quilt Index book and indeed, an illustration of Laura Wheeler’s “Beginner’s Choice” block appears there:

BeginnersChoiceLegacyPic.jpg

I suppose that one could look at this illustration and assume that those chisel-shaped pieces forming the center blades of the pinwheel had to have been cut out of one piece of fabric rather than being formed by a square next to a half-square triangle. If that was the case, one also could be forgiven for assuming that other parts of the block had to be equally odd-shaped. After all, if it had been designed by Laura Wheeler, it couldn’t have been simple, right?

I’m going to test my theory (when I find 24 more hours in the day) and make up a wallhanging using the block I drew in EQ8. I think that with a small-scale print, it’s not going to be noticeable if that chisel portion is made with two pieces of fabric rather than a single piece.

*******************************************

I did tie myself to my office chair this morning and worked on patterns and the website. Noon and Night will go up for sale some time this week, I think. I’m a bit stuck on what illustrations to add to the Cobbles pattern, so that one is on hold for the moment. The Cobbles quilt itself is bound and finished. I just need to get a photo. Hanging quilts off the loft railing in the new shop works really well—I tested that system over the weekend—but the lights are pretty bright in there and they tend to wash out the colors. I need to monkey around with only having one of the banks of lights on, I think.

Under the Big Top

I woke up yesterday intending to attack some cleaning projects, but I get going so early that my day is half over while most people are still drinking their coffee. I did three loads of laundry and cleaned two bathrooms—which included stripping them down and scrubbing everything, including the floors—and thought to myself that it must be past lunchtime. I looked at the clock.

It was 10:03.

Oh, joy! More time to sew. I had to laugh at myself, though.

I think I am ready to talk about the next quilt project. A couple of weeks ago, I was surfing Pinterest when this image popped up in my feed:

VintageCircleQuiltBlogPic.png

The link went to a sales site. This was a vintage quilt that had been sold from that site and was no longer available. A Google image search brought up lots of pretty quilts, but nothing else featuring this pattern. I was able to find the block in Jinny Beyer’s Quilter’s Album of Patchwork Patterns, listed under the nondescript name “Three Patch” and attributed to Alice Brooks, Detroit Free Press, May 20, 1937. It appears on page 311-1 of the book if you want to look at it.

Yes, the pattern is made up of three patches—three oddly-shaped patches obviously cut using templates. I stared at this quilt until I figured out that the pattern could also be made by shifting the area of the block to a different section of the quilt. By doing so, it would allow for rotary cutting and straightforward piecing. The key to the design, though, is the fact that the fabrics making up the half-square triangles in the corners of the original block are the same as one of the fabrics in the circle. Certainly, this could be made in a completely scrappy fashion with no thought as to how the fabrics fall in the finished quilt, but I think that the overall design is more attractive with that controlled fabric placement.

These kinds of patterns appear to be my lot in life, quilting-wise. Noon and Night was much like this. Why do these oddball blocks that have dropped out of favor keep popping up in my path? I love a challenge, but I can see why many designers stick with common blocks.

After some fits and starts with the Drunkard’s Path blocks—and getting a baby quilt out of the research process—I figured out a way to make this design. And it’s more than halfway complete, although I just have units up on the design wall, not completed blocks.

BigTopQuilt.jpg

I’ve got the construction figured out as well as (I think) a coherent way to present the pattern that relies on a formula for ensuring that fabrics end up where they are supposed to be. These are all leftover prints from Noon and Night on a background of Kona Snow. I’ve also been able to throw in some darker prints—navy blues and blacks—that I couldn’t use in Noon and Night because of the black background, although some of them, like that navy blue at the bottom, may just be too loud for the design.

So we’ll see. We’ll see where this one ends up. This has been a good mental exercise even if I don’t publish a pattern for it, and a finished quilt is always a bonus. And because this reminds me of a circus tent for some reason, the name of this one is Under the Big Top. That’s a bit more descriptive than “Three Patch,” don’t you think?

************************************************

I’m going to wait until later in the week to run errands as tomorrow is a holiday. I plan to spend the day finishing up the patten for Noon and Night, getting the pattern for Cobbles to a point where it can be tested and edited, and changing a few things on the website.

As much as I appreciated the speed with which the tech editor got Noon and Night edited and sent back to me, I don’t think I’m going to work with her in the future. Don’t get me wrong—she’s very good. I just don’t think that she’s a good fit as an editor for me. That is no one’s fault; it’s simply an acknowledgement that people have different philosophies. JC Briar and I had such a good working relationship for more than 10 years when she edited my knitting patterns that I am a bit spoiled. I am committed to having other sets of eyes on my patterns—and having my block instructions tested in real life, as I did for Noon and Night—but that process is going to look a bit different behind the scenes going forward.

************************************************

It looks like we’ll be out of this deep freeze soon, but the storm train keeps rolling on. DD#2 called yesterday to let us know that she hadn’t gone into work—she has snow tires on her car and knows how to drive in lousy conditions, but the road crews in Seattle just aren’t used to big snow events and were having trouble keeping the roads clear. I follow the WA DOT in my Twitter feed and got to see pictures from a 15-car pileup on I-90 at the bottom of Snoqualmie Pass in an area I’ve driven by dozens of times. (Sometimes it doesn’t matter how good a driver you are if the other people on the road don’t know what they’re doing.) I think we are supposed to get more snow this week. February is half over. I’ll need to start seeds in just another month or so.

February Deep Freeze

It was a balmy -20 (air temp) when I woke up this morning.

ColdTemps.jpg

Thankfully, this cold snap is supposed to be short-lived. The husband is keeping his fire gear in the kitchen so that it’s warm enough to get into should he have to go to a structure fire. We hope that doesn’t happen, as fighting fires in subzero temps comes with a whole set of additional issues beyond trying to save someone’s house. Pumps freeze up, engines won’t start, etc.

We are grateful to be warm inside.

I ran errands yesterday and didn’t get much sewing done. I did pick up a Creative Grids Circle Savvy Ruler, though. It took me a bit of searching to find it at the quilt store, not because their display is messy (it’s not), but because I was looking for something smaller and didn’t realize that the ruler is approximately 11” x 18”. I tried it out last night and it is going to make cutting go quickly. I think often about what Jenny Doan of Missouri Star Quilt Company says: You have to find the rulers that make sense to your brain.

Noon and Night is back from the tech editor and I am going through the suggested changes. That was definitely a worthwhile experience as it has helped me distill down my preferred approach to designing and writing patterns.

I am still a bit baffled by the fact that many of the very old, very cool quilt block designs that I run across in my internet travels have never made it into quilt designs. That gives me a lot to work with—I have a stack of ideas—but I wonder why we’ve been so quick to discard some of these blocks in favor of ones that lend themselves well to use with precuts. I know time is at a premium for many people, but as I’ve noted before in my role as a church pianist, the world doesn’t need Yet Another Arrangement of Amazing Grace.

Today will be devoted to finishing the quilting on Cobbles and getting that one bound. I would also like to give you some sneak peeks at the next quilt if I can get part of it assembled this weekend. Showing you one or two blocks won’t give you a sense of the overall design.

Finding My Groove

I am almost finished quilting Cobbles and Pebbles. I decided to quilt straight lines 1/4” from each seamline with beige thread on top and bottom. There is so much going on otherwise in this quilt; I didn’t want to add to the busy-ness with a complicated quilt design (which probably would have been loops, honestly). The straight lines looked good in both the large blocks and the small ones and I got in more practice with my ruler.

BRokenWheelLines.jpg

Let’s face it: custom quilting is just not my thing. I’ve always maintained that some people (me) love piecing and some people love quilting. Angela Walters pieces enough to get to the quilting. I quilt enough to finish the project, and as we all know, finished is better than perfect.

I laid this out on the floor of our bedroom to see how I liked the lines. At about three feet away, the lines disappear altogether. That’s another bonus, as far as I am concerned, because I want the overall design to shine here, not the quilting.

I am hoping to finish this today, bind it tomorrow, and sew the binding down over the weekend. I ended up not putting a border on, after all, but the binding is a chocolate brown print that I think will frame the quilt nicely.

********************************************************

The new quilt design is coming together despite hitting another small speed bump in the construction that is going to affect how I write the pattern. I plan to treat it as a “quilter’s choice” situation: I will write the pattern with instructions for replicating what I did as well as for a more random layout that will be just as attractive but not require a design wall and an engineering degree. (I could have gone with the more random layout, too, but I wanted to stay as faithful to the inspiration block as possible.) The blocks are on point. I have no idea how I am going to deal with the sides yet—plain setting triangles or something else?—but we will find out when I get there. The photo of the original quilt shows only a portion of it, not the entire quilt. However, this design has been very specific about what it wants thus far and I don’t expect that to change.

********************************************************

We had a video chat with the kids yesterday and got caught up on all the moving plans. The have a target arrival date in Ketchikan of March 7. There is a lot to do between now and then, but they are excited to be on their way. Yay!

Elysian is having problems with her internet service, so she asked if WS could come over yesterday afternoon for one of his classes. She is homeschooling him and signed him up for a series of seminars presented by the Field Museum in Chicago. Yesterday’s class was on dinosaurs. He sat in the husband’s recliner with the laptop and I sat in my recliner and we both watched and learned a lot. The class was over around 5 p.m., so I made him promise that he would eat what his mom made for dinner, then fed him a slice of apple pie.

********************************************************

Corey Yoder has a new fabric line coming out called Spring Brook. It’s basically the same colorway as her Pepper and Flax line with some blue thrown in, which means I can get some fat quarters and finish that quilt I started last spring with the positive/negative blocks:

PositiveNegative.jpg

I ran out of fabric and the fabric I pulled from my stash to try to round out the supply just didn’t play nicely with the Pepper and Flax. I’ll probably end up with enough blocks to make two quilts.

Bound for Alaska!

Our DSIL graduated from dental school in June. He was immediately offered a position at the Coast Guard station in Ketichikan, Alaska. He spent a significant portion of his childhood on Kodiak Island—and DD#1 is no slouch, either, having grown up in Montana—so the CG was thrilled to have someone familiar with life in Alaska. (Does anyone remember the show Northern Exposure?) The CG processed his paperwork last fall and was ready to have him start as soon as possible, but the position also required approval from the Public Health Service. Government bureaucracy, never efficient in the best of times, has ground to a near-halt because of the pandemic. The PHS lost his paperwork once and required him to submit everything again. He has jumped through a ridiculous number of hoops in search of the one signature that would release his orders and allow him and DD#1 to move to Ketchikan and start this adventure together. In the meantime, they’ve been living with his parents in Washington state.

He got his orders yesterday. DD#1 tells me they are hoping to move by the end of the month. The CG will pay for the move and pack all their stuff for them. They already have a place to live, thanks to a friend of the family with a house for rent there. DD#1 has applied for her Alaska state occupational therapy license and will look for a job once they arrive. And I plan to go visit them some time late this spring, after they are settled and the weather improves.

Whew. We are happy that things are coming together for them, finally.

******************************************************

I ran errands in town yesterday but completely forgot to look for the Creative Grids circle ruler at the first quilt store, and the second quilt store didn’t have them in stock. I’ll check again later this week. I was also looking for navy blue Signature 40wt thread. One quilt store in town carries some, but not in that color, of course. I bought a spool of Mettler 40wt cotton thread and I’ll try that out, but I haven’t been thrilled with the Mettler thread I’ve used so far. Also, it comes on tiny spools, not the large cones like the Signature thread. A spool has 164 yards versus 3000 yards on the cones—I’m not even sure 164 yards will be enough to do a baby quilt.

One of the quilt stores in Spokane carries all the colors of Signature. I could order from them if I have to. I really do try to buy local, but it’s hard sometimes. (And as soon as the weather breaks, I’ll be taking a road trip, trust me.)

I dropped off the tax stuff for the construction company so the accountant can get started on those returns.

The Noon and Night pattern is with the tech editor. I am curious to see what comments she makes about it. I feel a bit like I did when I first started writing knitting patterns 25+ years ago. I went looking for a “manual of style” for knitting patterns and couldn’t find one. I don’t think there is one for quilting patterns, either. I did ask for specific feedback from her on format and presentation.

I’m going to start quilting Cobbles this morning. I have a goodly number of pieces cut for the DP blocks. Those will be ready to put together when I have some time. And the Urban Chicken is ready for lots of fun embellishments:

CharmChicken.jpg

The days are getting longer now. My time to sit and do handwork in the evenings will disappear in a few months.

Keeping Warm in the Cold

The Scrapper’s Delight version 2.0 is finished and has been put on our bed, just in time for a week of subzero temps:

ScrappersDelightDone.jpg

It’s probably a bit oversized for our queen-sized bed, but someone (who is not me) has a tendency to hog the covers. The feather duvet is underneath the quilt. We’re going to need this quilt this week—the HIGH on Thursday is forecast to be -3, and that’s the air temperature, not the wind chill. The husband made sure the heat lamps were on and working on the chicken coop so my roosters don’t get frostbite on their combs.

I’ve done enough of the second batch of prototype DP blocks that I am fairly confident my idea is going to work. I pulled fabric yesterday and started cutting. I am using DP templates I made out of template plastic because I haven’t had time to get to town, but even so, the cutting is going reasonably quickly. This is going to be another quilt featuring reproduction feed sack fabric. I didn’t necessarily want to do that, but I literally cannot envision this pattern in a different fabric. (I can, but it doesn’t look right.) I’ve got plenty left over from Noon and Night, including some prints I didn’t use.

Susan and I had to meet a couple other people at church on Saturday afternoon to do some tech set-up for our service yesterday morning. She stayed after and helped me lay out and pin baste Cobbles on the floor of the fellowship hall. It went much faster with her help and we got to visit at the same time. And now it’s all ready for me to quilt this week. I just have to decide how I am going to quilt it.

The husband installed hooks on the railing in the new shop for me so I could photograph quilts. I’m going to test those out this week.

I managed to go to church yesterday without my knitting bag, which I had brought in from the car so I could work on the current prayer shawl during our Mennonite conference Zoom webinar Saturday morning. We normally keep an “emergency knitting project” at the church—a prayer shawl in a canvas project bag—in case someone shows up without knitting and needs something to work on. I couldn’t find it, though, which makes me wonder if someone (me?) finished the shawl. (It would not be outside the realm of possibility for me to have finished it and forgotten that I had.) I’ll cast on for a new one and leave it in the sewing room.

*******************************************************

One of the husband’s contractor friends called the other night to talk about scheduling a foundation job. After the husband got off the phone, he mentioned that his schedule is already booked through June. That’s unprecedented. He won’t be doing much concrete work this week because of the cold, but as things start to warm up—which it looks like it might do the first week of March—all hell is going to break loose.

I have all my seeds, though, and I’ll be ready to go when it’s time to start seedlings. Spring will be here before we know it.

Research and Development Continues

I tested out my self-drafted DP templates and made a couple of blocks out of scraps.

LadybugDP.jpg

I made them slightly oversized for trimming, which was good. That background piece, being so skinny at the ends, has a tendency to stretch more than in the previous DP blocks. Now I just need to make and attach the other element of this block to see if the larger circle was the answer to this block conundrum or if I should give up and move on. Hopefully it works, in which case I’ll sew it up into an actual design.

I’ve been watching a lot of videos by my favorite designers—Lisa Bongean, Sherri McConnell, and Edyta Sitar, to name a few—and they all say the similar things about designing and creativity. You can’t force it. You just have to figure out how to stay afloat when the tsunami comes.

Anna Graham of Noodlehead is starting a sewalong next week for her Sandhill Sling bag. I went ahead and cut pieces for it out of the Klum House royal blue waxed canvas:

SandhillPieces.jpg

The lining print doesn’t contrast very much, but I love it and wanted to use it. This is my last attempt at seeing if I can figure out how to make the industrial Necchi happy about sewing this canvas. It has zero problems sewing the AL Frances waxed canvas, but chokes on this stuff for some reason.

I’ve got time yet, to get to the actual bag sewing—Anna is only going to cover materials and cutting in the first installment and I already have that done. I love her patterns, though, and I think this will be a nice change of pace from quilt blocks.

I got a package in the mail yesterday containing some custom spice blends:

HoneybeesSeasonings.jpg

I ordered the Spicy Italian seasoning from Honey Bees Kitchen and Mercantile a few months ago and love it. I was almost out and needed more. When I placed my order, I asked Melissa if she had any chorizo seasoning. Our pork processor ran out of theirs while they were processing our pork, so most of the ground meat we got back is unseasoned. Melissa said that was a blend she had been planning to add. She mixed it up for me and I get to be one of the first ones to try it! I opened the pouch yesterday to take a whiff and I can tell it’s going to be great.

Honey Bees doesn’t have a website yet, but you can contact Melissa on Facebook. She’s very responsive, more than willing to make custom blends, and ships promptly.

I am supposed to participate in a Pacific NW Mennonite conference webinar this morning, but we’re under a winter storm warning through noon tomorrow. We got about 10” of snow yesterday. The poor husband had to spend a couple of hours tracking down a hydraulic fluid leak on the snowplow that turned out to be a bad O-ring. This next storm, though, is a back-door cold front bringing arctic air from Canada that will slam into a wave of moisture. The snow amounts are not supposed to be as high, but the wind is going to be an issue (again). Let’s hope we don’t lose any more trees or we’ll be living in a meadow.

Circling

Esther and Tera both had ruler suggestions for making DP blocks. Esther thought this one would work:

CircleCutRuler.jpg

And Tera said she used this one on a recent project and liked it:

CircleSavvyRuler.jpg

I’ll see if I can find either (both?—I like rulers) in town next time I go.

In the meantime, I found this incredibly useful tutorial on the Fabric & Flowers website. The tutorial gives step-by-step instructions and accompanying formulas for drafting any size DP block based on the radius of the circle and the finished size of the block. I spent some time yesterday morning playing around with the tutorial and drawing different DP templates with variously-sized circles in Illustrator before printing one out. I’m going to cut out and sew up some prototypes this afternoon. I am aiming for a finished block size of 10”.

Math is fun, although I like algebra better than geometry, for obvious reasons.

I also worked on the Cobbles pattern and cleaned and organized my sewing area. I am kicking around the idea of getting a new cutting table. I’ve got one of the inexpensive folding ones from Joanns, which has been adequate until now, but it’s becoming less and less stable. Every few months, I have to turn it over and get out the hex wrench and tighten up all the screws. I am looking at a similar Arrow table. I’d love some kind of permanent installation, but I need to have a portable table that can be folded up and put away when we have houseguests.

The baby quilt is basted and ready to quilt. The backing for Cobbles is pressed and ready to go. I have one side of binding left to sew down on the upsized Scrappers’s Delight quilt and then that one will get moved to our bed.

This morning will be devoted to making the graphics for the Cobbles pattern in Illustrator. Elaine and I also have one more Zoom meeting planned to finish picking music for Lent and Easter.

I would encourage you, if you have half an hour, to watch this video from Angela Walters. I took a class from her in Spokane two years ago and she’s a fabulous teacher.

Here, she talks about how she became a longarm quilter—”It’s not like you go to your guidance counselor in high school and tell him that’s what you want to be when you grow up!” It’s a lovely story involving her husband’s grandfather. There is also a plot twist with Tula Pink. The overarching message, though, is that not everything works out the first time, but everything is part of the learning process.

Still on the Drawing Board

I was very proud of myself for having figured out the block construction for that reverse-engineered block. I made all the blocks and the border and sewed it all together into a baby quilt approximately 40” x 40”. I went to town to run errands and pick up a backing for it. When I got home, I walked into the bedroom and stopped to look at the quilt on the design wall, and then it hit me.

I hadn’t actually succeeded in what I set out to do.

I’m going to try to explain the dilemma without giving too much away, which is becoming a problem for me. While I try to assume the best of people—and all of you, dear blog readers, are especially wonderful—the fact that I put my thought processes out in public means that any unscrupulous person could come along, take advantage of all the R&D that I’ve done, and pass off my work as their own. It’s rare, but it does happen. We have friends with a pottery business who had one of their signature lines copied (and copied badly) and sold in a local tourist shop. I’m trying to be prudent without being paranoid.

[I am not interested in having a heated debate about copyright, by the way, in case anyone is inclined to start one in the comments.]

The block I’m working on has two elements, one of which is a quarter circle. Put four of these blocks together and you get a full circle. Put enough blocks together and you get full circles and a secondary pattern formed by the second element in the block. I thought that using my Accuquilt cutter would speed things up, and it did. The problem is in the size and layout of the Drunkard’s Path dies. I’ll show you what I mean.

Drunkard’s Path blocks are based on a square with an arc inside. The arc can be placed anywhere within the square as long as there is sufficient fabric left for seams.

The Accuquilt die units look like this (dashed lines are cutting lines and solid lines are seamlines):

DrunkardSmall.jpg

As you can see, the “pie” portion of the block takes up roughly half of the block. When the Drunkard’s Path block is sewn to the second element, there is a significant portion of background fabric showing.

What I need is a Drunkard’s Path block that looks more like this:

DrunkardDie.jpg

In this version, the “pie” takes up most of the block. Less of the background fabric is visible. Ideally, when the units are assembled, the “pie” piece should butt right up against the second element of the block.

What happened with the Accuquilt-cut units was that when the reverse-engineered block was set into the quilt, the secondary pattern did emerge, but it became glaringly obvious that I could have achieved exactly the same look by alternating two different blocks, one containing each element, because the circle and the secondary pattern were the same size. What I need is for the circle to be larger than the secondary pattern, and to do that, I have to change the Drunkard’s Path block. Making the second element smaller isn’t going to matter much if I still have the excess background fabric on the Drunkard’s Path block.

[I explained it to the husband thusly: If I published the pattern the way I did it, someone would have looked at it and said, “Why did you take the scenic route to get to this destination when you could have taken the highway?” I need to have a good reason for taking the scenic route.]

So. I have a couple of choices.

1) I can cut the pieces on my 4-1/2” Drunkard’s Path die but trim the background section down after I sew the two pieces together. That wastes fabric. It also results in a 6” finished block (when sewn to the second element, which I also sized down) and I am not crazy about making 6” finished blocks, even for a baby quilt. However, I made two last evening to test this theory and it does work.

2) I have the 7-1/2” Drunkard’s Path die, but cutting those blocks down after sewing them together wastes even more fabric. I can (barely) stomach trimming 1/2” off a 4-1/2” block, but I cannot stomach trimming off more than an inch on each side from a 7-1/2” block.

3) Ideally, I would like a Drunkard’s Path block that is somewhere in the middle in terms of size, but Accuquilt doesn’t make a die in that size. There is a big jump from the 4-1/2” die to the 7-1/2” die. A 5-1/2” or 6” die would be perfect. I’ve looked at the available templates from quilt retailers and they all seem to be laid out the same as the Accuquilt die, with more background than “pie.” (Missouri Star’s templates look like they might work.) I could draft and make my own templates out of template plastic, but do I then want to cut all the blocks by hand?

4) I can design and pay for a custom die from Accuquilt. That would speed up things considerably on my end, although quilters would still have to make their own templates. (Or buy one, if I can suggest a suitable version.)

I am still thinking on how I would like to go forward. This whole exercise was not a complete waste of time, as I do have a baby quilt I can gift to someone in the future.

This is the part of being a designer that no one likes to talk about, LOL. Trust me, it’s not all rainbows and unicorns.

**************************************************

Tera called the other day and we had a nice chat. She had looked over Noon and Night for me and suggested some edits. She also said that she really enjoyed her class with Sarah Peasley. I asked how many people were in it and she said almost 20. Kudos to Sarah—teaching that many students in person is one thing; teaching that many students on Zoom is quite another.

We are both itching for a road trip and a quilting class. I keep checking the class schedules for all the stores within 250 miles for something suitable. Even a trip to Missoula would be good.

The first draft of Cobbles and Pebbles is about half written. I need to finish that one so I can send both patterns off to the tech editor next week. I’ve got tax stuff ready to drop off at the accountant on Monday (he is thrilled). The backing came for Cobbles and I’ll take that with me to the church this weekend and lay it out and pin baste it. If the weather cooperates, it would be nice to get out and take some photos of Noon and Night.

Oops, I Designed Something Again

I was planning to play around with the reverse-engineered quilt block just long enough to see if the construction worked. I had so much fun with it, though, that I kept going. I am only a couple of blocks away from a baby quilt. I’m going to finish it and add it to the pile of things to be published. Why wait? As long as my brain is churning out designs, I will take what it gives me, and gladly.

I’m stopping at a baby quilt size for a couple of reasons: 1) They are useful, and 2) I am almost out of fabric in that color combination and I don’t want to buy more. I pulled remnants from the stash and used them up. At some point, I’d like to make this in a larger quilt size with a few more tweaks to the block, but that needs to wait.

I’ll tease you with a picture, though:

CurvedSeams.jpg

Yes, this block has curved seams. I cut the fabric with my 4-1/2” Drunkard’s Path Accuquilt die. Each die cut two quadrants of a four-quadrant circle. With six layers of fabric folded over the die, you can cut 12 sets at one time.

Drunkard4.jpg

This is so slick. I especially love that the die cuts the notches in the center of each piece. I have the same die in the 3-1/2” and 7” finished sizes. If I do this pattern as a larger quilt, I might use the 7” die.

Curved seams are not hard. Tricky, maybe, but not hard. One of the phrases I learned to hate as a knitting teacher was, “I can’t do that; it’s too hard.” People get head-faked into thinking they can’t do Y-seams, curved seams, blah, blah, blah—you will miss out on all sorts of fun if you don’t try the tricky things. And that’s coming from someone with a serious spatial perception deficit.

I experimented on half a dozen of these curved-seam blocks before working on the ones in the quilt. You will find lots of advice on sewing curved seams on the internet:

  • Pin generously.

  • Use as few pins as possible.

  • Don’t pin at all.

  • Sew with the convex piece on top.

  • Sew with the concave piece on top.

  • Sew slowly.

  • Sew quickly and don’t stop (this advice came from the non-pinners).

  • Starch.

  • Don’t starch.

I tried sewing these on my Janome at first and moved back to Vittorio, my beloved Necchi. (He is a beloved machine for a reason.) After much experimentation, I discovered that it works best for me to use ONE pin, in the center, and to sew with the concave piece on the top. I sew fairly quickly to the middle, remove the pin, then sew to the end, using the stiletto to help hold things in place. I did not starch; starch controlled the bias—as it is meant to do—but in this case, I wanted to maintain the stretchiness of the bias to use it to my advantage. My seams turned out beautifully.

*****************************************************

I was in Seattle at this time last year. I had driven up there from Portland, having just attended one of our Mennonite Conference meetings where I delivered nine tied comforters for the 100th anniversary of Mennonite Central Committee. While I was in Seattle, I participated in a phone call with my MIL and her oncologist. She had just been diagnosed with gallbladder cancer.

The new year went downhill from there.

Elaine and I got together via Zoom yesterday morning to start working on music for Lent and Easter. At one point, I had eight books spread across my desk—four hymnals and four accompaniment books. Our denomination prepares worship materials for Lent and Advent that provide sermon starts and music and visual suggestions, but it is up to each congregation to decide how to use them. We went through the list of suggested songs for the first Sunday in Lent to see which might be suitable.

It was a challenge. We had to eliminate songs we might have done in the past simply because they don’t translate well to our current hybrid Zoom/in-person model. We’re trying to find the opportunities—with a brand new hymnal, we have a lot of new songs we could learn—but it’s not easy. With only a dozen of us in church, spread out among the pews and masked up, we sing one song together at the end of the service. Our quartet has been singing together since the beginning of December and we plan to continue that through Lent and Easter.

[The other three members of the quartet are two brothers and their sister (Elaine); the guys refer to me as “Sis,” and have for a long time, so I rather feel like an honorary sibling.]

And here I feel the need to insert a disclaimer, because the number of people determined to take offense seems to have grown exponentially over the past couple of years. I walk the middle road as much as I can. I do not want to cave to what I think are ridiculous rules imposed by the government while at the same time respecting that people truly are fearful when it comes to this virus. I wear a mask when I go out. However, I think the “science”—and that word is in quotes for a reason—has been politicized and distorted, as have the statistics. Much of the information doesn’t jive with the science I learned in school. I do know people who have had the virus. Some of them have gotten very sick. I know of two people who have died. That was true in past flu seasons, too—three years ago, I ended up on a ventilator in the ICU for a week after having the flu. I’m not talking out of my armpit here.

However, if we’re going to wait for the government to tell us it’s safe again, we’re going to be waiting a long time. I see it in how we went from “two weeks to flatten the curve,” to indefinite lockdowns. Now we’re being told there are more virulent strains of the virus out there. There will always be another bogeyman. At some point, people are going to have to say “Enough.” I am tired of hearing suicide calls on the scanner. People—yes, even the introverts—are not meant to live in isolation from each other.

So I will go to church. I will sing. I will push my personal envelope as far as I can because I refuse to live in fear. I do not condemn people who make other choices. If Zoom church works better for you, that’s great. We should be glad of the technology. If you want to keep your physical distance, I understand and respect that. But if you wanted to come up and hug me after church, I can assure you that I will embrace you warmly.

A Spatial Perception Win

The husband comments occasionally on how odd it is that someone as spatially challenged as I am would choose a hobby that relies so heavily on spatial perception skills. I think it’s important to challenge ourselves. Besides, it provides a great deal of entertainment. I laugh at myself a lot. I also believe the brain is trainable, and my spatial perception abilities are far better than they were 25 years ago when I could not spatially percept my way out of a paper bag. I said to the husband that when I do figure something out, it’s a powerful chemical hit in my brain.

Case in point: A couple of days ago, while surfing the internet, a picture of a vintage quilt popped up on my screen. It contained a block I had never seen before. I copied the picture into Preview and stared at it for a while, attempting to figure out how the block was assembled. I stared and stared. I could get one part of the block put together but not the other. I gave up and went and did something else for a bit.

When I came back and looked at the picture again, still exasperated with myself, I happened to tilt my head to the side and boom!—there it was. The block construction is odd, but as soon as I saw how it was put together, I was able to reverse engineer it. (A Google image search brought up nothing similar.) The block fits the definition of “quirky,” to be sure. I spent a couple of hours yesterday afternoon making sample blocks to test my theory. It works, so this will be my next design. I just have to figure out what fabrics I want to use.

And as of yesterday afternoon, I have hired a tech editor. I feel like I am in over my head and need a professional to look over my patterns. I offered first right of refusal to JC, who tech edited all my knitting patterns, but she isn’t as familiar with quilt patterns and declined. Googling “quilt pattern editors” brought up two results, so I chose one and sent off an inquiry e-mail. She responded affirmatively, and after some back and forth discussion about scheduling, we agreed that I would send off Noon and Night and Cobbles some time in the next two weeks. (I was actually glad to have the extra week of breathing room to write up Cobbles and get them both done even though it means delaying Noon and Night.)

I expect that this week will involve more time at the computer than the sewing machine, but that will be a good excuse to get the taxes and other paperwork done, too.

***************************************************

I ordered a second bobbin case for the Q20. I would like to try using 40wt thread in both the top and bottom, and having a second bobbin case will allow me to set up the second one with the proper tension and leave it instead of monkeying with the bobbin tension adjustment every time I want to change thread weights.

The Q20 came with something I had never seen before, although I was aware that this tool existed:

TensionGauge.jpg

This is a bobbin case tension gauge. You put a loaded bobbin case into the cam, run the thread through the tension disks, and measure the tension. For the Q20, Bernina recommends a tension of 220. They also recommend testing the tension every time you change bobbin thread. The tension will differ between brands even when the weight is the same. Aurifil 50wt and Mettler 50wt require different bobbin tension settings, which is why most people stick with the same combination of threads for all their quilts.

***************************************************

Ali and her little guy came over yesterday afternoon. We ate dinner and then left the little guy and the husband in the living room to watch heavy equipment failure videos while she and I went upstairs to sew. Ali had brought her serger with her, so I set it up and I showed her how to thread it. She nailed it on the first try.

[We heard all sorts of discussion happening downstairs, and when we checked on the guys, we discovered that the little guy (he’s 5) had climbed up into the recliner with the husband and the two of them were very seriously discussing what was going on in the videos. This kid has been watching heavy equipment failure videos with the husband literally since he was nine months old. I was babysitting him one time and left him with the husband for a bit to go take care of something, and when I came back, the two of them were sitting in the recliner together staring at the television.]

Ali wants to make fleece tops. She brought some fleece scraps with her, so we fine-tuned the serger settings to make the perfect seam. All she has to do is take the serger home and set it up and she’ll be ready to go.

Beans, Binding, And Birds

I am still working my way through that bounty of dried beans from Cathy; I think we’ve eaten about half of them. I canned another 14 pints of red beans yesterday:

RedBeans.jpg

I also cooked a pork roast in the crock pot and shredded it. The pork and some of the beans—along with rice, chiles, and enchilada sauce—will be the filling for some tortillas for dinner tonight. Yum.

[You would think that that amount of food would be enough to feed two people for several days. You would be wrong. We might get one meal and enough for lunch the next day out of it. Feeding the husband is the equivalent of feeding three teenage boys.]

I made and attached binding to the Scrapper’s Delight quilt and started sewing it down last night:

ScrapperBinding.jpg

The original quilt has black binding. I used royal blue on this one. I may have to move over to the couch to sew this down, however, because this quilt is too big to hold comfortably on my lap. I also spent an inordinate amount of time last evening trying to locate my favorite binding needle. It is thin and very sharp and just the right length. I need to go through my needle collection to see if I can find a few more like it.

I prepped a square in the Urban Chickens pattern. This is a lovely comb-bound book (25 pages) with nine different chickens. I decided to start with the one named Charm.

UrbanChickenCharm.jpg

Each chicken is about 8” x 8”, which will provide a nice canvas for playing with lots of different stitches. The pattern includes lots of suggestions and illustrations. And yes, my chickens will be made out of wild, retina-burning colors.

***********************************************************

My lettuce-growing operation is now back on track thanks to the husband, who took apart a shelving unit and put it back together in such a way that I have room for two shelves of lettuce. He also assembled and hung the lights. Now I can seed the lettuce in the plugs and get it growing. I also got an e-mail from the farm store yesterday about the upcoming chick delivery schedule, which means deciding on what breed we want to get this spring. I am leaning toward White Orpingtons again. We usually get chicks mid- to late-March, which isn’t all that far away.

***********************************************************

I know I said I wanted to have the Noon and Night pattern ready to release in January. It is close. It will probably be another week or two. I would rather delay a few days than rush it out incomplete, and I’m still tweaking bits of it. Cobbles and Pebbles hopefully won’t be too far behind. I look around and see all the tasks competing for my attention and try not to get paralyzed. I’ve got a quilt design in my head that is screaming to come out, but devoting several hours to cutting and sewing to see if it will even work means that something else—LIKE THE TAXES—isn’t getting done. My schedule involves a lot of juggling. I wish I could focus on one thing at a time until it’s finished, but that’s not the way things work around here.

A Bright and Happy Quilt

I have days when I have a plan and days when I know I want to do something, but I’m not sure what. After the husband left for work yesterday morning, I cleaned up the kitchen, started the laundry, and went up to look at my fabric room. I thought I might quilt one of the charity quilts, but the Scrapper’s Delight version 2.0 hollered at me. This is a quilt (pattern in Sunday Morning Quilts) to replace a similar quilt we currently have on our bed on top of the duvet. The existing quilt is 72” x 72”. This one is 96” x 96” and has been under construction for two or three years now. I added blocks as I had scraps. A few weeks ago, I sewed everything together, got a backing, then took it up to the church and laid it out on the fellowship hall floor to baste it.

[I am going to have to do that with Cobbles, too, because of the size. I got a notice yesterday that the wideback fabric I ordered had shipped.]

I pulled out a cone of rainbow variegated Signature 40wt and some Aurifil to match the backing and got to work. I am quilting loops, of course.

Scrappers2.jpg

With the leaves of the table up, the quilt has plenty of room to move despite being so big.

Scrappers3.jpg

I was able to get a third of this quilted yesterday afternoon, although it took me a bit of time to get started. I had put a Schmetz chrome needle in the machine—the chrome coating is supposed to better for high-speed quilting—but I kept getting skipped stitches. I took that needle out and tried another from the package. Same problem. I took everything apart, cleaned out the hook area, oiled thoroughly, and put a regular quilting needle into the machine. That combination of steps took care of the problem and I had no more skipped stitches.

I had a similar problem in my Janome with a nonstick needle. I am starting to wonder if the chrome/nonstick coatings make the needle so slick that it can’t pick up the bobbin thread correctly. That is something I’m going to have to investigate further.

I was a few minutes into this when I realized just how much I was enjoying the bright prints. A neutrals quilt like Cobbles has plenty of visual interest, but this riot of color made my brain happy. I am hoping to finish quilting it today.

And just as I had hoped, a few days “off” gave me the mental space I needed for some new design ideas. I plan to play around with one in particular this weekend.

*****************************************************

My friend Elaine sent me the link to Farmer Derek Klingenberg’s website where there is a bald eagle webcam. (He’s in Kansas.) In between quilting sessions, I took breaks and watched the eagle in its nest.

The husband thinks we would get all sorts of traffic if we started a YouTube channel with webcams of the chickens and pigs. He even suggested putting GoPros on the pigs’ heads, but it would only take about 30 seconds for them to start chewing the cameras off of each other.

*****************************************************

Ali is going to come over this weekend for a sewing session. She has the same serger I do, and she’d like to start making some clothes for herself and her little guy. I figured that while we were sewing, the husband and the little guy could watch heavy equipment failure videos on YouTube and talk about excavators.

Where Are the Widebacks?

PSA: The construction stuff has been moved over to the blog on the husband’s website. Check that one out if you haven’t yet.

***********************************************

I haven’t sewn much over the past two days because I’m trying to catch up on stuff I let slide while I was working on two quilts.

[See previous comment about staff.]

In any case, I can’t sustain that level of focus indefinitely, and time spent on other tasks is useful for mental housekeeping. My brain fills up with ideas that need to percolate.

I went to town yesterday in search of a backing for Cobbles and Pebbles. That quilt is big enough that I do not want to piece together three 3-yard lengths of regular quilting cotton, so I confined my search to the 108” wide fabrics. After visiting four fabric stores, I had to admit defeat and order it online. Several of the stores had widebacks that were perfect in both color and pattern, but there were only 1-2 yards left on the bolt.

Sigh. At that point, it might be a good idea to make it a remnant. A 36” x 108” piece of fabric isn’t useful for backing much besides a table runner.

I did get some fabric to use as a narrow border for Cobbles and Pebbles. I also picked up a set of half-circle rulers:

CircleRulers.jpg

I bought a set of Bernina rulers a few weeks ago, which I like, but the circle templates aren’t very big. These should do nicely for what I have in mind.

The selection of rulers out there is mind-boggling. The quilt store where I bought the Q20 has a display that is probably six feet long and three feet high filled with nothing but different kinds of rulers—mostly Handi-Quilter ones but also a few Amanda Murphy and Angela Walters rulers as well. I am only going to buy them if and when I need them. I like ruler work, but I am not obsessed with it.

I added this Amanda Murphy book to my library:

AmandaMurphyBook.jpg

She’s a Bernina ambassador and has some good YouTube videos on using rulers with the Q20.

It’ll be a week or so, at least, before the backing arrives and I can baste and quilt Cobbles. The pattern for Noon and Night is laid out and is being reviewed. I’ve got a couple of charity quilts basted and ready to quilt. I am going to start working on my Urban Chickens embroidery pattern, which was my reward for finishing Noon and Night. And every morning, I spend half an hour or so playing around with new quilt designs in EQ8.

***********************************************

Elysian has turkeys in with her chickens, including this very handsome Bronze Breasted tom:

BronzeTom.jpg

I like to watch him strut around the chicken yard. He tries to woo the hens, who don’t appear to be as impressed with him as I am.

Cobbles and Pebbles

As I mentioned, that Broken Wheel block looks a lot like a flower or an exploding firework. You can’t swing a cat through Pinterest without hitting those kinds of quilt designs. Interestingly, when I first began playing with layouts in EQ8, that block looked less to me like a flower and more like cobblestones. (I tend to do my layouts in black and white and colorize after.) I went with the cobblestone idea and laid the blocks out in a straight setting, one right next to the other.

That was a good start, but the design lacked some visual interest. Also, making the same block over and over could get tedious. I switched it up a bit and did a positive/negative layout. I really liked that one. The block didn’t change, but the color placement did. That layout also suggested it would work well with scraps.

I sewed up a dozen or so 12” blocks and hung them on the design wall. “Oooo,” I thought, “this design is chugging right along, but it needs something else. I know! I’ll make a 6” version of the same block and use it as a border.”

I abandoned that idea after making a few 6” blocks. By my calculations, I would have needed sixty-some 6” blocks for the border I had in mind, and I just couldn’t do it. I looked at the 6” blocks I had made, though, and wondered if I could incorporate them (and a few more of their friends) into the body of the quilt. I sewed sets of four into 12” blocks and dropped them randomly into the design.

The result of all of that is one I am calling Cobbles and Pebbles.

CobblesAndPebbles.jpg

(The picture is awful; I had to stand on the bed to get the whole layout in the frame.)

The large blocks remind me of cobblestones and the smaller ones of pebbles. The layout is scrappy browns, whites, and creams. I typically prefer jewel tones over neutrals, but there is a dearth of good masculine quilts out there and the browns and creams seemed to fit with the theme. This is already a sizeable quilt at 84” x 96” (I told you it wanted to be big). I may still add a border; I haven’t decided yet.

Despite having to make those tiny blocks, this quilt top went together quickly—less than two weeks from start to finish. Of course, there were days when I did nothing but sew.

I was discussing this one with the husband last night. I told him that my goal was four published quilt designs in 2021. I’ve already got two in process and it’s only January. ”Maybe you need to raise the bar,” he said. Perhaps, but I think I am going to stick with my original goal. Gardening season is only a couple of months away, and my sewing time will get cut in half or more. If I end up with six designs instead of four, I’ll consider that a bonus. 

I joked that I could get a lot more done if I had staff—either people to cook and clean or people to sew up my designs—but I don’t, so I am just going to have to figure out how to balance everything. And to be honest, it is exhausting to be this focused on a design no matter how much I enjoyed making it. I am going to take a break for a few days. The top still needs to be quilted and the pattern written up, but that can wait until later in the week.

******************************************

We were preparing for the church service yesterday morning when our minister walked in with an armload of books. “Someone just knocked on the door and handed me two boxes of these!” he said. (FedEx delivers on Sunday out here.)

Voices-Together-Hymnal-1.jpg

It is our new Mennonite hymnal. The original ship date was supposed to be back in the fall, but like many other things, its release was delayed due to the pandemic. I ordered a large print version for using when I play but it wasn’t part of yesterday’s shipment, so I brought one of the regular hymnals home for the week to look at and play through.

Creating a new hymnal is a process fraught with a myriad of considerations. Some denominations navigate that process well—the Cooperative Baptist hymnal is wonderful and the ELCA hymnal a very close second—and some denominations don’t. (The Missouri Synod Lutheran hymnal from 1982 springs to mind.) The Voices Together hymnal committee had to consider that Mennonites all over the world will be using this hymnal. To that end, it contains songs from many different musical traditions. Our congregation tends to be musically curious and willing to try lots of different kinds of songs as we have a lot of strong musicians, both vocal and instrumental. We don’t stick to singing just the traditional Western four-part hymns. From that standpoint, this hymnal is rich with opportunity.

My one criticism—and I know this is going to annoy people, but it’s my blog and my opinion—is that this hymnal went a bit overboard on “wokeness.” There is a tendency these days to throw out anything traditional as being bad. I am aware that hymns and songs change over the years to incorporate updated wording. Some of the wording changes in this hymnal make sense. Some of them look as though they’ve been done to reflect current cultural fads, and I am not sure that’s sufficient reason. I am, however, trying bear in mind what Ralph Vaughan Williams went through in producing The English Hymnal in the early 20th century. New is not always bad, just as old is not always good.

[Get off my lawn, LOL.]

My friend Elaine and I are in charge of music for Lent and Easter. We will start that planning soon. No doubt we will be spending a lot of time exploring this hymnal and seeing what new songs we can begin to incorporate into our services.

******************************************

Last fall, I discovered the Piping Up! organ recitals from Temple Square. Each concert is half an hour in length and features one of the Tabernacle organists. The program is hosted by Luke Howard, a music professor at Brigham Young University. He provides context and background information for each piece, which run the gamut of musical styles and periods. I enjoy the music, but I’ve also learned a lot in the process of listening to each concert.

How Much Information is Too Much?

The Noon and Night pattern is 18 pages. I don’t know if that is excessive or not. This is another one of those situations where no matter what I do, I won’t be able to please everyone. If I give the instructions and accompanying illustrations for the left half of the block and then say, “Work these instructions in reverse for the right half of the block,” a person with spatial perception impairment, like me, may struggle to figure out what to do. In terms of pattern writing, adding a set of instructions for both sides of the block didn’t involve much extra work. The illustrations were done. It was a simple matter, in Illustrator, to mirror image them. However, doing so doubled the number of pages in that section of the pattern. On the other hand, If I make the pattern too long, people might complain that printing it uses too much ink and paper.

I also realized that I have almost three pages of narrative and pictures about the provenance of this block. Does anyone else care about that? I think that all of you—my blog readers—do, but does it belong in a pattern? Personally, I love to hear about the inspiration behind a design. I like to know what design challenges the maker had to overcome. Those tidbits add to the enjoyment of the project for me, but perhaps most quilters just want the nuts and bolts information.

Back in the days of print-only pattern publishing, some of these questions never came up. The goal back then was to present as much information as possible in the smallest amount of space. Those constraints were both good and bad. Space limitations forced pattern writers to jettison extraneous or redundant material. However, sometimes critical pieces of information were left out. (Hello, embroidery pattern writers!)

If I am honest with myself, I think part of me misses the days of publishing Twists and Turns. I like to write. I like to educate. I like to share what’s going on inside the design part of my brain—circus tent though it may be some days. The nice part about digital patterns is that makers can decide to print all or only part of the pattern. I think what I need to do is rearrange the pattern layout slightly. I’m going to leave the narrative/history section in, but I’ll set the pattern up so that the quilter can skip over that part and get right to the materials and cutting information.

I know, I am probably overthinking this. Feel free to share your thoughts in the comments.

****************************************************

I am developing an appreciation for Moda Grunge (it’s a fabric). Grunge falls into that eminently useful fabric category known as “blenders.” Blender fabrics that do just that—they blend together parts of a quilt design and enable many different fabrics to play well together. Grunge reads a lot like a solid, but it’s got contrasting color elements to it that give additional depth and texture:

GrungePaper.jpg

I snuck a few fat quarters of Grunge into the Broken Wheel design. I might also use a Grunge wide-back for the backing fabric on that one. That top is so close to being done. I really need to be careful about balance, though; I have a tendency to put my head down and get so involved in a project that other tasks—like meals and laundry—languish for lack of attention. The problem I am having right now is that I have more designs leaking out of my brain than I have time to make.

[Margaret said to me one time that she thought the crock pot was a fabulous invention, because it meant you could put dinner on to cook and go quilt for the rest of the day. I concur.]

I made a big dinner last night so we would have leftovers today. That will free up enough time, I hope, for me to finish the Broken Wheel top. Once it’s put together, I might give you a sneak peek.

****************************************************

The husband made an interesting observation the other day. He and I keep very different schedules. We always have. Sometimes we wonder how we ever managed to find each other in college, because I am a lark and he is a night owl. I had physics at 8 a.m. and his first class started after lunch. We’re a bit more in sync now simply because he has to get up and go to work, but that shifts depending on the time of year.

I’ve had a horrible time sleeping this winter. I am not awake because of anxiety or too much caffeine; I’m just not sleeping well. I am stuck on a schedule where I wake up at 3 or 3:30 and I am asleep by 7:00 or 7:30. (No, I am not crazy about going to bed that early, but I’ve fallen asleep reading a couple of times and had my iPad hit me in the face.) He noted the other day that when we go back to daylight savings time, I’ll be back on my normal schedule. I so wish we would just pick a system and stick with it all year. The older I get, the less I am able to adapt to the time change.

Go Bigger

I spent all day yesterday at the sewing machine. The new design is at an inflection point and I was curious to see what direction it was going to take. Until now, the quilt has been quiet, but a few days ago, it began to insist—quite loudly—that it wanted to be bigger than I originally planned. I tend to prefer lap quilts over bed-sized quilts as they can be switched out on the couch for display and snuggling under. This quilt has already surpassed lap quilt size.

These are 12” finished blocks, so that may have something to do with the quilt’s need to be bigger. I have plenty of scraps and the blocks are fun to make and go together quickly. I will keep sewing until the quilt tells me I’m done.

Today, though, I need to buckle down and work on the Noon and Night pattern. My self-imposed deadline for release is fast approaching. This is the cover art as it stands right now:

NoonAndNightCover.jpg

This was generated in EQ8. I still need a good photo of the quilt itself.

**********************************************************

I listened to the latest episode of the Living Free in Tennessee podcast while I sewed yesterday. The guest was a woman named Sue Zoldak, who is a friend of Nicole’s and a frequent guest. She owns The Zoldak Agency in Washington, DC, a company involved in advertising, marketing, and public policy. You might think she is an odd person to have as a guest on a podcast which tends to focus on homesteading, but she’s incredibly down-to-earth and shares all sorts of insights on marketing and business. Many of the people in this homesteading group are self-employed or have side hustles, so her advice is invaluable.

I’ve been thinking a lot about how to describe my quilt-designing aesthetic. My niche in the knitting world is/was obvious: cabled designs. Broadly speaking, I like scrap quilts. I tend to lean more traditional than modern, but I don’t like traditional that looks dated. Marketers often talk about “the elevator pitch”—a one or two-minute description you could give to someone you were sharing an elevator with that would get the gist of your project across to them. This could be something like, “My aesthetic is mid-century modern married to vintage farmhouse with a soupçon of Baroque influence.”

[I totally made that up to sound ridiculous as possible.]

The word that keeps popping up when I think of my quilting style is “quirky.” I can’t get any fancier than that. Quirky is putting 1930s reproduction feedsack prints on a black background, and hey, would you also like to learn how to make a quilt block that almost went extinct? Quirky is taking the Broken Wheel block and doing something different with it other than piecing it in bright colors to make it look like flowers. There are a lot of Broken Wheel “flower” quilts out there. My Broken Wheel quilt is not going to remind anyone of flowers, I can assure you. And if I can teach you something about quilting technique or design while you’re making a quilt, that’s an added bonus.

I think I’ve found my lane.

**********************************************************

When I was in town the other day, I picked up a fat quarter bundle of Tim Holtz’s new fabric line, Abandoned.

This is quite a departure from his earlier fabric collections. I adore it. This line is full of bright, saturated prints. I’m not sure yet what I want to do with it, but I likely will be buying yardage of some of the fabrics.

**********************************************************

I managed to get us on the schedule for October at a meat processor about halfway between here and Missoula. I talked to Cathy yesterday, who found out that the meat processor we’ve both been using sold their operation to a family that raises cattle. This family has three sons and intends to process and sell their own cows. As of right now, there is no indication that they will take in other people’s animals.

Cathy bought half a pig from us and she said it is some of the best pork she’s ever eaten. She already reserved another half for this fall. The first time I cooked up a package of bacon, I said the same thing to the husband about the taste. This particular batch of pork is so good that I’ll occasionally dip a spoon into the bacon grease that I save for cooking and eat it. Mmmm. It’s like candy.

Is this a midwest thing or a Slovak thing or what?—When we were growing up, we used to have “bacon roasts.” My grandfather and my father and my uncles would build a bonfire in the backyard. They would put chunks of bacon on sticks and roast them over the fire, then drip the bacon grease onto pieces of rye bread. It was finished off with slices of raw onion and eaten. Bacon roasts were great occasions in my family. They were always accompanied by lots of Budweiser and several rounds of Jarts.

The Noon and Night Big Reveal

I took the Noon and Night quilt with me to church on Sunday intending to hang it up in the fellowship hall for a picture, but the quilt was too heavy and kept slipping out of the quilt holder. I finally gave up and went to plan B. My friend Frieda and her husband took the quilt up to the balcony of the sanctuary and held it over the railing so I could get a picture:

NoonAndNightQuilt.jpg

I had to promise to crop them out, LOL.

In the end, I decided on plain black for the border and binding because I wanted the stars to look like they were floating in the night sky. I am thrilled with the way this turned out. Noon and Night has been a long and fascinating journey but I am glad to be nearing the end.

I worked on the pattern for a couple of hours yesterday morning. The process of creating a quilting pattern is similar to that of creating a knitting pattern, although in some ways, it’s much easier. Sizing up and down is not nearly as complicated. A knitted garment does not get proportionally larger as it increases in size; some parts of the sweater change at a slower rate or even stay the same while other parts increase. Add in a few stitch patterns and the next thing you know, you’re awash in a sea of numbers and letters. I relied on a lot of Excel spreadsheets to size knitted garments.

Measurements for quilt patterns are proportional—at least in a quilt like this—and lend themselves nicely to presentation in neat tables. They do, however, require more schematics and illustrations than knitting patterns. I spend almost as much time in Illustrator now as I do in InDesign.

I am using an EQ8-generated graphic for the cover, which was not my first choice. We got about 8” of snow over the weekend, but the temps are still warm enough that it’s slush, not the fluffy powder that would make a nice backdrop for the quilt. I may stick with the graphic on the cover but include a photo of my quilt somewhere else in the pattern.

Forward progress is progress, no matter what speed, and I am happy with where I am at with this project.

***************************************

I was surfing Pinterest on my tablet before bed the other night and discovered that I have a quilt block named after me. How did I not know this? It is called Janet’s Star:

JanetStar.jpg

This appears to be a variation on an Ohio Star block. I am going to play around with this one for sure.

The new quilt top is well on its way to being finished. I might be quilting that one on the Q20 in another week or so, and writing up the pattern shortly after. I have no delusions that this is going to be how fast I churn out designs, but it’s gratifying to know that I can do at least a couple in quick succession.

I have noted, while working on the new top, that my cutting skills have improved dramatically since I first started quilting. Part of that is due to having the Accuquilt cutter, certainly, but part of it is due to experience. I began this quilt using 2-1/2” and 5” squares from my scrap bins, some of which date back to the first few quilts I ever made. I was having to fudge more than expected to get seams and points to match up. This last dozen or so quilt blocks have been cut fresh, from remnants, and they are going together perfectly. The quilt blocks will all be mixed up in the finished top, and once it’s quilted, any discrepancies (and they are minor) won’t be obvious.